
Make it ! little houses !!!! PART #2

.....as you now, my last post was not complete, because one part was still missing!!!!

So today, I'm going to show you what else you can crochet from the basic patterns shown here and just adding few more stitches.....

Are you ready with a hook (again a 5mm hook and US crochet terms!) in one hand and some yarn in the other????

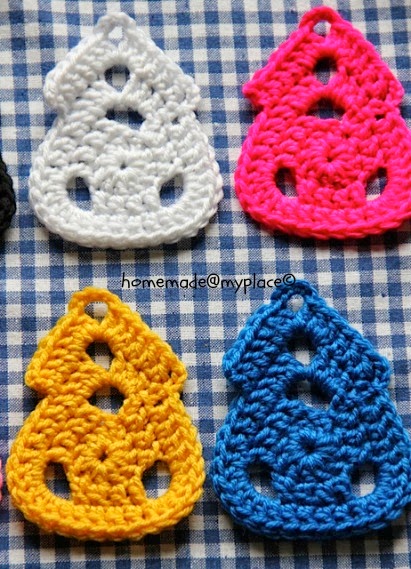
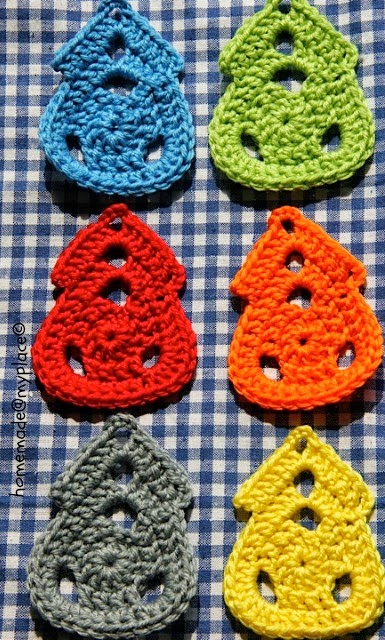
You can obtain these cuties, my dears....


....and these are all the ones I made.....!!!!!.....


....and you know how???

Just follow these simple steps :
  • make a slip knot on your hook, chain 4 and slip stitch in the first chain to form a ring.
  • chain 3, crochet 10 DCs into the ring and slip stitch in the top of your first DC made
  • chain 8 (chain 3= DC and chain 5 more, to form the first arch), in same stitch crochet 1 DC, crochet 3 DCs in next 3 stitches, chain 5 (2nd arch) and crochet 1 DC in following stitch, crochet 3 DCs in next 3 stitches, chain 5 (3rd arch), crochet 3 DCs in last 3 stitches and slip stitch in third chain of first arch
  • chain 3, and around the first arch : (3 DCs, chain 5, 3 DCs), 4 DCs in top of previous group of DCs, 8 DCs around the second arch, 4 DCs in top of previous of DCs, 8 DCs around the third arch, 3 DCs in top of previous group of DCs and slip stitch in the top of first DC made
  • roof : chain 3 and first DC in same stitch, 2 DCs in next stitches, and around the last arch : (3 DCs, chain 5, 3 DCs), 3 DCs, chain 3 and slip stitch in nearby DC or, if you prefer, just make another DC (instead of a chain 3)
  • fasten off
This is what you will get :


More photos to tempt you ( I hope!) to do your own little houses....


Have fun !!!!!

xxxx Alessandra

Party links : Link your Stuff ! 

Comments

  1. Awesome project! I really like the colors you use! So fun!

    ReplyDelete
  2. so cute!! love them♥
    xxo, martina

    ReplyDelete
  3. Do you ever run out of ideas Ale? :)
    Kate :}

    ReplyDelete
  4. Great! They are on my to do list. The colours you use are so beautiful, I really like them. Further I would like to thank you for your eamil. It gives me hope. Love from Holland, X Tinie

    ReplyDelete
  5. They are lovely, I'd make a garland for my daughters bedroom! :) x

    ReplyDelete
  6. They are cute:) If you make the corners a little more spiky you have Christmas trees. A versatile design, thanks for sharing!

    ReplyDelete

Post a Comment

Hi my dear reader!
I'm very happy to see you here! After your visit, feel free to leave a comment!
I love to hear from you and I like to keep in touch!
I'll answer you back asap!!
Thank you and enjoy your day,
xxxx Alessandra

Popular posts from this blog

Make it ! The Granny Yarn Chain !!!

ARE YOU READY FOR THIS ???? SURE YOU ARE !!! I now that!!!! ;oD So during this last week I was showing you via Instagram (see  my personal feed ) some colourful pictures about my new crochet w.i.p. , which I completed last night ... ... so this morning, before school/office time a couple of boys helped me with the last photos for this blog post ... TA-DAH ... The beauty of this project resides in the fact that is adaptable to any extent, any kind of yarn and any corner of your home (in or out!) !!! The inspiration and "creative kick" derives from two other projects I've seen around :  The Chain Statement Necklace  by my dear friend Miki from  Set Free My Gypsy Soul  and  Peggy's Comfy Indoors Blanket  by Pip Lincoln from  Meet Me at Mike's  !!! Thank you both, girls !!! It has been a long time since I've been wanting to crochet (or even knit !) a paper chain ... I made some long paper chains for our Christmas tree back in Indonesia but I al

Make it ! Knitted triangular scarf !!!

Last December, I saw a very simple and cute scarf knitted by Angie ( le monde de sucrette) and I thought to knit one for me, too, but then I was busy with the gifts to prepare for family and friends back in Italy .... so nothing was done for me!!! Luckily, some days ago, while browsing through my blogs list, I found a post from Ilaria ( IDA interior lifestyle) , who was proposing the same (she added a pompom!) piece of clothing .... I didn't have any excuse to wait longer for knitting my own triangular scarf!!!! ;oD So, I started .... Do you want to start one, too ??? Well, you need : some yarn ! My personal choice was : Lana Grossa Basics Calmo (59% acrylic, 24% cotton and 17% linen), shade 207. All my 4 balls of yarn (50g each) have been used for this project. Then 2 balls (50g each) from Rowan Classic Cotton Jeans Yarn (100% cotton), shade 365-Sierra, for both stripes and tassels! a pair of 4,5mm  knitting circular needles or, if you prefer, a pair of long strai

Make it ! The Granny Bunny !!!

You know, this picture from my  Instagram feed  has collected more than 900 likes ... ... and a colourful crocheter named Karin @woolfieber , made her own version just looking at my pic (you can find her work  HERE  ) !!!! My idea, since the beginning , was to prepare a photo tutorial for you, but do you really need one ? These Granny Bunnies are so easy to crochet, believe me !!!! YOU NEED : some colourful mercerised cotton a 3,5 mm hook a pair of scissors a tapestry needle beads for embellishments (optional) Please note that I follow the US crochet terminology, thank you ! Each bunny measures 13 cm in height and it can be used for different purposes : bunting, hanging decorations, appliques, brooches, on napkin rings and more !!!! The sky's the limit !!! You can use this pattern even with different yarns and, consequently, hook sizes !!! ;oD Abbreviations : DC = double crochet ch = chain SC = single crochet 2SCtog = 2 single crochet