ARE YOU READY FOR THIS ????
SURE YOU ARE !!! I now that!!!! ;oD
So during this last week I was showing you via Instagram (see my personal feed) some colourful pictures about my new crochet w.i.p. , which I completed last night ...
... so this morning, before school/office time a couple of boys helped me with the last photos for this blog post ... TA-DAH ...


The beauty of this project resides in the fact that is adaptable to any extent, any kind of yarn and any corner of your home (in or out!) !!!
The inspiration and "creative kick" derives from two other projects I've seen around : The Chain Statement Necklace by my dear friend Miki from Set Free My Gypsy Soul and Peggy's Comfy Indoors Blanket by Pip Lincoln from Meet Me at Mike's !!! Thank you both, girls !!!
It has been a long time since I've been wanting to crochet (or even knit !) a paper chain ... I made some long paper chains for our Christmas tree back in Indonesia but I always thought that something made out of yarn will be more durable, right ?
So here I am with this colourful project, which I'm going to share with you RIGHT NOW !!!
WHAT YOU NEED :
some colourful yarn : I was using some DK acrylics from my personal stash (there is no need to buy new yarn!) and I could do my chain way longer than I did, but other projects are on the way, so...
a 4mm hook
a pair of scissors
a yarn needle
Please remember that I follow the US crochet terminology, thank you !
Be aware that my turning chain is made of 2 chains and not 3, even though working with double crochets (= DC) ! Notice that this turning chain is never considered as a proper stitch, too !
We are going to crochet a lots of granny rectangles. If you never did one before or your memory is simply a little bit rusty, I suggest you to look at some videos on YouTube, like How to crochet a GRANNY RECTANGLE by Bella Coco or How to crochet a granny rectangle by Yolanda Soto Lopez .... there are a lot more !!!! ;oD
Pattern for the GRANNY RECTANGLE

My chain is made of 24 rectangles or links.
Each rectangle is worked in 3 rounds and every round is crocheted in a different colour.
I prefer to weave in ends all the time one round is completed, to avoid too many tails at the end of the work !!!
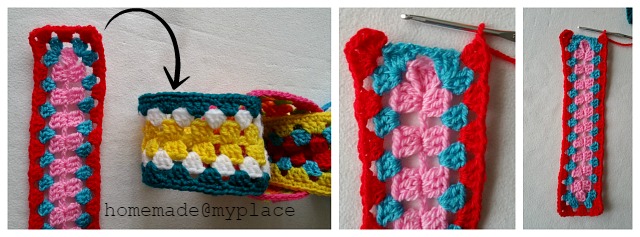
The picture above shows you a complete rectangle I'm giving you the pattern to crochet. Useful if you prefer to sew your rectangles together, but ... I prefer to use the join-as-you-go method, so my rectangles, instead, are never totally done, as I complete each of them while joining to the previous link : no worries, I'm going to show you how!!!


first round : choose your first colour and make a slip knot on your hook.
Chain 30+2 (= my turning chain!), wrap yarn around hook and push it in 3rd chain from hook : work your first DC. In the same chain, work other 2 DCs, so that you will have your first shell (in above chart : extreme right, you can see a small horizontal shell with a A .... sorry for the quality of my drawing!). Now chain 2, then work the first shell (1) of the long side and chain 1. Skip two chains and in 3rd chain work the new shell and chain 1. Repeat this pattern until you reach 10 shells ( you are in the second last chain of your foundation chain)! After this shell, chain 2 and work shell B in last chain. Chain 2, s you can start to crochet the second long side of your rectangle, working your 10 shells at the base of the previous shells and remembering to space them with a chain-1 space !
When shell 10 is completed, chain 2 and slip stitch in the top of first DC made. Slip stitch even in the tops of the following 2 DCs and in the corner!
Cut yarn and fasten off.

second round : choose a new colour and, in the same corner you have completed your first round, add the new yarn (insert front to back your hook in corner, pull new yarn from back to front, wrap yarn around hook and pull it trough the loop!), chain 1 and crochet 3 DCS, chain 2, 3 DCs in this first corner. Chain 1, (3 DCs in chain-1 space + chain 1) 9 times. In second and third corner : 3 DCs, chain 2, 3 DCS and chain 1. Along the other long side : (3 DCS in chain-1 space + chain 1) 9 times. In fourth corner : 3 DCs, chain 2, 3 DCs. Chain 1 and slip stitch in top of first DC made. Slip stitch even in the tops of the following 2 DCs and in the first corner!
Cut yarn and fasten off.
third round : choose the last colour and join it as done for the second round !
After the joining, chain 1 and crochet 3 DCS, chain 2, 3 DCS in this first corner. Chain 1, (3 DCs in chain-1 space + chain 1) 10 times. In second corner : 3 DCs, chain 2, 3 DCs and chain 1. Work 1 shell in next chain-1 space and chain 1. In third corner : 3 DCs. chain 2, 3 DCS and chain 1. Along the other long side : (3 DCs in chain-1 space + chain 1) 10 times. In fourth corner : 3 DCs, chain 2, 3 DCs and chain 1. In next chain-1 space crochet a shell + chain 1. Slip stitch in top of first DC made. Slip stitch even in the tops of the following 2 DCs and into the first corner !
Cut yarn and fasten off.
This is the full pattern of a granny rectangle made of 3 rounds.
Honestly, I stop mine (see above picture) when half fourth corner (3 DCs + chain 1) is done ...
In this way I can use the join-as-you-go method to join the short sides of my rectangle (s) to form a link (s) for my granny yarn chain !
Wanna see how ?
The JOIN-AS-YOU-GO METHOD to make links
We need to have links for our chain, right ?


Nice, right ???
But how to do that???
Very simply !!!
When you have a rectangle almost done (just started half fourth corner of third round), you need to fold it in half (back sides facing each other) and make pass the short side completed, from bottom to top, inside a previous link already joined ...

... and be sure to have the rectangle and the link in the right position, as follows ...

... with the completed side of your rectangle at the top and the uncompleted side at the bottom !
Let's start the joining !!!

Insert the tip of your hook in the corner at the top (see above picture, left), wrap yarn and and pull it to the front, through the loop formed by last chain 1 : slip stitch done (joining officially started!)!
You can complete the 4th corner of your rectangle ...

... by working 3 DCs in that corner, as usual (see above pic) !
Then ...

... slip stitch in above chain-1 space (it replaces the chain 1) (see above pic) and work a new shell in next chain-1 space (see below pic) ...

.... and, again, slip stitch in the above chain-1 space, as did previously ...

Now : slip stitch in top of first DC made at the beginning of round 3 of your rectangle ...

... and slip stitch in tops of following 2 DCs and in corner, too !! Hope you can see this in the below pic ...

To complete the joining, just slip stitch in the top corner ...

Joining done !!!!!
DON'T CUT ANY YARN !!!!
We have to finish off the link properly ! In order to do that, simply turn your work from left to right of 90 degrees ...

... and work a single crochet (= SC) in the first corner at the left of the joining line.
You have to work 3 SCs into the tops of each shell and 1 SC in each chain-1 space and corner!
When the round is completed (last SC in corner adjacent joining line), slip stitch in first SC done, cut yarn, fasten off and weave in ends.

If you look closely at the above picture, you can notice how much neater looks the bottom line in comparison with the top one, not yet "single crocheted" !!!! ;oD
So, repeat the same procedure even for the bottom of your link : make a slip knot on your hook, insert it in the top corner at the left of the joined line and work your first SC.
Crochet the same pattern, but this time, when ending the round, slip stitch in the 2nd SC you made !!!
Cut yarn, fasten off and weave in all the ends !!!
LINK DONE !!!!! Go on the same way for all the other ones !!!! ;oD
PLEASE, NOTE that even your absolute first link is joined in the same way !!! The only difference is that you don't have to connect it to any link! It will be, instead, the first link to insert in the second one you will make !!!!
Nothing difficult and really addictive !!!


... and some more ...


.... Maybe with a softer yarn and a couple of tassels it would be nice as a scarf, too ....

Have a lovely weekend !!!!
xxxx Alessandra
... if you like more photo tutorials/patterns to try, just click HERE and ... have a lot of fun !!!
SURE YOU ARE !!! I now that!!!! ;oD
So during this last week I was showing you via Instagram (see my personal feed) some colourful pictures about my new crochet w.i.p. , which I completed last night ...
... so this morning, before school/office time a couple of boys helped me with the last photos for this blog post ... TA-DAH ...


The beauty of this project resides in the fact that is adaptable to any extent, any kind of yarn and any corner of your home (in or out!) !!!
The inspiration and "creative kick" derives from two other projects I've seen around : The Chain Statement Necklace by my dear friend Miki from Set Free My Gypsy Soul and Peggy's Comfy Indoors Blanket by Pip Lincoln from Meet Me at Mike's !!! Thank you both, girls !!!
It has been a long time since I've been wanting to crochet (or even knit !) a paper chain ... I made some long paper chains for our Christmas tree back in Indonesia but I always thought that something made out of yarn will be more durable, right ?
So here I am with this colourful project, which I'm going to share with you RIGHT NOW !!!
WHAT YOU NEED :
some colourful yarn : I was using some DK acrylics from my personal stash (there is no need to buy new yarn!) and I could do my chain way longer than I did, but other projects are on the way, so...
a 4mm hook
a pair of scissors
a yarn needle
Please remember that I follow the US crochet terminology, thank you !
Be aware that my turning chain is made of 2 chains and not 3, even though working with double crochets (= DC) ! Notice that this turning chain is never considered as a proper stitch, too !
We are going to crochet a lots of granny rectangles. If you never did one before or your memory is simply a little bit rusty, I suggest you to look at some videos on YouTube, like How to crochet a GRANNY RECTANGLE by Bella Coco or How to crochet a granny rectangle by Yolanda Soto Lopez .... there are a lot more !!!! ;oD
Pattern for the GRANNY RECTANGLE

My chain is made of 24 rectangles or links.
Each rectangle is worked in 3 rounds and every round is crocheted in a different colour.
I prefer to weave in ends all the time one round is completed, to avoid too many tails at the end of the work !!!
The picture above shows you a complete rectangle I'm giving you the pattern to crochet. Useful if you prefer to sew your rectangles together, but ... I prefer to use the join-as-you-go method, so my rectangles, instead, are never totally done, as I complete each of them while joining to the previous link : no worries, I'm going to show you how!!!


first round : choose your first colour and make a slip knot on your hook.
Chain 30+2 (= my turning chain!), wrap yarn around hook and push it in 3rd chain from hook : work your first DC. In the same chain, work other 2 DCs, so that you will have your first shell (in above chart : extreme right, you can see a small horizontal shell with a A .... sorry for the quality of my drawing!). Now chain 2, then work the first shell (1) of the long side and chain 1. Skip two chains and in 3rd chain work the new shell and chain 1. Repeat this pattern until you reach 10 shells ( you are in the second last chain of your foundation chain)! After this shell, chain 2 and work shell B in last chain. Chain 2, s you can start to crochet the second long side of your rectangle, working your 10 shells at the base of the previous shells and remembering to space them with a chain-1 space !
When shell 10 is completed, chain 2 and slip stitch in the top of first DC made. Slip stitch even in the tops of the following 2 DCs and in the corner!
Cut yarn and fasten off.

second round : choose a new colour and, in the same corner you have completed your first round, add the new yarn (insert front to back your hook in corner, pull new yarn from back to front, wrap yarn around hook and pull it trough the loop!), chain 1 and crochet 3 DCS, chain 2, 3 DCs in this first corner. Chain 1, (3 DCs in chain-1 space + chain 1) 9 times. In second and third corner : 3 DCs, chain 2, 3 DCS and chain 1. Along the other long side : (3 DCS in chain-1 space + chain 1) 9 times. In fourth corner : 3 DCs, chain 2, 3 DCs. Chain 1 and slip stitch in top of first DC made. Slip stitch even in the tops of the following 2 DCs and in the first corner!
Cut yarn and fasten off.

third round : choose the last colour and join it as done for the second round !
After the joining, chain 1 and crochet 3 DCS, chain 2, 3 DCS in this first corner. Chain 1, (3 DCs in chain-1 space + chain 1) 10 times. In second corner : 3 DCs, chain 2, 3 DCs and chain 1. Work 1 shell in next chain-1 space and chain 1. In third corner : 3 DCs. chain 2, 3 DCS and chain 1. Along the other long side : (3 DCs in chain-1 space + chain 1) 10 times. In fourth corner : 3 DCs, chain 2, 3 DCs and chain 1. In next chain-1 space crochet a shell + chain 1. Slip stitch in top of first DC made. Slip stitch even in the tops of the following 2 DCs and into the first corner !
Cut yarn and fasten off.
This is the full pattern of a granny rectangle made of 3 rounds.
Honestly, I stop mine (see above picture) when half fourth corner (3 DCs + chain 1) is done ...
In this way I can use the join-as-you-go method to join the short sides of my rectangle (s) to form a link (s) for my granny yarn chain !
Wanna see how ?
The JOIN-AS-YOU-GO METHOD to make links
We need to have links for our chain, right ?


Nice, right ???
But how to do that???
Very simply !!!
When you have a rectangle almost done (just started half fourth corner of third round), you need to fold it in half (back sides facing each other) and make pass the short side completed, from bottom to top, inside a previous link already joined ...

... and be sure to have the rectangle and the link in the right position, as follows ...

... with the completed side of your rectangle at the top and the uncompleted side at the bottom !
Let's start the joining !!!

Insert the tip of your hook in the corner at the top (see above picture, left), wrap yarn and and pull it to the front, through the loop formed by last chain 1 : slip stitch done (joining officially started!)!
You can complete the 4th corner of your rectangle ...

... by working 3 DCs in that corner, as usual (see above pic) !
Then ...

... slip stitch in above chain-1 space (it replaces the chain 1) (see above pic) and work a new shell in next chain-1 space (see below pic) ...

.... and, again, slip stitch in the above chain-1 space, as did previously ...

Now : slip stitch in top of first DC made at the beginning of round 3 of your rectangle ...

... and slip stitch in tops of following 2 DCs and in corner, too !! Hope you can see this in the below pic ...

To complete the joining, just slip stitch in the top corner ...

Joining done !!!!!
DON'T CUT ANY YARN !!!!
We have to finish off the link properly ! In order to do that, simply turn your work from left to right of 90 degrees ...

... and work a single crochet (= SC) in the first corner at the left of the joining line.
You have to work 3 SCs into the tops of each shell and 1 SC in each chain-1 space and corner!
When the round is completed (last SC in corner adjacent joining line), slip stitch in first SC done, cut yarn, fasten off and weave in ends.

If you look closely at the above picture, you can notice how much neater looks the bottom line in comparison with the top one, not yet "single crocheted" !!!! ;oD
So, repeat the same procedure even for the bottom of your link : make a slip knot on your hook, insert it in the top corner at the left of the joined line and work your first SC.
Crochet the same pattern, but this time, when ending the round, slip stitch in the 2nd SC you made !!!
Cut yarn, fasten off and weave in all the ends !!!
LINK DONE !!!!! Go on the same way for all the other ones !!!! ;oD
PLEASE, NOTE that even your absolute first link is joined in the same way !!! The only difference is that you don't have to connect it to any link! It will be, instead, the first link to insert in the second one you will make !!!!
Nothing difficult and really addictive !!!


... and some more ...


.... Maybe with a softer yarn and a couple of tassels it would be nice as a scarf, too ....

Have a lovely weekend !!!!
xxxx Alessandra
Please, show me your makes on IG using the following hashtag : #homemadeatmyplaceoriginals or tagging me @alessandrapoggiagliolmi .
Text, Design and Photography : Alessandra Poggiagliolmi
All Rights Reserved. No part of this pattern may be reproduced or transmitted in any form or by any means, without the prior written permission of the copyright holder.
... if you like more photo tutorials/patterns to try, just click HERE and ... have a lot of fun !!!
Love it! Love Tinie
ReplyDeletethank you, Tinie!!!!
Deletexxxx Ale
I love your chain and what a funny photo's with your boys.
ReplyDeleteGrtz,
Chris
thank you, Chris!!!!
Deletexxxxx Ale
that's lovely, very original! I've never seen one of these before :-) X
ReplyDeleteClever you!! So fun and easy to make... thanks for sharing :))... cheers, Marian
ReplyDeleteYou are really welcome, Marian!
Deletexxxx Ale
This is wonderful. Thanks for sharing!
ReplyDeleteAmalia
xo
Ma che genialata! Ti ho trovato tramite una serie di link e trovo questo lavoro davvero incredibile. Avrei tanta voglia di decorare una stanza con queste catene! Grazie... sharing and pinning! :) Lisa
ReplyDelete