Hi my dear friends!!
I have to apologize for my long absence from the blog, but we had a lot of problems with internet (will they ever stop????) and my laptop is almost dead, so I'm using the one of my husband...
This is even the reason, you will find me more often on Instagram, as you need just a photo and a little caption.... the right solution for me, at least for the moment!
I really miss my blogging activity, but my internet reality is not easy!
Anyway, I did a photo tutorial for you and I hope you will love it!!!
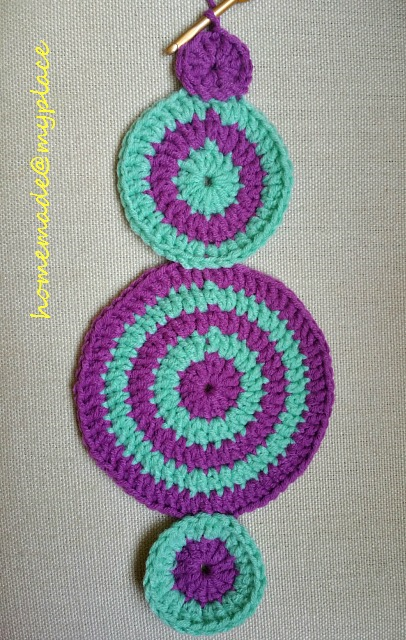
It's all about my mini mandalas (shown for the first time HERE) and they look like the followings


I think you got the idea, right? ;oD
WHAT YOU NEED:
The project calls for different sizes of double crochet (abbrev. DC) circles : the bigger is made of 5 rounds, then we have one circle of 3 rounds, one of 2 rounds and the last one is just made of one round!
You can choose to work these 4 circles separately and then sew them together. I prefer to join them as I go.... It's up to you and, honestly, the final result doesn't change because of the sewing or joining method!
PATTERN

I always start with the bigger one (5 rounds). The smaller ones follow the same pattern, shortened!
Select two colours to work with. I prefer to start with the darker one (name it "A") and then use the lighter one (name it "B"). You are not obligated to follow this rule and feel free to use more than two colours, if you like! This choice of mine, is just a simplification for the project to follow.
Pick the first colour (A) and make a slip knot on your hook. Chain 3 and insert the tip of your hook in the 1st chain made to crochet one DC (= double crochet). Make other 11 DCs in the same chain. Slip stitch in top of first DC to close the round. Your first round is done! (12 stitches)
second round : join colour B (do not cut colour A!), chain 2, work 2 DCs in each stitch. Slip stitch in 1st DC to close the round. (24 stitches)
third round : rejoin first colour A (do not cut colour B!), chain 2, repeat [1 DC + 2 DCs in same stitch] 12 times. Slip stitch in top of first DC to close the round. (36 stitches)
fourth round : rejoin second colour B (do not cut A!), chain 2, repeat [1 DC + 1 DC + 2 DCs in same stitch] 12 times. Slip stitch in top of first DC to close the round. (48 stitches) Now you can cut yarn B!
fifth round : rejoin colour A, chain 2, repeat [1 DC + 1 DC + 1 DC + 2 DCs in same stitch] 12 times. Slip stitch in top of first DC to close the round. (60 stitches) Cut yarn, fasten off and trim in all ends.
Once the big circle is completed, you can crochet the other ones (3 rounds, 2 rounds and one round) individually and then sew them together : the "2 rounds circle" at the bottom of the decoration-to-be, while the "3 rounds circle" will be at the top of the bigger circle and the "one round circle" will be at the top of all them, as the hanging loop will be at its top!!!
I prefer to work differently! Follow me, if interested in this alternative way to join!
I have to prepare my big circle

I use 4 pins as stitch markers to mark the stitches I will use for the joining. A total of 4 stitches are involved at the top of the big circle and the same amount of stitches are considered at the bottom of the same circle.
As the last round of the circle is made of 60 stitches, the stitches left free on both sides are 26 : 26+26+4+4=60 !
I start the joining at the bottom of the big circle, while working a "2 rounds circle"
Once the first round is done, I start the 2nd round and the first two stitches of it are joined to the two stitches (of the bigger circle) on the left

It's not difficult! When you are starting to work the second part of your DC, before wrapping the yarn around your hook, push the tip of your hook under the top of the Dc of the bigger circle, then wrap the yarn around the hook and pull it to the front of your work and the two loops of the DC to complete!!! Join and DC done at the same time!
After the first two DCs are joined, continue to work the round as usual and stop before the last two stitches are done

These last two stitches will be joined with the tops of the two DCs of the big circle as the first two

See?
Cut yarn, fasten off and trim ends in !
This time, we have to do the same with the top 4 stitches of the big circle and the bottom 4 stitches of the "3 rounds circle"

In this situation, you need to join the stitches 17, 18, 19 and 20 to the 4 stitches of the big circle


and this is how the 3 circles appear joined together

Now, to complete the body of the hanging decoration, we need to join the last circle (made of just one round) to the top 4 stitches of the "3 rounds circle"

You start to work the first 4 DCs of the last circle and you will join the following 4 to the other DCs of the "3 rounds circle"


As the "one circle" is made of 12 stitches, after the joining you need to work 4 more DCs and then slip stitch in the top of the first DC.
Work extra 20 chains and slip stitch in the first chain made and then slip stitch in the top of first DC : the loop is done, too!!!

Cut yarn, fasten off and trim in all ends!

You need to embellish your decoration!
To make a tassel : I cut 10 lengths of one colour + 10 lengths in a different colour (each length is about 30 cm long). Fold together these lengths in two , pass two strands under the fold and knot them together. You need other two strands to knot around and form the "head" of the tassel. Knot the tassel at the bottom of the last circle. Trim it.
Before adding the tassel, you can embellish your hanging decoration with some slip stitches in contrasting colours and add an extra edging at the bigger circle, made of single crochets or even picots!
Have a look :


Have fun, xxxx Alessandra
I have to apologize for my long absence from the blog, but we had a lot of problems with internet (will they ever stop????) and my laptop is almost dead, so I'm using the one of my husband...
This is even the reason, you will find me more often on Instagram, as you need just a photo and a little caption.... the right solution for me, at least for the moment!
I really miss my blogging activity, but my internet reality is not easy!
Anyway, I did a photo tutorial for you and I hope you will love it!!!
It's all about my mini mandalas (shown for the first time HERE) and they look like the followings


I think you got the idea, right? ;oD
WHAT YOU NEED:
- some colourful yarns from your personal stash. I was using acrylic leftovers from other projects and still have some, so other decorations are on the way!!!!
- a hook, in my specific case : a 4mm hook
- a pair of scissors
- a yarn needle
- a tape measure
- some stitch markers (optional)
The project calls for different sizes of double crochet (abbrev. DC) circles : the bigger is made of 5 rounds, then we have one circle of 3 rounds, one of 2 rounds and the last one is just made of one round!
You can choose to work these 4 circles separately and then sew them together. I prefer to join them as I go.... It's up to you and, honestly, the final result doesn't change because of the sewing or joining method!
PATTERN

I always start with the bigger one (5 rounds). The smaller ones follow the same pattern, shortened!
Select two colours to work with. I prefer to start with the darker one (name it "A") and then use the lighter one (name it "B"). You are not obligated to follow this rule and feel free to use more than two colours, if you like! This choice of mine, is just a simplification for the project to follow.
Pick the first colour (A) and make a slip knot on your hook. Chain 3 and insert the tip of your hook in the 1st chain made to crochet one DC (= double crochet). Make other 11 DCs in the same chain. Slip stitch in top of first DC to close the round. Your first round is done! (12 stitches)
second round : join colour B (do not cut colour A!), chain 2, work 2 DCs in each stitch. Slip stitch in 1st DC to close the round. (24 stitches)
third round : rejoin first colour A (do not cut colour B!), chain 2, repeat [1 DC + 2 DCs in same stitch] 12 times. Slip stitch in top of first DC to close the round. (36 stitches)
fourth round : rejoin second colour B (do not cut A!), chain 2, repeat [1 DC + 1 DC + 2 DCs in same stitch] 12 times. Slip stitch in top of first DC to close the round. (48 stitches) Now you can cut yarn B!
fifth round : rejoin colour A, chain 2, repeat [1 DC + 1 DC + 1 DC + 2 DCs in same stitch] 12 times. Slip stitch in top of first DC to close the round. (60 stitches) Cut yarn, fasten off and trim in all ends.
Once the big circle is completed, you can crochet the other ones (3 rounds, 2 rounds and one round) individually and then sew them together : the "2 rounds circle" at the bottom of the decoration-to-be, while the "3 rounds circle" will be at the top of the bigger circle and the "one round circle" will be at the top of all them, as the hanging loop will be at its top!!!
I prefer to work differently! Follow me, if interested in this alternative way to join!
I have to prepare my big circle

I use 4 pins as stitch markers to mark the stitches I will use for the joining. A total of 4 stitches are involved at the top of the big circle and the same amount of stitches are considered at the bottom of the same circle.
As the last round of the circle is made of 60 stitches, the stitches left free on both sides are 26 : 26+26+4+4=60 !
I start the joining at the bottom of the big circle, while working a "2 rounds circle"
Once the first round is done, I start the 2nd round and the first two stitches of it are joined to the two stitches (of the bigger circle) on the left

It's not difficult! When you are starting to work the second part of your DC, before wrapping the yarn around your hook, push the tip of your hook under the top of the Dc of the bigger circle, then wrap the yarn around the hook and pull it to the front of your work and the two loops of the DC to complete!!! Join and DC done at the same time!
After the first two DCs are joined, continue to work the round as usual and stop before the last two stitches are done

These last two stitches will be joined with the tops of the two DCs of the big circle as the first two

See?
Cut yarn, fasten off and trim ends in !
This time, we have to do the same with the top 4 stitches of the big circle and the bottom 4 stitches of the "3 rounds circle"

In this situation, you need to join the stitches 17, 18, 19 and 20 to the 4 stitches of the big circle


and this is how the 3 circles appear joined together

Now, to complete the body of the hanging decoration, we need to join the last circle (made of just one round) to the top 4 stitches of the "3 rounds circle"

You start to work the first 4 DCs of the last circle and you will join the following 4 to the other DCs of the "3 rounds circle"


As the "one circle" is made of 12 stitches, after the joining you need to work 4 more DCs and then slip stitch in the top of the first DC.
Work extra 20 chains and slip stitch in the first chain made and then slip stitch in the top of first DC : the loop is done, too!!!

Cut yarn, fasten off and trim in all ends!

You need to embellish your decoration!
To make a tassel : I cut 10 lengths of one colour + 10 lengths in a different colour (each length is about 30 cm long). Fold together these lengths in two , pass two strands under the fold and knot them together. You need other two strands to knot around and form the "head" of the tassel. Knot the tassel at the bottom of the last circle. Trim it.
Before adding the tassel, you can embellish your hanging decoration with some slip stitches in contrasting colours and add an extra edging at the bigger circle, made of single crochets or even picots!
Have a look :


Have fun, xxxx Alessandra
Please, show me your makes on IG using the following hashtag : #homemadeatmyplaceoriginals or tagging me @alessandrapoggiagliolmi .
Text, Design and Photography : Alessandra Poggiagliolmi
All Rights Reserved. No part of this pattern may be reproduced or transmitted in any form or by any means, without the prior written permission of the copyright holder.
Very pretty!! Especially the one with the picot border. Hope you get your computer fixed soon!
ReplyDeleteSo cute and colourful Alessandra! Missed your lovely blog posts, but I really should have Instagram :) Hope your internet connection gets better soon! Alison x
ReplyDeleteGorgeous Ales!!! I can see some of these on door handles or dangling from a large cabinet door key. Very nifty!!!
ReplyDeletekeep well
Amanda xx
I wanted to try this pattern so badly, and the entire pattern is covered by an ad for Cypress Textiles. I have tried 4 different times reloading the page. Is it possible for you to email me the pattern, Please!!!!! nanabanana52@yahoo.com. Thank you!
ReplyDeletelovely
ReplyDelete