
Diamond Week : my crafts !!!!

My work has been based on the bigger diamond shape found on Sarah's book "Craft-A-Day"...


...and I even thought to use a different one from minieco....


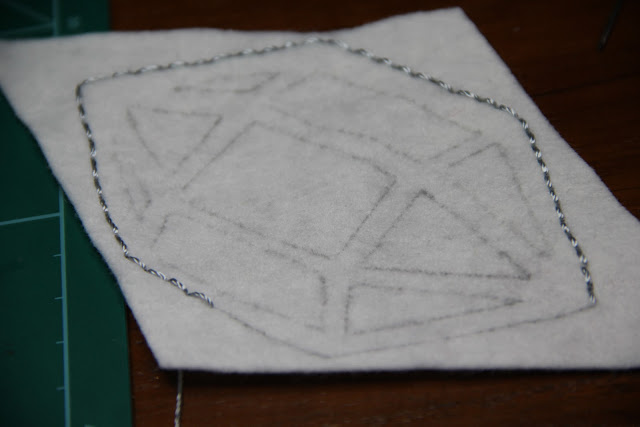
I cut out 2 "diamonds" from white felt...


then I traced, with the help of a pencil, the minieco's gem on one of my diamonds...


....and I started to embroider the gem with some glossy grey thread...


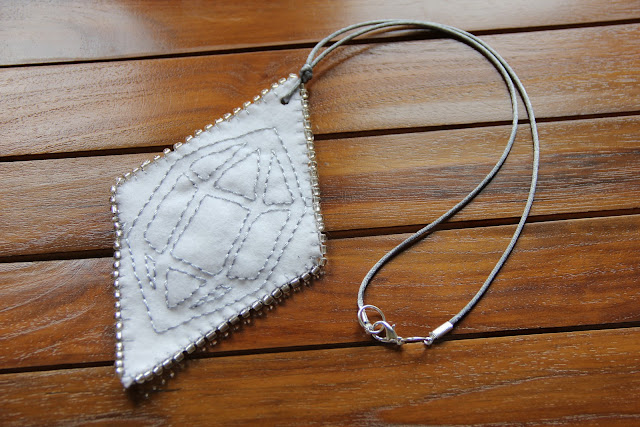
Once completed the embroidery, I sewed the other diamond on the back of the previous one, using a basic blanket stitch and some beads for a more girlish result...


...a final touch : a little hole and a rat tail to wear my precious diamond...


...you know the quote "Diamonds are a girl's best friend"???
.....well, not true!!!.....till now!!!!!

My LINK HERE !!!!

xxxx Alessandra

P.S.: sorry for the photos quality.....stormy days!!!! sigh....

P.S.#2 :
last 6th of February I found this in my email box....


sah-rah.com1:39pm Feb 6
Hi Alessandra,
I just wanted to say all your crafts are amazing! I love seeing all your personal touches. That is exactly what I had hoped people would do with my weekly patterns. Keep up the awesome work.

Sarah

....well, I was blushing and jumping around the house!!!! ;oD


Comments

  1. Oh tres jolie coiler Alessandra!!! Grenela le dessin!!

    Bonne semaine!!

    xxx Maria xxx

    ReplyDelete
  2. Very fun, and I love the grey! xo Heather

    ReplyDelete
  3. a very pretty perfect pendant! :)

    ReplyDelete
  4. You are brilliant!Happy Valentine's week to you..hope you gather lots of love along the way. xoxo

    ReplyDelete
  5. Nice bling!! That email from Sarah is so exciting!!
    Kate :}

    ReplyDelete
  6. I forgot to write you that your heart board is amazing!! I´m proud to be part of it my dear♥
    XO, Martina♥

    ReplyDelete

Post a Comment

Hi my dear reader!
I'm very happy to see you here! After your visit, feel free to leave a comment!
I love to hear from you and I like to keep in touch!
I'll answer you back asap!!
Thank you and enjoy your day,
xxxx Alessandra

Popular posts from this blog

Make it ! The Granny Yarn Chain !!!

ARE YOU READY FOR THIS ???? SURE YOU ARE !!! I now that!!!! ;oD So during this last week I was showing you via Instagram (see  my personal feed ) some colourful pictures about my new crochet w.i.p. , which I completed last night ... ... so this morning, before school/office time a couple of boys helped me with the last photos for this blog post ... TA-DAH ... The beauty of this project resides in the fact that is adaptable to any extent, any kind of yarn and any corner of your home (in or out!) !!! The inspiration and "creative kick" derives from two other projects I've seen around :  The Chain Statement Necklace  by my dear friend Miki from  Set Free My Gypsy Soul  and  Peggy's Comfy Indoors Blanket  by Pip Lincoln from  Meet Me at Mike's  !!! Thank you both, girls !!! It has been a long time since I've been wanting to crochet (or even knit !) a paper chain ... I made some long paper chains for our Christmas tree back in Indonesia but I al

Make it ! Knitted triangular scarf !!!

Last December, I saw a very simple and cute scarf knitted by Angie ( le monde de sucrette) and I thought to knit one for me, too, but then I was busy with the gifts to prepare for family and friends back in Italy .... so nothing was done for me!!! Luckily, some days ago, while browsing through my blogs list, I found a post from Ilaria ( IDA interior lifestyle) , who was proposing the same (she added a pompom!) piece of clothing .... I didn't have any excuse to wait longer for knitting my own triangular scarf!!!! ;oD So, I started .... Do you want to start one, too ??? Well, you need : some yarn ! My personal choice was : Lana Grossa Basics Calmo (59% acrylic, 24% cotton and 17% linen), shade 207. All my 4 balls of yarn (50g each) have been used for this project. Then 2 balls (50g each) from Rowan Classic Cotton Jeans Yarn (100% cotton), shade 365-Sierra, for both stripes and tassels! a pair of 4,5mm  knitting circular needles or, if you prefer, a pair of long strai

Make it ! The Granny Bunny !!!

You know, this picture from my  Instagram feed  has collected more than 900 likes ... ... and a colourful crocheter named Karin @woolfieber , made her own version just looking at my pic (you can find her work  HERE  ) !!!! My idea, since the beginning , was to prepare a photo tutorial for you, but do you really need one ? These Granny Bunnies are so easy to crochet, believe me !!!! YOU NEED : some colourful mercerised cotton a 3,5 mm hook a pair of scissors a tapestry needle beads for embellishments (optional) Please note that I follow the US crochet terminology, thank you ! Each bunny measures 13 cm in height and it can be used for different purposes : bunting, hanging decorations, appliques, brooches, on napkin rings and more !!!! The sky's the limit !!! You can use this pattern even with different yarns and, consequently, hook sizes !!! ;oD Abbreviations : DC = double crochet ch = chain SC = single crochet 2SCtog = 2 single crochet