Well, well, well......it's time for another tutorial and some knitting fun!!
I'll show you how to knit a five petals flower. Before we start, you need to group the followings:

cast on 57 stitches (that is : slip knot plus 56 stitches)
row 1 : k all stitches
row 2 : k2 stitches, [k1 and place it back on your left needle, then lift 8 stitches over the k1 stitch, yo twice,
k3 stitches, the first one of these is the k1, that has to be knitted again !]. Repeat the pattern in the
square brackets other 4 times, till the end of the row. You'll have 27 stitches on your needle.
row 3 : k1 stitch, [p2tog, drop the first yo so that you'll have a big one and in this stitch (k,p,k,p),drop the
yo, p1 stitch]. Repeat the pattern in the square brackets other 4 times till last stitch, k1 stitch.
You'll have now on your needle 32 stitches.
rows 4 and 5 : k all stitches
row 6 : k1 stitch, k2tog 15 times, k1 (17 stitches left on your needle)
row 7 : k1 stitch, k2tog 8 times (9 stitches left on your needle)
Cut the yarns (more or less 10 cm) and thread them on the tapestry needle. Push the tapestry needle through the 9 stitches still on the knitting needle and pull gently. The flower, in this way, gets its shape!!!
Advice for the beginners : I friendly recommend you to use only one thread of yarn, not two as specified at the beginning, the first time you'll have a go with the above pattern. It's not hard, but challenging, yes (both rows 2 and 3)!!! If you'll experiment the "easy way", you'll love this knitting sequence without being disappointed (discouraged?infuriated?exasperated? resentful?disheartened?.....!!!!).
For the experienced knitters, if you like, you can skip row 1 and start the pattern right from row 2!
So, let's take the first step!
Cast on 57 stitches (1 slip knot and 56 stitches), using the knit-stitch cast on method.

So, begin row 1 : k all stitches and then proceed with row 2 : k 2 stitches

and then k1 (our third stitch in the row)

Now, place this k1 stitch back on the left needle, just sliding the right needle to your right, while the tip of the left needle is in the k1 stitch :


From this point, you have to deal with the delicate part! Put the tip of the right needle in the loop of the second stitch on the left needle ( is the second one, just behind the k1 or even called third stitch)

while keeping in place the third stitch (with the help of your left forefinger!), let the second stitch slip over the third one

and drop this stitch slipping slowly the right needle

You need to repeat this tricky slip stitch other 7 times, so that it will form a little arch with 8 slipped (and not knitted!) stitches positioned on it!

Now, take the yarns and yarn over twice (you create two new stitches)

knit our third stitch again (!!) and k other two stitches (k3 stiches in the pattern, still row 2)

If you have clearly understood what I tried to explain, you should go on and reproduce the above pattern (row 2, in square brackets) other 4 more times


At the end of row 2, you'll find out that on the knitting needle there will be 27 stitches.
row 3 : knit 1 stitch

and p2tog (you'll notice a big bump)

Now, you have to work the double yarn over (yo)....No worries! Just drop the first one while sliding carefully to the left your left needle :


In this big loop you have to work the following : k,p,k,p ! Description : pass the yarns in the back of the work and k in the front of the yo (keep the stitch on the needle)


Pass the yarns in the front of your work

and p in this same stitch; pass the yarn to the back again and k; pass the yarns in the front and p ! After all that, you can also drop the big loop and p1 stitch.

Repeat the above sequence other 4 times.
start again : p2tog....


I'll show you how to knit a five petals flower. Before we start, you need to group the followings:

- a pair of straight knitting needles 3 1/2 mm or 4 mm
- 2 cotton yarn balls in different colours
- a pair of scissors
- a tapestry needle
- slip knot and cast on method
- knit (k) and purl (p)
- slip stitch
- yarn over (yo)
- purl 2 stitches together (p2tog)
- knit 2 stitches together (k2tog)
cast on 57 stitches (that is : slip knot plus 56 stitches)
row 1 : k all stitches
row 2 : k2 stitches, [k1 and place it back on your left needle, then lift 8 stitches over the k1 stitch, yo twice,
k3 stitches, the first one of these is the k1, that has to be knitted again !]. Repeat the pattern in the
square brackets other 4 times, till the end of the row. You'll have 27 stitches on your needle.
row 3 : k1 stitch, [p2tog, drop the first yo so that you'll have a big one and in this stitch (k,p,k,p),drop the
yo, p1 stitch]. Repeat the pattern in the square brackets other 4 times till last stitch, k1 stitch.
You'll have now on your needle 32 stitches.
rows 4 and 5 : k all stitches
row 6 : k1 stitch, k2tog 15 times, k1 (17 stitches left on your needle)
row 7 : k1 stitch, k2tog 8 times (9 stitches left on your needle)
Cut the yarns (more or less 10 cm) and thread them on the tapestry needle. Push the tapestry needle through the 9 stitches still on the knitting needle and pull gently. The flower, in this way, gets its shape!!!
Advice for the beginners : I friendly recommend you to use only one thread of yarn, not two as specified at the beginning, the first time you'll have a go with the above pattern. It's not hard, but challenging, yes (both rows 2 and 3)!!! If you'll experiment the "easy way", you'll love this knitting sequence without being disappointed (discouraged?infuriated?exasperated? resentful?disheartened?.....!!!!).
For the experienced knitters, if you like, you can skip row 1 and start the pattern right from row 2!
So, let's take the first step!
Cast on 57 stitches (1 slip knot and 56 stitches), using the knit-stitch cast on method.

So, begin row 1 : k all stitches and then proceed with row 2 : k 2 stitches

and then k1 (our third stitch in the row)

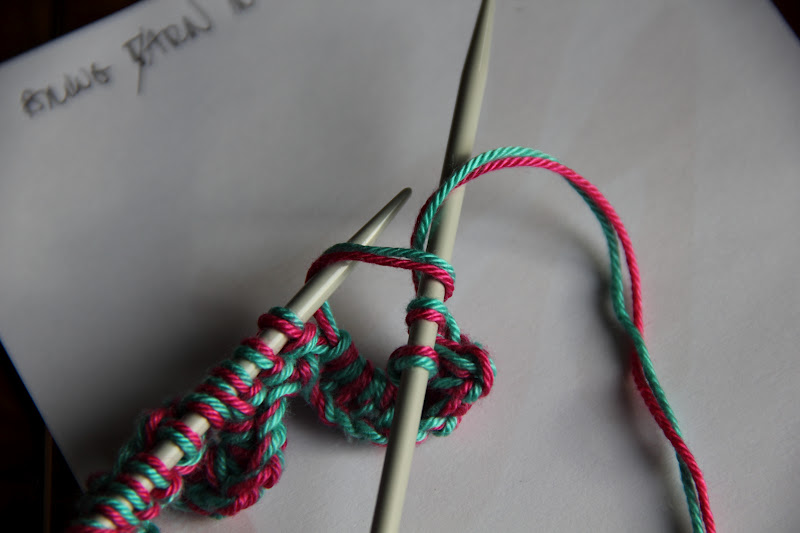
Now, place this k1 stitch back on the left needle, just sliding the right needle to your right, while the tip of the left needle is in the k1 stitch :


From this point, you have to deal with the delicate part! Put the tip of the right needle in the loop of the second stitch on the left needle ( is the second one, just behind the k1 or even called third stitch)

while keeping in place the third stitch (with the help of your left forefinger!), let the second stitch slip over the third one

and drop this stitch slipping slowly the right needle

You need to repeat this tricky slip stitch other 7 times, so that it will form a little arch with 8 slipped (and not knitted!) stitches positioned on it!

Now, take the yarns and yarn over twice (you create two new stitches)

knit our third stitch again (!!) and k other two stitches (k3 stiches in the pattern, still row 2)

If you have clearly understood what I tried to explain, you should go on and reproduce the above pattern (row 2, in square brackets) other 4 more times


At the end of row 2, you'll find out that on the knitting needle there will be 27 stitches.
row 3 : knit 1 stitch

and p2tog (you'll notice a big bump)

Now, you have to work the double yarn over (yo)....No worries! Just drop the first one while sliding carefully to the left your left needle :


In this big loop you have to work the following : k,p,k,p ! Description : pass the yarns in the back of the work and k in the front of the yo (keep the stitch on the needle)


Pass the yarns in the front of your work

and p in this same stitch; pass the yarn to the back again and k; pass the yarns in the front and p ! After all that, you can also drop the big loop and p1 stitch.

Repeat the above sequence other 4 times.
 |
| k,p,k,p |
 |
| drop the yo loop |
 |
| yarns in the front to p1 |
 |
| done!! |
start again : p2tog....

End of row 3 : you'll have on your needle 32 stitches and these scalloped edges

row 4 : knit all stitches

row 5 : knit all stitches

row 6 : k first stitch

and k2tog 15 times, inserting the tip of your right needle, from left to right, in two stitches (decreasing row) and k the last stitch on the needle (17 stitches on the needle)


row 7 : k1 stitch, k2tog till the end of the row (9 stitches left on the needle9
Now, cut a yarn tail approx. 10 cm long

and thread this tail on the tapestry needle

push this needle in the first stitches

and pull it gently. The stitches caught on the passing yarn, can be slipped from the right knitting needle


So, pass the tapestry needle in the last stitches


.....and you don't need your knitting needle anymore.....


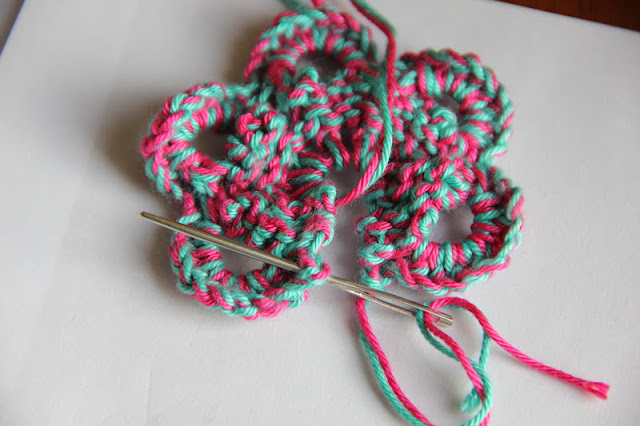
pull the tail and "magically" your flower is there!!!

Ok!! Collect the tapestry needle and in it thread the yarns close to the slip knot

and pass the needle through the first stitch on the opposite side of the flower

then zigzagging from one side to the other, you reach the centre of the flower. Now, pull off the tapestry needle

Make a knot (simple or double ) with the two groups of yarns

turn your work and ..... voila'!!!

WELL DONE !!! ENJOY YOUR LOVELY KNITTED 5 PETALS FLOWER!!!!!
Any problem/question, please feel free to contact me here, thank you !!!
See you soon, xxxx
Please note that this knitting project has just been featured on "Knit & Crochet Superstar" # 38 (Feb 2015) !!!! Thank you Cat !!! xxx
You can find my Ravelry notes right HERE !!!
Please note that this knitting project has just been featured on "Knit & Crochet Superstar" # 38 (Feb 2015) !!!! Thank you Cat !!! xxx
You can find my Ravelry notes right HERE !!!
that's so clever, I never knew you could knit a flower!
ReplyDeleteBellissima!
ReplyDeleteHello...thats so clever and so pretty....Daisy j xx
ReplyDeletei did it!!! yeah. only took four times (and still was a bit off), but i'll know for next time. next time will be 'exactly' like yours.
ReplyDeletethank you so much for your tutorial. your site is an inspiration.
thank you.xxx