I'm passing through a "house phase".....I see houses everywhere!!!!!
So I have to crochet them, at least!
Do you like it?

Obviously, this is a consequence of my granny circle "home sweet home" : I just couldn't resist to not make a granny square version of it!!!

In this photo tutorial, I will show you how to crochet the roof of the house, because for the basic granny square I wrote this tutorial a little while ago!
What do we need to start?


So I have to crochet them, at least!
Do you like it?

Obviously, this is a consequence of my granny circle "home sweet home" : I just couldn't resist to not make a granny square version of it!!!
In this photo tutorial, I will show you how to crochet the roof of the house, because for the basic granny square I wrote this tutorial a little while ago!
What do we need to start?

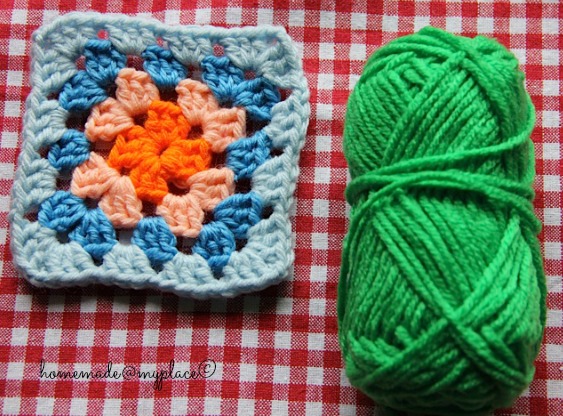
- some yarn
- one hook
- a pair of scissors
- a tapestry needle

...and this is the square I'll use as a base for my roof...a green roof !!!! ...
Let's start!!!!
Row 1 : Collect the hook and the chosen yarn for the roof and make a slip knot on the hook...

Please, remember that I use the american crochet terminology!!!!
Pick your granny and insert the hook in any corner of the square (from the front of your work)...

Wrap the yarn around the hook and...

....make a single crochet (or SC) to attach the yarn at the granny....

Now, chain 6...

Wrap the yarn once around the hook and crochet a double crochet (or DC) in the same corner of the previous SC...

Make other 2 DCs, so you'll have your first shell of 3 DCs and chain 1...

Make more shells, one in each chain-1 space.....Remember to chain 1 after every shell!!!...


Even in the corner make a shell, but do not chain 1, because....

...you have to chain 6, instead!...

...and make a SC in the same corner...

This is the end of row 1 !
Row 2 : Turn your work and wrap 5 SCs around the previous chain 6...

Now chain 4 ...

Wrap the yarn around the hook and crochet 3 DCs (= first shell) in the first chain-1 space...

....and go on till you arrive at the 4th shell (don't chain 1 after this one)...

Chain 4 ....

...and make a SC in the space created by the former "chain 6" stitches...

...even row 2 is completed now!
Row 3 : Turn your granny...

Wrap 3 SCs around the last "chain 4" stitches...

...and chain 4...

3 DCs in the first chain-1 space and chain 1...

When you have done the 3rd shell (no chain 1 after that!)...

....chain 4...

...then a SC attach our stitches and complete row 3 ....

Row 4 : Turn the granny and wrap 3 SCs around the last "chain 4" stitches...

Now chain 4 ...

...and crochet 2 3 DCs shells (remember not to chain 1 after the second shell!)...

Chain 4 ....

....and make a SC to join these chain stitches...

Have a look at the work done...

Row 5 : Turn once more your granny and wrap 3 SCs around the previous chain of 4 stitches...

Chain 4 ...

Crochet your last roof shell, made of 3 DCs...

Don't chain 1, but chain 4 instead... ;oD.....

...and 1 SC....

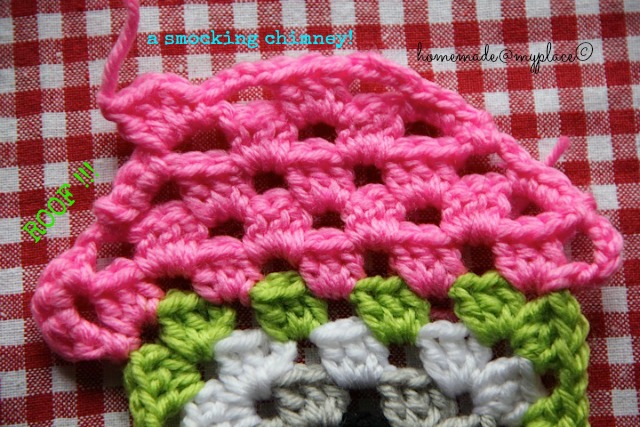
...and you know? Your roof is done !!!!! .....

...but if you add 3 treble crochets in the same space where we just made the SC, you will add a chimney to the roof of your granny house and when you fasten off, leave some cm of yarn to pretend a smoking chimney....


I have a lovely neighbourhood of crocheted houses....

Once you are more confident with this roof tutorial, you can have more houses, no?....;oD...


...you can play with different shapes and various colours combos....The easy hexagon pattern comes from meet me at mikes....

.... rectangles ( patterns from this video tutorial)...

....have fun!!!....


xxxxx Alessandra
Today link : Link Your Stuff! and hookin on hump day #48 link party See you there! xxxx
Your houses are very cute! Great tutorial!
ReplyDeleteHow cute! A whole entire village. :)
ReplyDeleteAnd just when I think I've seen everything from you.....could you make them in to bunting? :) x
ReplyDeleteThese are so cute! And that's a brilliant tutorial ... ven though I can barely crochet still I followed it perfectly :)
ReplyDeleteOoooooh, they're so cute Ale....... a little village in the making......x
ReplyDeleteVery nice!! Ending with chimney is a very creative idea!! :) you are very rich , you can build houses in minutes;)
ReplyDeleteThis is adorable! Only you would think to add a roof onto a granny square. LOVE!! :)
ReplyDeleteYour little granny houses are so cute Ale. You've got yourself a little city going on there. :)
ReplyDeleteYour houses are very cute. Bookmarked and pinned! :)
ReplyDeleteYes I like your houses. Smile:)
ReplyDeleteThese are sooo cute!
ReplyDeletexoxoxo
Really cute! I'm in a house loving phase too!
ReplyDeleteKate :}
Hi, I love anything granny square and I love the house you crocheted. So cute! I saw it on Hookin On Hump Day!
ReplyDeleteJulie from julieslifestyle.blogspot.com
Soo cute your houses! Love your tutorial. I can already picture a pillow case with all those houses in my mind... :)
ReplyDeletexxx Lucia
Fantastic tutorial! And great houses! Thanks so much for linking up on Hooking on Hump Day!
ReplyDeleteAs usual I'm a "day late and dollar short" (lol) but I found your blog and Pinterest boards this evening and and totally blown away. Your tutorials are first rate, and the whole concept is brilliant!!
ReplyDeleteMitzi
Thank you so much Mitzi for your lovely words!!!!! ;oD
Deletexxxxxxx Ale