When a little kid, my mum (grazie mamma!! <3) used to entertain me and my sisters with some crafts....At that time, we were living in Canada (Calgary, Alberta) and the winter was long....So, simple crafts were a good solution to pass a good time all together!!!
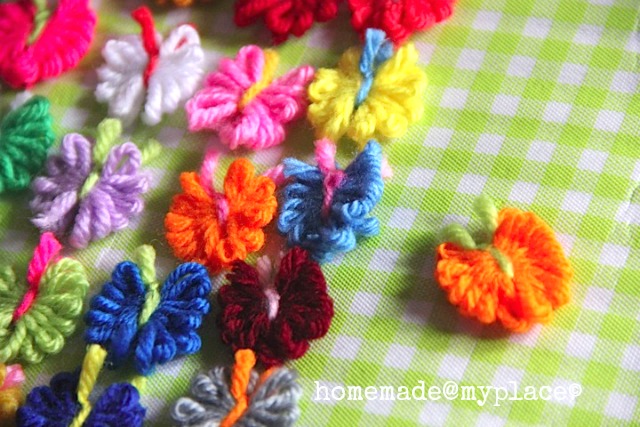
I remember fondly one of them : mini butterflies made from yarn leftovers, like these ones...


.....I think they are extremely beautiful and colourful....they make me smile for sure!!!!
The fact is that they are even so easy to make....!!!! In few minutes you'll have tons of them!!!
It's a very inexpensive craft and you'll need just...

- a fork (in this case, with 4 prongs)
- some little balls of yarn
- a pair of scissors
Do you want to have some nice butterflies, too, in your home????
Well, follow me and the simple instructions....
We'll work with 2 different colours/yarns, so that you'll recognize the central body with a pair of antenna from the pair of wings!
Starting with the antenna/body yarn, cut a piece of 20cm and place it in the dent in the middle of your fork, like here...


...and keep it in place with the help of your thumb and forefinger!
Then, pick the yarn for the wings...

...and from left to right, insert the yarn, weaving it around each one of the prongs and keep going...


...remember to push down the yarn as you go!
This is the end of your second round...

...the end of your third round....

Notice that the odd rounds start from the left to the right, while the even ones go from the right to the left!!!
I've decided to reach 15 rounds and then stop weaving around...


This last picture is the real thing that you are creating, infact you have to remember to push down your yarn as you go, after each round!! The picture above this one is there to show you better all the rounds, once completed!!
Now, you can cut the wings yarn...

...grab both the green ends and tie 2 tight knots (to do that, hold the handle of the fork between your knees!) , to fix the body and the wings of your butterfly...


Once this passage is done, you have to grab the bottom of your butterfly and gently slip it off from the fork...


When your butterfly is free, you'll have something like this...

Pick up the scissors and start to trim the antenna...


...and then trim the wings...


....and your butterfly is free to fly...

....and eventually she joins her friends....
...but she is not the only one!!! As you can see, this craft is really addictive, so many more butterflies are on the way....


....Spring is finally here!!! ;oD
I honestly think that this is a perfect craft for kids!!! If you prefer, you can use plastic forks with kids, maybe a better solution for them....less dangerous than metallic ones!!!
I really hope you will enjoy this tutorial!!!
To me, it's really important to record crafts like this one.....kids need to be involved in simple projects like yarn butterflies, do you agree? ;oD
If there is any problem/question, please feel free to ask me via the comments option or here !!! Thank you!!!
WANNA DO BIGGER ONES ???? LOOK HERE !
WANNA DO BIGGER ONES ???? LOOK HERE !
Just lovely......now where's a fork. :) x
ReplyDeleteWhat a colourful photos. The butterflies are so cute and easy to made. So perhaps I will follow the tutorial en try some of my own.
ReplyDeleteLove from Holland, -X- Tinie
Cute little butterfly. Must try this.
ReplyDeleteThanks for the tutorial Ale.
How adorable!
ReplyDeleteNina x
They're very cute Ale - great craft to do with the kids. :)
ReplyDeleteWowie! Simple yet so so so pretty, as always! :)
ReplyDeleteThese are so sweet. I love how puffy and cute they are. I've been wanting to make yarn butterflies, so I'm bookmarking this one. :)
ReplyDeleteHi Alessandra. Thank-you for sharing this lovely craft with us. I am going to make some with Little Son and maybe we will make a little garland for his room. Lily. xxx
ReplyDeleteBrilliant tutorial Ale :)
ReplyDeleteThe butterflies are awesome!!!
ReplyDeleteSo cute, I bet Maia would love to make these!!!
ReplyDeleteHey Ale, these butterflies are just so cute..... a great craft for littlies.
ReplyDeleteThey would look pretty hanging from the branches of a tree in the garden.
You have been busy recently, lots of crafty fun going on at your place. Your fingers are always busy, stitching or crocheting......
Claire xx
Bel tutorial e dolci ricordi, qualche giorno dobbiamo provare anche io e la mia bimba.
ReplyDeleteA presto
Maddalena
I love those butterflies. They are sweet and quick. They would make a really cute mobile or applique for a blanket too.
ReplyDeleteThis is sooo cute! Thanks a lot for sharing this at Link Your Stuff. Have a lovely day!
ReplyDeleteBest wishes, Annemarie
Super cute!! ♥ And such a nice way to remember your mum :-). I guess it's hard to stop when once started making these little fellows, isn't it ;-)
ReplyDeleteME ENCANTAN!!!!!!!
ReplyDeletePARA QUE LOS UTILIZAS...???
SALUDITOS
Fantástica!!! =)
ReplyDeleteSaludos
Sooooo adorable! I love the colours. xox
ReplyDeleteAwww these butterflies are just adorable! I'm going to be getting my fork and yarn out later and giving it a go :) Elisabeth x
ReplyDeleteGood Morning Alessandra
ReplyDeleteand Greetings from Ireland
I just wanted to pop by and wish you
a very Happy St. Patrick's Day.
May you always have
Walls for the winds,
A roof for the rain,
Tea beside the fire,
Laughter to cheer you,
Those you love near you,
And all your heart might desire!
Fiona
ps love the tutorial
Oh my... These are sooo cute!!
ReplyDeleteSuch unique and beautiful idea for spring decoration!
wauw thank you for sharing!!
ReplyDeleteOh I love them Ale, I'm def going to be making some of these, your first picture with all the colours is SOOOOOO beautiful...ahhh made me smile this morning whilst Elizabeth screams her little tired head off :o) xxx
ReplyDeleteThis is GREAT! My kids are gonna love making some of these sweet butterflies, thanks so much for sharing on Craft Schooling Sunday!
ReplyDeleteThank you for sharing these Are so cute! I look forward to trying them...
ReplyDeleteWunderful and so easy.
ReplyDeleteLG Heather
beautiful, clever idea and sooo 'do'- able. Just not sure what you mean by "trim the wings" ?? Do you mean trim the yarn ends?
ReplyDeleteThanks for a lovely craft idea!
Yes Maryke! I mean : trim the yarn ends!
ReplyDeletethank you, xxx Ale
Adorable! so many cute things you can do with these little gems. are you giving a potted plant or plastic plants, attach one to a skewer stick with a glue dot to add color to the pot. Add a small magnet to the back of them to decorate the fridge. really the ideas and possibilites are endless. possible to even use in scrapbooking page, depending on how thick you make them. Thanks for sharing
ReplyDeleteFantastic Butterflies! thank you x
ReplyDeleteAlessandra - what a great & fantastic idea & they are so beautiful I'm going to give it a try especially since I have lot's of left over yarn from my crochet projects. Thanks for sharing you idea.
ReplyDeleteSusan of Sunny Oxnard California ":)
Dear Elaine, Emma and Anonymous!!!
ReplyDeleteI thank you so much for your visits and comments!!!
I'm really happy to know that my butterflies have been really appreciated by all of you!!!!
xxxxxx Ale
So fantastic butterflies. Thank you for this funny and easy idea.
ReplyDeleteLiane
to Liane : You are welcome!!!
ReplyDeletexxx Ale
These are adorable! Hope you won't mind me linking to them next week at Tangled Happy. Thanks for sharing this tutorial! I know two little ladies who would love to try making these. :)
ReplyDeleteHow cute are these! Absolutely adorable and a great stash buster and decorative item alike.
ReplyDeleteI can't wait to make some of these and then show my grand daughters how to make them. I live in Alberta Canada and we do go south for the winter but upon coming home we still have a long not so warm summer ahead of us!
ReplyDeleteThese are so great! As soon as I am able to stop making them myself I will do it with the kids! Little one will be so happy to finally do her own yarn work !!! Thank you :)
ReplyDeleteVery fun little project! Thanks for sharing it!
ReplyDeleteAdrei as borboletinhas!Muito facil de fazer .vou tentar com minhas filhas.Estou te seguindo como josê e me blog é http://fazendoartecomajo.blogpot.com.
ReplyDeleteThis is a beautiful project. Your tutorial is very professionally done. I plan to do this with my grandchildren for their mother's day gift for their mom.
ReplyDeleteGoing to try these with kids at church day camp this summer. Might glue a pin-back or magnet to them. They would be a great item to include in Operation Christmas Child Shoe Boxes! Thanks for the idea!
ReplyDeleteNice butterflies, i'm gonna follow you.
ReplyDeleteGreetz Chantal
Hello,Alessandra. Thank you so much for the pattern of the cutest butterflies I've ever seen. I just couldn't stop making them.Going to use them on some crochet scarfs and hats for my friends,for next Christmas. Thank you again, From Texas,love Peggy.
ReplyDeletethis is terrific. i am a knitter and hate to throw away any length of yarn. i will make a few dozen flutterbys and then string them on fishing line, hang them from the inside of my window. when the breeze blows in, my flutterbys will fly around my window.
ReplyDeleteI'm the Editorial Assistant for Fun Family Crafts and I wanted to let you know that we have featured your butterflies! You can see them here:
ReplyDeletehttp://funfamilycrafts.com/tiny-yarn-butterflies/
If you have other kid friendly crafts, we'd love it if you would submit them. If you would like to display a featured button on your site, you can grab one from the right side bar of your post above. Thanks for a wonderful project idea!
I just want to say these are NOT just for little girls! 2 little boys I sit for had a blast making them for their Mom! And --- a variegated yarn makes a reversible one!!! Different patterns on each side! Beautiful! Thank you! JEANNIE C
ReplyDeleteBedankt voor deze leuke tutorial
ReplyDeletegroetjes, Marieke
http://knutsel-meiden.blogspot.nl/2013/06/vlinder-krans.html
They're just so sweet - many thanks for sharing! All the best, Rachael
ReplyDeleteButterflies are great and easy to make. Thanks
ReplyDeleteThese are so cute, can't wait to show them to my two grand-daughters. Thank you so much for sharing:)
ReplyDelete@ Diginan : hope your grand-daugters will have a lot of fun in making them !!!! Thank you,
ReplyDeletexxxxxx Ale
so adorable! i'm not usually super crafty b/c of clean-up w/ 3 girls 6 and under, but this is RIGHT up our alley! thanks!
ReplyDeleteYou are welcome!!!!
Deletexxxxxx Ale
I love these!!! My grandchildren will love making these. They would be good as a clippy in the hair or on a head band too!!
ReplyDeletegood ideas!!!!! ;oD
Deletexxxxx Ale
I love these!! My grandchildren will love making these!! Thank you for sharing!
ReplyDeleteyou are really welcome!!!!
Deletexxxxxx Ale
Wow this is so easy! I always have wool left over when I finish my knitting projects! Can't wait to show this to my 8 year old! This would be a good idea for her friends at her birthday party in the summer - a self-made souvenir!
ReplyDeleteWhat a cute idea for leftover yarns! I love these butterflies!
ReplyDelete_____
Lee Ann
Crochet...Gotta Love It! Blog:
http://crochetgottaloveit.blogspot.com
YouTube Channel:
http://youtube.com/user/crochetgottaloveit
#crochetgottaloveit
#crochet
Goodness, that's so easy and so much fun as well! They'd be such a wonderful decoration for a kid's room or something!
ReplyDeleteglad you like it!!!
Deletexxxxxx Ale
merci pour ce tuto fort simple mais tellement sympatique
ReplyDeleteThis is so perfect with our school holidays around the corner. Imagine the range of butterflies you can make. Use baby wool, glitter wool, fluffy wool any wool, then think about what you can attach them to!!!
ReplyDeletethe sky is the limit!!! Have fun with them,
Deletexxxx Ale
Absolutely beautiful! Thank you for sharing - we will be making hundreds of those with our brownie troop for the holiday bazaar on Friday! You rock!
ReplyDeleteThank you, Maria! Hope you will have a lot of fun in making the butterflies!!!
Deletexxxx Ale
Thank you, Maria! Hope you will have a lot of fun in making the butterflies!!!
Deletexxxx Ale