Oh yes, I did it!!! The bag is done!!! I've showed you the first steps of the making in a previous post (right here), while today I'll show you the last moments of the "hard" (I honestly hate to sew...) work!!!
My husband went out to buy me some right needles for the sewing (it's all hand sewn, no sewing machine....I have one, but in Jakarta, so...) and after a break of few days on the mountains (I'll show you the pics in the following posts!!!), I forced myself to sew and sew.....!!!
First of all, I started to crochet (treble crochet) a border on the side of the bag that was supposed to support one of the bamboo handles


and this is the end of the first row

Then, I turned the work and I started to crochet a second row in treble crochet

You can see the two rows unfolded

and the two rows folded on each other

Once completed even the second row, I folded it over the first one and I started to sew them together, using the same yarn (doubled)

Obviously, I did the same thing along the opposite side of the bag


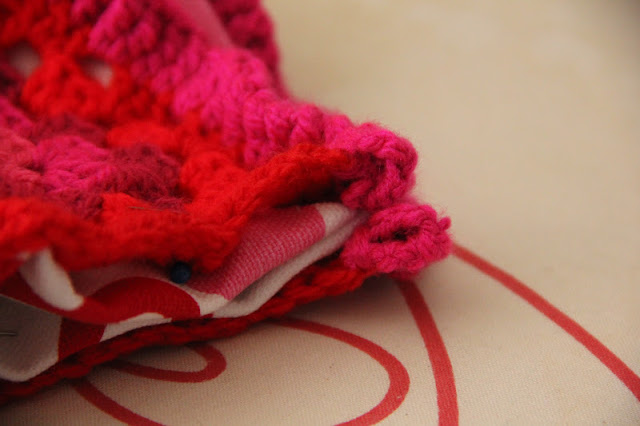
After finishing and folding the second border, I sewed it and in this way I've obtained two yarn "tunnels", where to insert later each base of the bamboo handles
Remember the granny circle and triangle that I choose for the inside pockets?? Well, I've collected and put them on the floral fabric in the right place

and then I sewed the pockets with a simple straight stitch, using a thick (and red) cotton thread


After that, I decided to sew the hem of the lining, using two different colours of thick cotton thread (red and pink)


So, at the end of all that sewing, we'll have this at the front of the lining

while on the back.... eh!eh!eh!

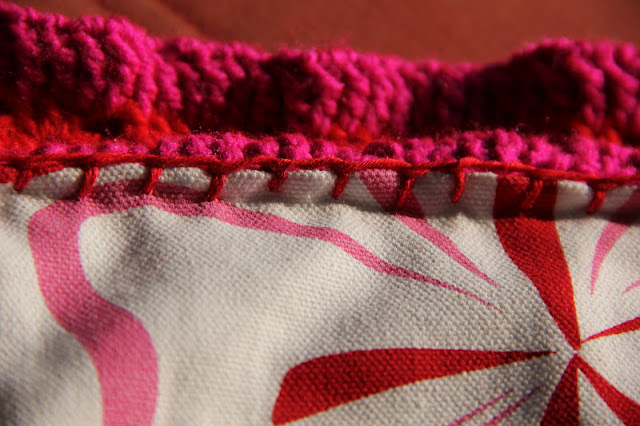
Going on with the sewing journey (!!!), I began to sew the fabric on the sides of the bag with the blanket stitch (and the lovely red cotton again!)

from the outside you can't see it!!!

Some other views...


Once both sides were completed, I started to sew the lining to the "tunnels"(blanket stitch and red cotton again!)


Well, now starts the best part...
I unscrewed the first handle and let pass it trough the first "tunnel"...

Then I did the same with the other one...

And I folded the bag


Close to the end (at least, the hand sewing was completed !! ;oD)...
I add to chain (155 chains each) two cords

....and the bag is in my hands right now!!!!! Yippie!!!


Some more details...


I'm so so so happy with the result and really proud of myself, simply because I didn't follow any pattern or tutorial, but only the ideas that little by little popped in my mind and in my.... heart!!! ;oD
I would like to know your opinion!!!
See you soon, xxxx
P.S.: this project is joining Creative Friday at Natural Suburbia. See you there!!!
My husband went out to buy me some right needles for the sewing (it's all hand sewn, no sewing machine....I have one, but in Jakarta, so...) and after a break of few days on the mountains (I'll show you the pics in the following posts!!!), I forced myself to sew and sew.....!!!
First of all, I started to crochet (treble crochet) a border on the side of the bag that was supposed to support one of the bamboo handles


and this is the end of the first row

Then, I turned the work and I started to crochet a second row in treble crochet

You can see the two rows unfolded

and the two rows folded on each other

Once completed even the second row, I folded it over the first one and I started to sew them together, using the same yarn (doubled)

Obviously, I did the same thing along the opposite side of the bag


After finishing and folding the second border, I sewed it and in this way I've obtained two yarn "tunnels", where to insert later each base of the bamboo handles

Remember the granny circle and triangle that I choose for the inside pockets?? Well, I've collected and put them on the floral fabric in the right place

and then I sewed the pockets with a simple straight stitch, using a thick (and red) cotton thread


After that, I decided to sew the hem of the lining, using two different colours of thick cotton thread (red and pink)


So, at the end of all that sewing, we'll have this at the front of the lining

while on the back.... eh!eh!eh!

Going on with the sewing journey (!!!), I began to sew the fabric on the sides of the bag with the blanket stitch (and the lovely red cotton again!)

from the outside you can't see it!!!
Some other views...


Once both sides were completed, I started to sew the lining to the "tunnels"(blanket stitch and red cotton again!)


Well, now starts the best part...
I unscrewed the first handle and let pass it trough the first "tunnel"...
Then I did the same with the other one...

And I folded the bag


Close to the end (at least, the hand sewing was completed !! ;oD)...
I add to chain (155 chains each) two cords

....and the bag is in my hands right now!!!!! Yippie!!!


Some more details...

I'm so so so happy with the result and really proud of myself, simply because I didn't follow any pattern or tutorial, but only the ideas that little by little popped in my mind and in my.... heart!!! ;oD
I would like to know your opinion!!!
See you soon, xxxx
P.S.: this project is joining Creative Friday at Natural Suburbia. See you there!!!
I think it's beautiful. You did a great job with the lining. :)
ReplyDeleteYeahhhh!! I love the feeling when I finish a project. love, Love, LOVE the granny square pockets... too cool. This is such a fun bag. :)
ReplyDeleteI bet you will be walking around the shops with a big grin on you face! Well done! Ada :)
ReplyDeleteOh, wonderful, it's wonderful.... La la la la la
ReplyDeleteYou really can be proud! So Great!!
Xoxo, Miriam
Oh WOW!
ReplyDeleteYou did so well with this, it is SOOOOO pretty :o) :o) I absolutely love it and can't believe how well you did to keep going with the sewing (it always makes me grumpy!).
It really is perfect, you should sell these.
xx
Hi dear Alessandra, Your bag is amazing.. So good work.. All colors are very bright and the stlye is so fashionable...:))Yes Yes I want it...:)))
ReplyDeletexoxo...
I think it looks lovely - like a rainbow of colour - and so much detail and work gone in....just perfect.
ReplyDeleteNina xxx
I love it, the colours and the lining are perfect! You will look stunning carrying this bag!
ReplyDeleteI think it's lovely. Colourful and clever :D
ReplyDeleteIt is such a HAPPY bag. I want one. Thanks for showing us the process :-)
ReplyDeleteOh I love that bag! Such fresh and happy colors! And what an effort with the lining etc! But it was worth it, it's a really lovely bag, you can be proud :-)
ReplyDelete