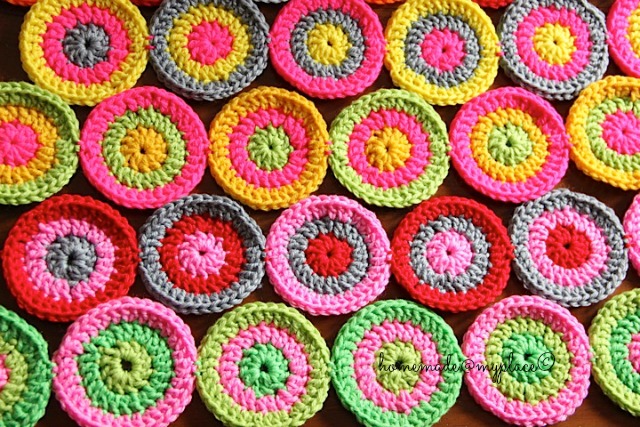
....I just made using these circles, that I laid the other night on my studio desk...

What to do with them all???


....use them perpendicular to each other or just a little bit shifted????


Eventually, I opted for the shifted arrangement!!!
So I started by sewing horizontal strips using a tapestry needle and some matching/contrasting yarn

Pick 2 adjacent circles and pass the needle from the back of any stitch of the first disc and push the same needle in any stitch (from the front) of the second circle

Pass the needle (from the back) in the next stitch (on the left) of the first disc and pass it in the next stitch of the second circle (again from the front) (sequence to follow : A-B-C-D)

On the back of this couple of discs, tie a double knot and cut off the tails!
....and repeat this stitching for the remnants circles of the same row! Note that from the third circle on pay more attention in the selection of the stitches to use in the joining : you are making a kind of straight row!!! ok?

Another strip on the way....


After a while all the strips were done...

Next step : join the strips together!

I just used one stitch for each contact point between each circle!

And strip after strip


Some little knots on their back

A fabric made of "tons" of circles !!!!
How to use it : horizontal strips...

...or vertical strips ???.....


but this is not the only dilemma that I have.....
I'm still thinking how to use this nice piece of fabric......give me some days to figure it out !!!! ;oD
xxxx Alessandra
Today links : Creative Friday, Link your Stuff! and Craft Schooling Sunday!

What to do with them all???


....use them perpendicular to each other or just a little bit shifted????


Eventually, I opted for the shifted arrangement!!!
So I started by sewing horizontal strips using a tapestry needle and some matching/contrasting yarn

Pick 2 adjacent circles and pass the needle from the back of any stitch of the first disc and push the same needle in any stitch (from the front) of the second circle

Pass the needle (from the back) in the next stitch (on the left) of the first disc and pass it in the next stitch of the second circle (again from the front) (sequence to follow : A-B-C-D)

On the back of this couple of discs, tie a double knot and cut off the tails!
 |
| back |
 |
| front |
....and repeat this stitching for the remnants circles of the same row! Note that from the third circle on pay more attention in the selection of the stitches to use in the joining : you are making a kind of straight row!!! ok?

Another strip on the way....


After a while all the strips were done...

Next step : join the strips together!

I just used one stitch for each contact point between each circle!

And strip after strip


Some little knots on their back

A fabric made of "tons" of circles !!!!
How to use it : horizontal strips...

...or vertical strips ???.....


but this is not the only dilemma that I have.....
I'm still thinking how to use this nice piece of fabric......give me some days to figure it out !!!! ;oD
xxxx Alessandra
Today links : Creative Friday, Link your Stuff! and Craft Schooling Sunday!
So pretty and colorful , love it :)
ReplyDeleteMy goodness you have been busy Ale, those circles must be very addictive to crochet......
ReplyDeleteLoving all the bright colours.
Look forward to seeing what you make out of them.
Claire x
Soooo many lovely, colourful circles! :) x
ReplyDeletemaybe hang in front of a window, some where which needs some shade perhaps. or you could sew onto some felt and make something like a pillow or wall hanging? I'm sure you will come up with something funky! Heather x
ReplyDeleteGreat idea, so nice colors!! I could imagine this on a wooden table with a big round vase full of flowers on it :-). Happy Sunday!!
ReplyDeleteYour photos make me think of eating ice cream on a warm Summer day:)
ReplyDeletei looove all the colors, what a great idea!! i would use it in my kitchen as a curtain. can´t wait to see, what will be your choose.
ReplyDeletexo,martina♥
Ale, this is wonderful!
ReplyDeleteI would add a fabric below and make a blanket reversible: one crocheted blanket and the other side with fabric. I think it would be a wonderful blanket! Luck in your choice!
It's pretty Ale. I agree with the other ladies - it would look nice hanging in a window. :)
ReplyDeleteGosh these are beautiful Ale, what are you going to do with it? Are they thick enough to make a rug?? What a pretty rug that would be....I'm going to attempt your fork butterflies this week, will let you know how I get on xxx
ReplyDeleteSo very pretty Ale!! You are always so creative! Maybe you could use it as a table runner or a side table piece or a shawl over a chair. xo Heather
ReplyDeleteThose colors are just irresistible !! They look very beautiful !!:)
ReplyDeleteYou can use it in many conventional ways ; table top, turn into cushion or bolster cover , hang on wall or window. I have one more unconventional idea. If you have any pillar inside home, you may try winding around it.
Seeing all these wonderful colours my imagination starts working.
ReplyDeleteSo many of them. How many hours have they taken up to now?
Can't wait to see the final result.
Do you buy the yarn where you live or is it bought through the internet?
Gorgeous! A feast for the eyes. I'd put that where I could see it every day. :)
ReplyDeleteLove all these colors Ale! Can't wait to see what you do with it!!
ReplyDeleteKate :}
Every last one of those little circles is super cute! Love it. xoxo
ReplyDeleteThey are looking pretty together! Curious to know what you are going to do with this colorful piece. :)
ReplyDeleteLove it, I think you ought to make a wall hanging by attaching the short side to a rod of some kind. Knowing you, you'll want to add some tassels at the bottom or something, but maybe resist and enjoy it simply as is, as it's gorgeous! Or sew it to a piece of fabric and stretch it around a frame! thanks for sharing on craft schooling Sunday!
ReplyDelete