I would love to visit the Yarndale Festival at the end of this September, but you know....is quite impossible as it's not just around the corner for me !!!!!
My granny triangles (here and here), instead, will be flapping in the wind of Yarndale, so in some way I'll be there, too!!! They are my participation to the invitation given by Lucy from Attic24 to join the challenge to make the longest bunting ever (!!!!!!) , but you know, I decided to "be there" even in a different way!!!!
Following the granny bunting triangles tutorial written by Lucy, I decided to crochet some more (extras !) granny triangles....


....to have my personal "Yarndale Bunting", just to remember myself I was there too, with my sent triangles and my heart!!!
If you like, I'll show you how I did embellish them!!! Follow me !!!
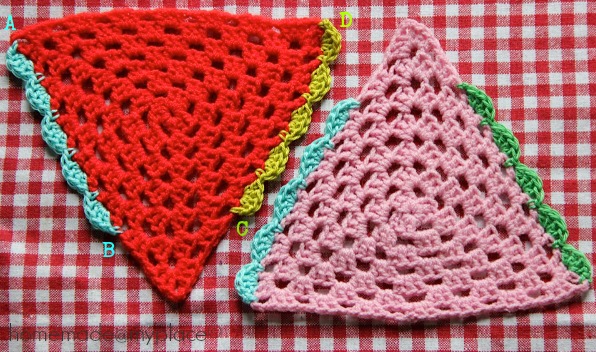
Scallop edging :


Starting from the "A" corner, make a single crochet (SC), then in the first shell, precisely in the top of the second stitch, crochet 4 double crochets (DCs) and make a SC in the next chain-1 space! Follow this pattern until point "B", where you finish with a SC.
Cut yarn and weave in the ends.
Start the same pattern (with the same colour, a different one, two colours or more!!!) at point "C" and finish to crochet at point "D".
Cut yarn and weave in the ends.
Chain edging :


With a contrasting colour, make a SC in the "A" corner, chain 8, make a SC in the first chain-1 space that you encounter. Repeat this scheme until you reach point "C".
Cut yarn and weave in the ends.
Pointy edging :

Do you remember my spiky baby blanket ???? Well, the inspiration comes from that one!!!
Starting from "A", crochet a SC, chain 5, make a slip stitch in the 4th chain from the hook, crochet a SC in the 3rd one, a half double crochet in the second one and a DC in the first one (I'm still counting from the hook!). Now, make a SC in the first chain-1 space you meet.
Repeat the pattern to point "B", where you finish your work with a SC.
Cut yarn and weave in the ends.
Repeat the identical scheme from point "C" to point "D".
Cut yarn and weave in the ends.
So here they are....!!!!.....

Obviously I've added some embellishments, as you can see (fringes and tiny butterflies !!!)....


Then I had to decide how to arrange the triangles on the bunting-to-be....


Some little details.....


I decided to hang (with knots) my triangles on a long line crocheted with a 10mm hook (200 chains) and using a B&W gingham ribbon (2cm wide)...


....and I had to crochet (with a 3,5mm hook) some little "cords" ( 20 chain stitches long, 3 for each triangle) to help me in the knotting process...

...after a while, it was done...

YIPPIE !!!!!!!!!!!!!!!!!!!!
So now this personal Yarndale bunting is hanging here in Jakarta....


.....just to remind myself that I've joined this big event, too!!!! In my own way!!!! ;oD
xxxx Alessandra
Today links : Link your Stuff! and Craft Schooling Sunday !!! See you there, too!!!! xxxx
My granny triangles (here and here), instead, will be flapping in the wind of Yarndale, so in some way I'll be there, too!!! They are my participation to the invitation given by Lucy from Attic24 to join the challenge to make the longest bunting ever (!!!!!!) , but you know, I decided to "be there" even in a different way!!!!
Following the granny bunting triangles tutorial written by Lucy, I decided to crochet some more (extras !) granny triangles....


....to have my personal "Yarndale Bunting", just to remember myself I was there too, with my sent triangles and my heart!!!
If you like, I'll show you how I did embellish them!!! Follow me !!!
Scallop edging :


Starting from the "A" corner, make a single crochet (SC), then in the first shell, precisely in the top of the second stitch, crochet 4 double crochets (DCs) and make a SC in the next chain-1 space! Follow this pattern until point "B", where you finish with a SC.
Cut yarn and weave in the ends.
Start the same pattern (with the same colour, a different one, two colours or more!!!) at point "C" and finish to crochet at point "D".
Cut yarn and weave in the ends.
Chain edging :


With a contrasting colour, make a SC in the "A" corner, chain 8, make a SC in the first chain-1 space that you encounter. Repeat this scheme until you reach point "C".
Cut yarn and weave in the ends.
Pointy edging :

Do you remember my spiky baby blanket ???? Well, the inspiration comes from that one!!!
Starting from "A", crochet a SC, chain 5, make a slip stitch in the 4th chain from the hook, crochet a SC in the 3rd one, a half double crochet in the second one and a DC in the first one (I'm still counting from the hook!). Now, make a SC in the first chain-1 space you meet.
Repeat the pattern to point "B", where you finish your work with a SC.
Cut yarn and weave in the ends.
Repeat the identical scheme from point "C" to point "D".
Cut yarn and weave in the ends.
So here they are....!!!!.....

Obviously I've added some embellishments, as you can see (fringes and tiny butterflies !!!)....


Then I had to decide how to arrange the triangles on the bunting-to-be....


Some little details.....


I decided to hang (with knots) my triangles on a long line crocheted with a 10mm hook (200 chains) and using a B&W gingham ribbon (2cm wide)...


 |
| I think she thought to be really helpful.... |
....and I had to crochet (with a 3,5mm hook) some little "cords" ( 20 chain stitches long, 3 for each triangle) to help me in the knotting process...

...after a while, it was done...

YIPPIE !!!!!!!!!!!!!!!!!!!!
So now this personal Yarndale bunting is hanging here in Jakarta....


.....just to remind myself that I've joined this big event, too!!!! In my own way!!!! ;oD
xxxx Alessandra
Today links : Link your Stuff! and Craft Schooling Sunday !!! See you there, too!!!! xxxx
I think that's the cutest and most original bunting I've seen Ale. Well done. :)
ReplyDeleteIt's beautiful and looks so pretty! :)
ReplyDeleteThere you go again, taking a simple little triangle and turning it into something extra special with your creativity and embellishments. Bravo! It is so colorful and clever! Best bunting ever! Best wishes, Tammy
ReplyDeleteI love the way you have used small details to make your bunting extra special. The gingham to hang the buntings is so special :)
ReplyDeletePretty bunting !! Nice ideas too !!:)
ReplyDeleteI like your bunting, especially the tassels! Nice idea. Also sent two off the yarndale.
ReplyDeleteBy the way, did you know about Jakarta's link to South Africa? The Dutch East-Indian Co established offices there in the 1600's, for their spice trade, and then established a halfway station at the Cape of Good Hope, which was later to become Cape Town. They also sent slaves here from south-east Asia, resulting in a rich heritage in Cape cuisine, culture and traditions. There is even still a neighbourhood called Macassar, named after similar.
This is lovely!
ReplyDeleteYour bunting is the best, I love the Ale touch:) Well done!
ReplyDeleteI like how they're all a little different!
ReplyDeleteKate :}
Looks fabulous, thanks for sharing on craft schooling Sunday!
ReplyDelete