It all happen when I was crocheting another thing ( a little bag!) but my mind was thinking about stars and suns....so I started the new little work and this is what came out from the hook....

....and while crocheting these suns, I was even writing down the pattern to share with you all!!!
HAPPY????? I really hope so and right now we are going to start! Gather all you need, my dears!!!


 |
| ....the grey and round thing is the bottom of the bag...... |

....and while crocheting these suns, I was even writing down the pattern to share with you all!!!
HAPPY????? I really hope so and right now we are going to start! Gather all you need, my dears!!!

- yarn
- hook (I've used a 5,5mm)
- scissors
- tapestry needle
Please, remember that I'm following the US crochet terminology!
I suggest you to weave in the ends at the end of each worked round !
LET'S START !!!!
Round 1
Choose a colour and pick up the hook! Make a slip knot and chain 4 stitches

Then slip stitch in the first stitch to form a ring


Now, chain 3 (counts as the first double crochet or DC)

Add 5 DCs (worked in the ring) and you'll have your half first round

Crochet 6 DCs and your first round ....


.... is done !!!!
To close the round I've used the invisible join, but if you prefer you can use even a slip stitch.
Total stitches : 12
Round 2
Choose a new colour to join in any space between two stitches and chain 3 (counts as your first DC)

Crochet 1 DC in the same space

Crochet 2 DCs in each space between 2 stitches till the end of this round


Even this time, I've been using the invisible join !
Total stitches : 24
Round 3
Join the new colour in any space between two sets of 2 Dcs and : chain 3, 2 DCs and chain 1

Repeat this pattern (3 DCS and chain 1) in every space


Make an invisible join so that the 3rd round...

.... is completed!!!
Total stitches : 48
Round 4
This is our last round, where the sun's beams will form with the help of simple stitches!
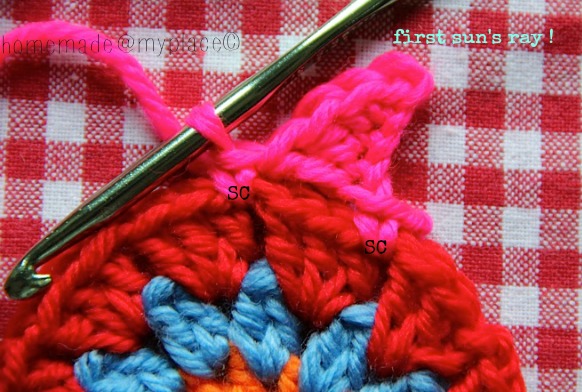
Make a slip knot on the hook with the new colour and crochet a single crochet stitch (or SC) in any chain-1 space, then chain 5

Along this chain, starting from the 4th chain stitch backward to 1st stitch, crochet a slip stitch (sl st in 4th chain), a SC in 3rd stitch, a half double crochet ( hDC in 2nd stitch) and a DC in the 1st chain !!!

When the "beam" is completed, you need to attach it in the next chain-1 space with a SC

You can start the second beam in the same way as the first one

Go on in this way....

....so that you'll have your little sun to play with..

To attach your last beam properly, you have to push the point of your hook in the middle of the SC that we crocheted at the beginning of this round. Make a slip stitch and so fasten off. DONE !!!!!

This is your sun

Pretty, eh? ;oD


If you pay a little attention to the above picture, you will notice that the centres of the 2 suns are slightly different, just because the second round was worked in a different way. In fact, instead of working 2DCs in the space between 2 stitches, you can crochet 2 DCS in the top of each stitch of round 1

The "A" sun is crocheted following the photo tutorial, while the centre of sun "B" is crocheted as I just explained above the picture!


Which one do you prefer ?????


Have fun crocheting !!!!!
xxxx Alessandra
Today Link Parties : hookin on hump day #54 !
busy fingers showing off #13 !
Creative Friday !
Link you Stuff !
Craft Schooling Sunday !
The Crochet Boulevard
busy fingers showing off #13 !
Creative Friday !
Link you Stuff !
Craft Schooling Sunday !
The Crochet Boulevard
Your colorful suns just made my day!
ReplyDeleteTania is so right! They made my day too and i prefer the first one - don´t know why... thank you for sharing the tutorial.
ReplyDeletexxxo, Martina♥
Lovely colours and you have a talent for making tutorials! ;)
ReplyDeleteGood job you sunshine!
ReplyDeleteSo bright and cheery! Thanks for sharing Ale!
ReplyDeleteKate :}
They're so bright and cheery Ale - I love them. Thanks for sharing your tutorial with us. :)
ReplyDeleteSunny, I love the design!
ReplyDeleteSuper nice, Ale!! Sunny funny fresh and fantastic :-)
ReplyDeleteGreat tutorial, thanks for sharing
ReplyDeleteWonderful sunny makes! So kind to share a tutorial too, and I'm sure lots of people will love to crochet these happy suns! I love all the colours :)
ReplyDeleteHelen x
Yep, I'll have to make some of these, lovely! :) x
ReplyDeleteThese are fabulous, Alessandra! Bookmarked! :)
ReplyDeleteThese are so pretty! And well done on producing an excellent tutorial yet again :)
ReplyDeleteThese are great Ale, so cheery and bright.
ReplyDeleteI can imagine them linked together to make a cushion or a blanket!!
When I get back into my crochet I will have to give these a go, they look like fun and a great tutorial too.
Claire XX
Beautiful! Love the colors! Thanks for sharing! :)
ReplyDeleteThese are great! I was just thinking I should make some giant ones for our Sukkah decorations, though don't realistically think I'll have time by next Wednesday night, we'll see! Thanks for sharing on craft schooling Sunday@
ReplyDeleteBeautiful Ale! Really nice tutorial too. Very easy ti follow. Well done. Will have to try these. The pink red and blue is my favorite. Happy weekend.
ReplyDeleteExcellent tutorial and your sunflowers are just gorgeous.
ReplyDeleteLove your sight.
Thanks so much for sharing Alessandra
Happy crocheting,
Yoka
They are so sweet!
ReplyDeleteLove those very colorful and playful suns! Thanks so much for your kindness in sharing them with us all! God bless and keep you and all your loved ones! 😙⛄
ReplyDelete