Recently, I put this picture in one of my posts...

Would you love to have a try with it????
I think that YES! will be the answer, so I'll show you step by step how to!! READY???

As usual, I love simple projects, so the materials you'll need to work with are just a few :


Would you love to have a try with it????
I think that YES! will be the answer, so I'll show you step by step how to!! READY???

As usual, I love simple projects, so the materials you'll need to work with are just a few :
- some colourful yarns
- a hook
- a pair of scissors
- a tapestry needle
The work starts with the idea to crochet a basic granny circle of 4 rounds.
Please note that I use american crochet terminology! Thank you!
Collect the hook and the yarn you would like to see in the centre of your granny circle and make a slip knot on your hook
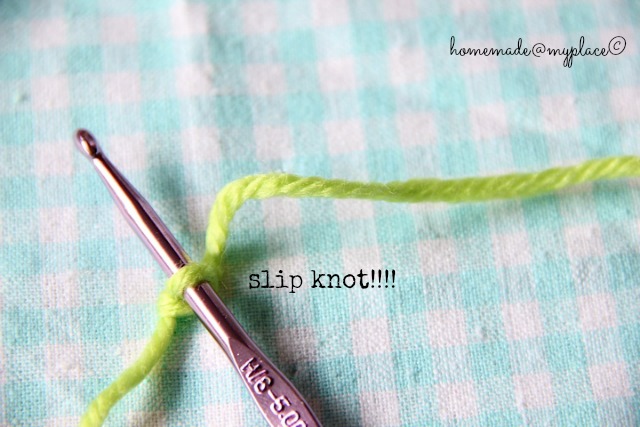
chain 4

slip stitch in the 4th stitch from the hook (that is the first one that you have chained! ;oD)...

....to form a ring....

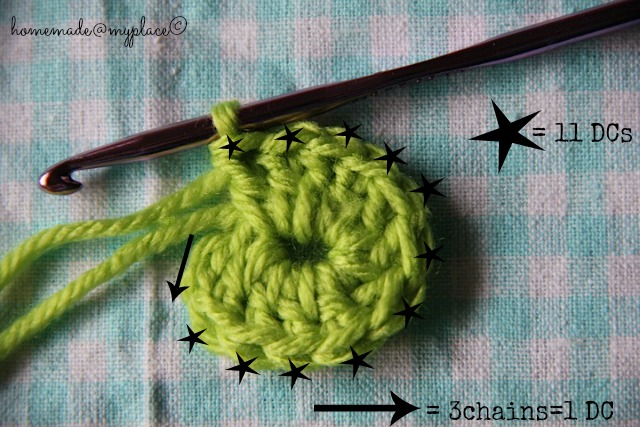
chain 3 ...

... and work 11 double crochets (or DCs) in the centre of the ring
After 6 DCS, you'll have something like this...

adding the last 5 DCs (total : 3 chains+11 DCs = 12 stitches) your first round will be completed..


Remember : to close the round, use a slip stitch or the invisible join! This happens at the end of each round !!! ;oD
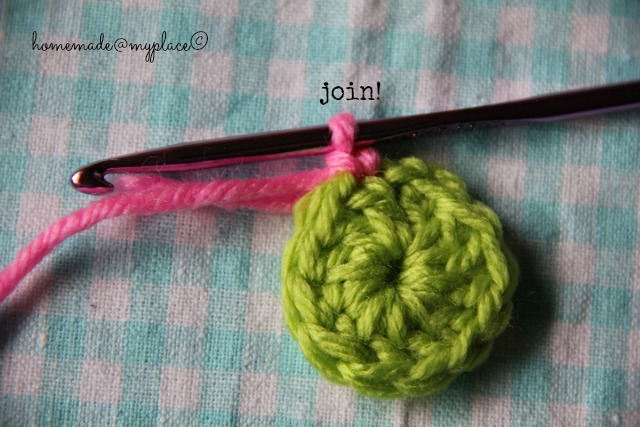
Now round 2 !!!
join new colour in any stitch

chain 3

work 1 DC in same stitch as chain 3 : you have your first shell and chain 1

Now round 2 !!!
join new colour in any stitch
chain 3

work 1 DC in same stitch as chain 3 : you have your first shell and chain 1

Repeat : 2 DCs + chain 1 in every stitch, until the end of the round.
After 6 shells, your work will be like this one

adding 6 more...

Start round 3 joining the third colour in any chain-1 space

chain 3

and work 2 DCs in the same space and chain 1

Repeat : 3 DCS + chain 1 in all the other chain-1 spaces of the 2nd round
After 6 shells, your third round will be like

when completed

and now round 4 : repeat the same scheme as in round 3!!!
join new yarn in any chain-1 space

chain 3

work 2 DCs and chain 1 in the same space

Repeat : 3 DCs + chain 1 in all the other chain-1 space of round 3!
At the end, this is what your basic granny square will look like

Do you really want to stop here, right now????? Maybe yes and surely you can, but what about this?

I think a roof is something to think about.....So, CHOOSE YOUR NEXT COLOUR!!!!!!
HOW TO CROCHET THE ROOF
Pick a new colour and join it in any chain-1 space.
First row : chain 3 and work 2 DCs in the same space. chain 1.
work 3 DCs in the second space and chain 1.
in next chain-1 space, work : 1 DC, 1 half treble, 1 treble, chain 2, 1 treble, 1 half treble, 1 DC, chain1. If you prefer, you can crochet 2 DCs shells separated by 2 chains, instead! It's up to you!!!
in next chain-1 space : 3 DCs and chain 1.
in fifth space : 3 DCs and chain 4.
Turn your work.


Second row : you have now the back of your work in front of you!
work 3 DCs in the first space and chain 1

In next space, work other 3 DCs and chain 1.
In the top of the roof work : 3DCs, chain 2, 3 DCs, chain 1.


in the following chain-1 space : 3 DCS + chain 1.
in last space : 3 DCs and chain 4.
slip stitch in the 3rd stitch of the chain 3 of the first roof row!
We have the roof! A chimney is tempting, too, no? ;oD
Turn your work and with the same yarn make 3 or 4 slip stitches in the first chain-1 space before the first shell!
work other 3 slip stitches in the 3 stitches of the first shell.
in the second space : make a slip stitch, chain 3, 3 DCs (or : chain 4/5, 3 half treble/treble) and fasten off!!!!
If you like, leave some cm of yarn to give the idea of smoke from the chimney!!!
Happy with your HOME SWEET HOME ???????

Some more details


....my neighbourhood is growing! What about yours??? ;oD

Happy weekend girls!!!!
You can find my Ravelry notes HERE !!!
xxxx Alessandra
today link ; Link your Stuff ! See you there!!!
For someone who just can't seem to get the hang of crochet, this is very inspiring. Your colours are just gorgeous! A beautiful post.
ReplyDeleteThat's so cute Ale. Looks like a little bird house. :)
ReplyDeleteI drop in from time to time, never leaving a comment. Just thought I would to tell you that I enjoyed reading your lesson. You did it so well..Have a great weekend
ReplyDeleteSo these are the granny circles you're busy with! Very good tutorial, and the chimney is a nice touch.
ReplyDeleteHow nice:-)
ReplyDeleteAdorable! I love the colours and the cute design! wishing you a happy weekend, Ale!
ReplyDeleteHelen x
Hey Ale, I love your little home, it does remind me of a sweet home for a feathery friend.
ReplyDeleteGreat tutorial too.
Enjoy your weekend,
Claire X
Oooohhh!!! What a lovely idea, Ale! I is so cute, really!
ReplyDeleteThis is another very nice idea of you and so colourful again:)
ReplyDeleteAw, this is very cute Alessandra! What a fab idea - very inspiring!!
ReplyDeleteAlison xx
Thanks Ale, I've bookmarked these and will have a go once I put the paintbrush down! :) x
ReplyDeleteGosh, it is cute! It would make a great housewarming gift! :)
ReplyDeleteAw, this would be a great tree ornament for someone's first Christmas in a new home! You could even stitch the date on it, or a family name to personalize; very nice! :)
ReplyDeleteso clever! x
ReplyDeleteWow, a colourfull post!! Very beautiful.
ReplyDeleteGreetz,
Miriam ('t Bezige Bijtje)
Ali I love this cute little house!!!
ReplyDeleteCute idea and so lovely colorful!! Thanks for the tutorial :-)
ReplyDeleteSo cute thank you for sharing:)
ReplyDeleteVery cute Alessandra!!!
ReplyDeleteGreetz from Ellebel
Thank you for sharing your beautiful work
ReplyDelete@ cecysoto56 : It's a pleasure!!!!!
ReplyDeletexxxxxx Ale
Such a super cute idea! I made one and linked back to you on my blog.
ReplyDeleteI just found you from Robbie's link (see comment above mine) Lovely idea, lovely pattern, lovely instructions - thank you!
ReplyDeleteThank you Julia!!!!
DeleteLovely to have you here and I'm glad that my tutorial was helpful!!!!
xxxxxx Ale
This is the best granny circle tutorial I've come across. You've done a great job! I'm wondering what the increase would be if I wanted to make this really really big (like a rug)? Would I just keep doing 3dc in each space or would I eventually need to change that?
ReplyDeleteHi Catherine and thank you!!!!! I think that a rug could be a great idea!!!! I never crocheted very big circles, but I think your reasoning could be right! If you doubt about it, I suggest you to have a look in Pinterest and look for "crochet granny circles" or similars!!! Good luck and have fun crocheting, xxxxxxx Ale
DeleteHi!
ReplyDeleteI'm working on a blanket tutorial and i really like your little house, Can i have permission to share the link on my new blog and give some explenation about the stiches you used?
Thanks fiona
Www.depakjesboomcreative.be
Hello Alessandra
ReplyDeleteI have made 4 granny house potholder,
and I put the link to your pattern on my new blog (created yesterday )
If You have a second, drop by and see.
Thank you so much :)
I've visited your new blog, but I was not able to leave a comment!!
DeleteI shared your post on my facebook page
https://www.facebook.com/homemadeatmyplace-306480292701380/?ref=bookmarks
Hope this is ok with you!!!!
xxxxx Ale