….. It has been a long time without a patterns or photo tutorials from me…. Sorry for that, but I didn't have honestly the time or the mind set for all that !!!! ;oD
Today I can show you what happened to my colourful and stripy piece of fabric ……

… Yes !!!! It turned out as a bright and cheerful placemat ( Tobia and Matteo want one both!) ….

I didn't put down a proper pattern to follow, but I can give you some directions, if interested !!!
Using a 2,5 mm hook, I decided to chain 110 chains+3 more (as my first double crochet for the beginning of the first row) for the foundation row and the first 2 rows (in red) are made of double crochets (please remember that I follow US crochet terminology!). Then I added pink at the beginning of the 3rd row (without cutting the red thread) : with this colour, instead, I worked 2 rows of single crochets. At the end of the 4th row, I cut the pink thread and reused the red one, working other 2 more rows of double crochets!
The stitches are repeated in sequences of two ( 2 rows in double crochets, then 2 rows in single crochets, then again!) and I decided to use red and hot pink as the main colours for the base of my placemat. In pink, turquoise, green lime and peach I crocheted the tiny stripes of single crochet.
In total, I worked 62 rows (32 rows in double crochet and 30 rows in single crochet), then I fasten it off.


After trimming in all the colourful ends, keeping the front of the work in front of me, I decided to start to work on one of the shorter sides of my rectangle. I chose yellow to be the main and only colour, and with it I started to crochet a first row of single crochets.
The second row was made of single crochets (again!), while the third row was something like : chain 3 (as first double crochet), chain 1, 1 double crochet in 3rd stitch, chain 1, 1 double crochet in 5th stitch, chain 1, …… repeat till the end of the row!!!!
Rows 2 and 3 were repeated 3 more times. I completed the yellow strip at the end of row 9.
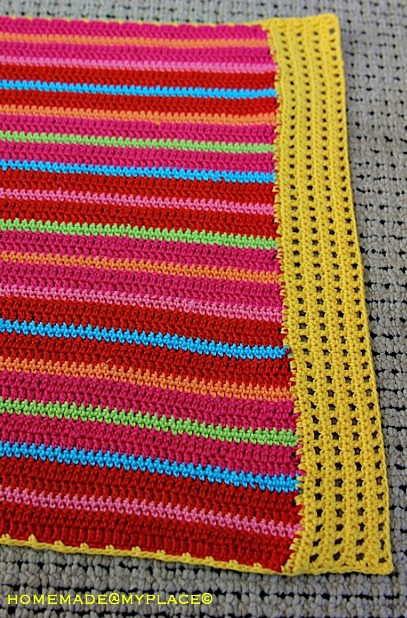

At the conclusion of row 9, I didn't cut the yellow thread, but, instead, I started to work a simple and tiny border, all around the placemat. I didn't work it for the 4th side of the placemat, but I stopped at the end of the 3rd side, where I decided to cut the yarn and fasten off ! DONE !
This border is quite easy : 1 sc, 2 chains, 1 sc, 2 chains, …… and on and on !!!! Do you remember this photo tutorial ??? It can be helpful !!!!
The dimensions of the finish placemat are : 47cmx32cm
Some more pictures ….. !!!!!! …… ;oD …….


Happy weekend, xxxxx Alessandra
My Ravelry notes are HERE !!!!
Today links : Link your stuff!
Busy fingers Show off !
Craft Schooling Sunday
Today I can show you what happened to my colourful and stripy piece of fabric ……
… Yes !!!! It turned out as a bright and cheerful placemat ( Tobia and Matteo want one both!) ….
I didn't put down a proper pattern to follow, but I can give you some directions, if interested !!!
Using a 2,5 mm hook, I decided to chain 110 chains+3 more (as my first double crochet for the beginning of the first row) for the foundation row and the first 2 rows (in red) are made of double crochets (please remember that I follow US crochet terminology!). Then I added pink at the beginning of the 3rd row (without cutting the red thread) : with this colour, instead, I worked 2 rows of single crochets. At the end of the 4th row, I cut the pink thread and reused the red one, working other 2 more rows of double crochets!
The stitches are repeated in sequences of two ( 2 rows in double crochets, then 2 rows in single crochets, then again!) and I decided to use red and hot pink as the main colours for the base of my placemat. In pink, turquoise, green lime and peach I crocheted the tiny stripes of single crochet.
In total, I worked 62 rows (32 rows in double crochet and 30 rows in single crochet), then I fasten it off.
After trimming in all the colourful ends, keeping the front of the work in front of me, I decided to start to work on one of the shorter sides of my rectangle. I chose yellow to be the main and only colour, and with it I started to crochet a first row of single crochets.
The second row was made of single crochets (again!), while the third row was something like : chain 3 (as first double crochet), chain 1, 1 double crochet in 3rd stitch, chain 1, 1 double crochet in 5th stitch, chain 1, …… repeat till the end of the row!!!!
Rows 2 and 3 were repeated 3 more times. I completed the yellow strip at the end of row 9.
At the conclusion of row 9, I didn't cut the yellow thread, but, instead, I started to work a simple and tiny border, all around the placemat. I didn't work it for the 4th side of the placemat, but I stopped at the end of the 3rd side, where I decided to cut the yarn and fasten off ! DONE !
This border is quite easy : 1 sc, 2 chains, 1 sc, 2 chains, …… and on and on !!!! Do you remember this photo tutorial ??? It can be helpful !!!!
The dimensions of the finish placemat are : 47cmx32cm
Some more pictures ….. !!!!!! …… ;oD …….
Happy weekend, xxxxx Alessandra
My Ravelry notes are HERE !!!!
Today links : Link your stuff!
Busy fingers Show off !
Craft Schooling Sunday
I love it Ale - it's very bright and cheery. Have a great weekend. :)
ReplyDeletethank you Debi!!!!!!
Deleteenjoy your weekend, too, xxxxxx Ale
And yes, it becomes a table runner or placemat:)) bright colors, I like it, and also a new colorful header of your blog, I thought, who is this?? hahaha.... byebye and have a nice weekend, Francien
ReplyDeleteYou were right!!!! ;oD
DeleteThank you and xxxxxxxx, Ale
Yay, love the new blog design, will we start seeing an African influence soon..all those bright colours and beautiful patterns....ooooooh xx
ReplyDeleteCiao Ale, anch'io la settimana scorsa ero alle prese con una tovaglietta colorata! La tua mi piace molto :)
ReplyDeleteColours and stripes, always a feast for my eyes! Like your header too!
ReplyDeleteHappy weekend Ale!
happy you like both my placemat and my new header!!!!!
Deletexxxxxxx Ale
It looks great Alessandra!!! Somehow I imagined from the previous photo that it was a lot larger, it is funny when you just see a bit of something how you can get the scale all wrong isn't it!! xx
ReplyDeleteAle! I loooooove your placemat!
ReplyDeleteI loooooove stripes, too!
today I'm work in one stripe blanket! Hahahaha!
Have a nice day and enjoy your crafts!
A big hug from Catalonia!
Gorgeous and great to see you again, was wondering how you were doing! Thanks so much for sharing on craft schooling Sunday!
ReplyDeleteSo happy to share my work with you Sara!!!!
Deletesee you soon, xxxxxx Ale
Nice placemat
ReplyDelete(I always wonder about the pronounciation ot he word, is it in the English or in the French way?)
Your new banner is WOW!
well, I use to say it in English …. !!!!!
DeleteThank you for liking my new header , xxxxxx Ale
♥wov, love this! Super!!! Happy day, my friend! xxx Riitta
ReplyDeleteNice placemat, love the colors, its beautiful.
ReplyDeleteThanks for the nice comment on my blog.
Loes
thank you to you Loes !!!!
Deletenice to have you here, xxxxxx Ale
Why is it when I do simple stitches, I think they are rather blah. But when you do them, it looks amazing ! The color definitely makes it pop. I have a hard time choosing colors. I love the yellow border off to only one side. Very pretty. Best wishes, Tammy
ReplyDeleteUn ottimo modo per iniziare la giornata a colori e con ottimismo!Bellissimi i colori! Ciao,Ale!:-)))
ReplyDeleteNice idea Ale, it certainly will cheer up the dinner table! X
ReplyDeleteHey Alessandra - love your 'new look' blog! So cheery and colourful - just like your work :) :) The placemat is fab - I'm not surprised you're getting orders, hehe! Great to see you blogging regularly again BTW :)
ReplyDeleteAlison x
It's looking so lovely and colorful, Ale!!:) thanks for sharing!!
ReplyDeleteWhat a bright, cheerful and very useful make.
ReplyDeletethank you Gillian!!! you know, even my cat finds the placemat useful …… ;oD
Deletexxxxxxxx Ale
So good! I love the yellow stripe at the end, and so nice and colorful, like always!
ReplyDeleteKate :}
So pretty and colorful!!! xo Heather
ReplyDelete