

It's time for a new photo tutorial, isn't it? ;oD
I just wanted something simple and clever ( kind of a stash buster!), like the one I did to make tiny yarn butterflies a while ago!
The technique is the same, because you need again a fork as a loom and some yarn to weave along!!!
Grab few little things as :

- a fork (metallic or plastic) with 4 prongs
- some colourful yarn
- a pair of scissors
- craft glue (quick dry)
- some pins
- a few strands of thinner yarn (2 for each candy)
- tape (optional)
When ready, collect the fork , the scissors, the thick yarn for the "body" of your candy and a couple of thinner yarn threads ( each10 cm long, more or less)

Insert the two thin strands in the first and in the third dents of your fork

Now you can take the thick yarn and from left to right (it's up to you if to start in the front or in the back of the fork. I started from the back!) start to weave the yarn, back and for...

A useful advice : as there are many strands of yarn, I suggest you (to avoid confusion and tangles!) to use another thread or ribbon and knot it around the other four on the fork handle

After this information/interruption, remember to weave/wrap your yarn row after row...

..... until you have completed 15/17 rows (cut your yarn!) and free your lower strands....

With the first strand on the left make a loose knot on the top of your work

Now do the same with the second strand on the right

Gently slip off the "candy" from the fork

At this point, you can tie tighter both your knots to give your candy a nicer shape....

Collect the scissors and cut the thick (the blue one for me!) yarn, to level it to the sides of the candy "wrap"

then, cut a couple of strands from one side.....

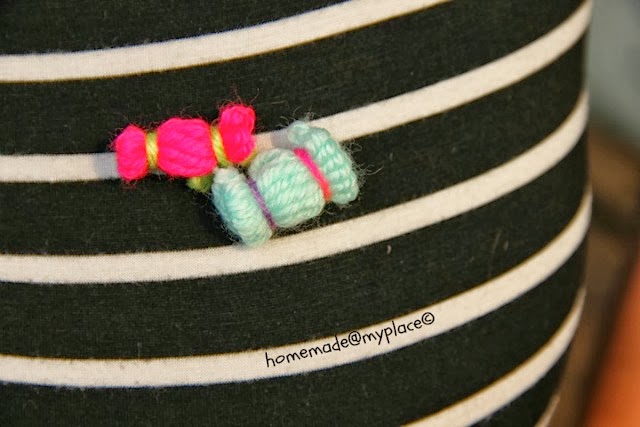
.....now you can do the same for the other side...... YOU HAVE YOUR FIRST YARN CANDY !!!!

Once you have cut all the threads, to give your candy a probable bon bon shape, just keep your candy (from side to side) between your thumb and forefinger and press it gently twice or 3 times until you have a nice bon bon!!!!

Do you have a sweet tooth???? Do you want a bigger candy, then????

I swear to you that YOU CAN !!!!!
The technique is the same used for the little candy : the only thing that changes is the amount of yarn weaved : just MORE!!!!!
Another tip (you learn a lot while doing things!!!) : To keep your strands of yarn in place, just add a piece of tape in the front of the fork on the top of your threads

You have to weave the yarn close to the top of the fork (more or less, 31 rows) and the two knots at the top of your work need to be tight (more yarn to handle!!!)(remember to pull off the tape, before the knotting!)

Again, gently slip off your "candy" from the fork

All these strands....so confusing....!!!!....... Remember : the procedure is exactly the one I've shown you above with the previous candy!!! ;oD

After cutting all the exceeding strands, you'll have a BIG CANDY

All together...

Any idea ????

Do you remember the glue and the pins in the list at the beginning of this tutorial?
It's their moment, right now !!!!
Put some glue on the pins, where you are going to press on your candies and voila'....


Remember to be fair with all your candies, because.....

Have fun!!!!!!
Please don't hesitate to CONTACT ME (even using the comment box below!) if you have any question/problem !!!! Thank you!!!
xxxx Alessandra
Today link party : hookin hump day #56 link party fiber arts !!!! See you there! thank you!!!
mmmmm You've just made me hungry for candy....
ReplyDeleteKate :}
Sweet...
ReplyDeleteThank you, nice tutorial! I can use it for mij daughter, she will like the candy's too! :-)
ReplyDeleteWhat a great idea! I really like them. And these are better than the real ones. ;-) Love Tinie
ReplyDelete