You know, good inspiration comes always in a dash....you can't even stop to think about it : too late, you are framed in just few seconds....no time even to realize what's going on!!!! ;oD
Anyway, the day before yesterday, during my daily routine in catching up with most of the posts written by lovely people I follow with the help of my blogroll list, I was caught by the colourful images shown at Le monde du Sucrette here ..... well, I fell in love with both the stripy cowl and the moss stitch for crochet !!!
I had to try this stitch!!!! It's a stitch that I really love in knitting, so why not crochet it?
So I went on YouTube to check a couple of videos (thank you Angie for sharing all this!!!! ), like this one :

To have an idea about how to crochet the moss stitch, I suggest you the vision of the above video. The quality of the images is not the best, but is good enough to follow and understand this stitch.
You have to crochet a starting chain with an odd number of stitches. In this project I chain 45 stitches (see pattern).
Then, you start the foundation row (row 1 in the pattern), where you insert your hook in the 3rd chain from the hook and you do a single crochet (sc) and chain 1. Skip one chain, insert the hook, sc and chain 1. Repeat this scheme till the end the row. You will end with a sc.
Now chain 2, turn your work and skip the first chain/stitch, inserting the hook in the first chain space (the space between 2 sc, that is the space between the 2 "v"s !!!), sc and chain 1. Repeat as the first row, on and on!!! Easy !!!
After the first 12 rows (I don't have pics of the beginning, sorry!!!), you'll have something like this :


...and after row 20 we will have this:


at row 30, instead, ...


Anyway, the day before yesterday, during my daily routine in catching up with most of the posts written by lovely people I follow with the help of my blogroll list, I was caught by the colourful images shown at Le monde du Sucrette here ..... well, I fell in love with both the stripy cowl and the moss stitch for crochet !!!
I had to try this stitch!!!! It's a stitch that I really love in knitting, so why not crochet it?
So I went on YouTube to check a couple of videos (thank you Angie for sharing all this!!!! ), like this one :
....so I started to crochet (the same night, before going to bed!!!) the moss stitch!!!
Yesterday morning, after few rows, I had the idea to what to do with my work : a placemat!!!
Are you interested, too, in this project? yes? So follow me, please!!! We'll have some fun together!
What you will need :

- a 5,5mm hook
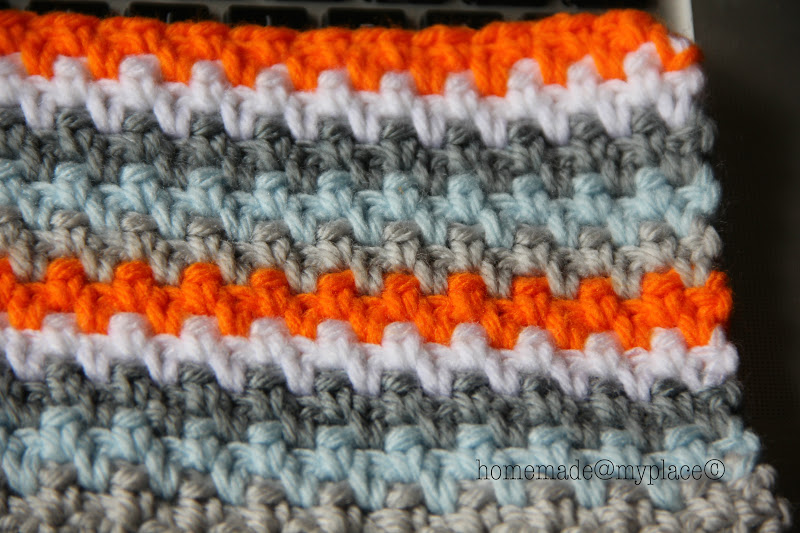
- some colourful yarn. I chose 5 colours : light grey (LG), light blue (LB), dark grey (DG), white (W) and orange (O)
- a pair of scissors
- a tapestry needle
- a tape measure marked in cm (optional)
Chain 45 stitches
rows 1&2 : moss stitch in LG (even rows 11&12)
rows 3&4 : moss stitch in LB (even rows 13&14)
rows 5&6 : moss stitch in DG (even rows 15&16)
rows 7&8 : moss stitch in W (even rows 17&18)
rows 9&10 : moss stitch in O (even rows 19&20)
Repeat this scheme one more time, so to complete row 20 in O.
rows from 21 to 40 : moss stitch in DG
rows 41&42 : moss stitch in LG
rows 43&44 : moss stitch in LB
rows 45&46 : moss stitch in W
rows from 46 to 74 : moss stitch in LG
rows 75&76 : moss stitch in DG
rows 77&78 : moss stitch in O
rows 79&80 : moss stitch in LG
Bind off and trim in the ends!!!
Crochet know-how (US terms):
- chain
- single crochet (sc)
- chain space (cs)
- turn
- change colour
- trim in ends
To have an idea about how to crochet the moss stitch, I suggest you the vision of the above video. The quality of the images is not the best, but is good enough to follow and understand this stitch.
You have to crochet a starting chain with an odd number of stitches. In this project I chain 45 stitches (see pattern).
Then, you start the foundation row (row 1 in the pattern), where you insert your hook in the 3rd chain from the hook and you do a single crochet (sc) and chain 1. Skip one chain, insert the hook, sc and chain 1. Repeat this scheme till the end the row. You will end with a sc.
Now chain 2, turn your work and skip the first chain/stitch, inserting the hook in the first chain space (the space between 2 sc, that is the space between the 2 "v"s !!!), sc and chain 1. Repeat as the first row, on and on!!! Easy !!!
After the first 12 rows (I don't have pics of the beginning, sorry!!!), you'll have something like this :


...and after row 20 we will have this:

at row 30, instead, ...


Further, at row 56....


In the next pictures we are really close (row 77 !!!) to the end of the work....


At this point, we have to take a break, because I would love to review just 2 tricky points with you (I'm worried mostly for the beginners!). The pattern and the moss stitch are really easy to follow, but we have to pay attention to :
the last single crochet at the end of each row : you need to insert the hook just after the "v" (or sc !!) of the previous row, because there is a chain space (obtained by chaining 2, just before turning your work!)..In the back of your work, wrap the yarn around the hook and pull to the front...


Again, wrap the yarn around the hook...

Pull the wrapped yarn trough the 2 loops, so that you'll have one stitch on the hook...

Chain 2...

Turn your work...

Insert your hook in the chain space between the first 2 single crochet stitches (or simply, the 2 first "v"s... ;oD)..


So, 1 single crochet, 1 chain, 1 sc, ch 1, and on.....

how to change the yarn colour : at the end of a row (in this specific case, we stop using the orange and we'll start with the light grey, ;oD), cut the yarn (leave a tail of 3cm, more or less) and collect the new yarn (no knots needed!)...

Wrap the yarn around the hook...

Pull the new yarn through the loop on the hook, so you'll have a light grey yarn loop now..

Chain 2 and pull the threads a little bit to adjust the tension..(sorry for the pic quality...)

Turn your work and start to crochet as usual...

Hope I've been useful !!!!
Now, I'll show you the work "completed"...


...and after the trimming....


Well, well, well.....
if you have troubles, questions or something more to ask, please contact me here !!!
The second part of the tutorial will be out really soon......don't hate me for that, but I have to add a little thing .... or maybe two !!! ;oD You can find it HERE !!!!
My Ravelry notes can be found HERE !!!!
xxxx, Alessandra
Today's links : Link your Stuff! , Welcome to Craft Schooling Sunday ! and Creative Friday !!! Thank you ladies!!
FUN! It's a perfect stitch (one I didn't know had a name!) for a placemat! Thanks for sharing!!!
ReplyDeleteKate :}
I won't be able to join in your CAL at this time Alessandra - but I wanted to tell you that your placemat looks very nice. :)
ReplyDeleteThis is fantastic! I've been wanting new placemants... now I can make them :)
ReplyDeleteIt is beautiful Alessandra.
ReplyDeleteYou are so talented.
I love it...
This looks lovely Alessandra! The colours are great too - look forward to seeing the second part :) :)
ReplyDeleteAlison x
Gorgeous! You know I LOVVVVE grey and orange :)
ReplyDeleteBeautiful! Thank you very much for sharing and all the work you had with these pictures!
ReplyDeletelooks like a great stitch and a fab placemat! thanks so much for sharing on Craft Schooling Sunday!
ReplyDeleteI love this! Could this stitch be used in a blanket?
ReplyDeleteThis comment has been removed by a blog administrator.
ReplyDeleteDear Ale,
ReplyDeleteLooks splendid!
You are such a crochet ace.
Have been away from Blogland for a while, too much work at school. That's probably the reason why I only see your new picture of the little fox (above) right now. It's lovely well done!