Why???
Well, I need to crochet some flags (not big, for a bunting) for an upcoming event in school : International Day !!!! Being Italian, I have to think about a decoration good for all Europe, so I thought about some blue european flags….
No problem to crochet the flags : a rectangle is fast done with some single or double crochets, but the Europe flag has in its centre a circle made of stars….
So I started a research on Pinterest for a crochet pattern including both a circle and a rectangle, but no luck…. sigh! I found, instead, patterns for circles in squares….. Then, I decided to develop one of this patterns into a rectangle : I obtained what I needed !!!!
….. still need to think about the stars to embroider on my blue flags, but I think some little straight stitches will do !!!! ;oD
WHAT DO YOU NEED ???


The first 5 rounds are done, but, as I told you before, I need a rectangle ….

…. to have the same one on the left in the above picture, I've added 2 extra rounds to Doriens' pattern : round 6 and 7 ! Note that : I follow US crochet terms and that, in this specific case, I don't change colours in my work, because my flags all have a blue background! Obviously, you can adapt the pattern for a colourful version, instead!!!
My photo tutorial starts from :
ROUND 6 :
After the last slip stitch, used to close the last round (5th), you need to chain 3
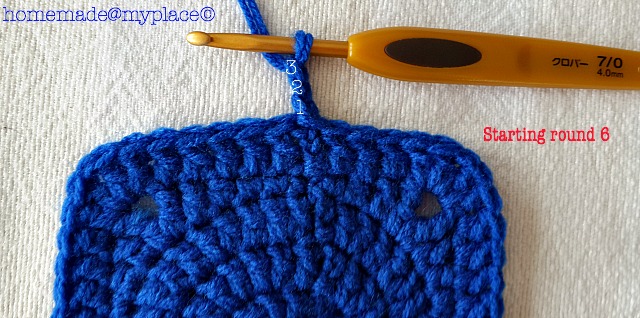
then, crochet 1 DC into next 7 stitches (total : 7 DCs)

now 1 DC in the corner (2 DCs, chain1, 2 DCs of 5th round)

chain 1

rotate to the right (90˙) your work

and crochet 2 SCs along the last DC you worked (the one in the corner)

add 1 SC in the first stitch you find (that is the top of the 3rd DC of the corner !)

and work 1 SC into the following 12 stitches (total : 12 SCs)

In the corner, crochet 1 SC

chain 4

and crochet 2 DCs in the same corner

then, crochet 1 DC into the following ( I skip the first DC of this side!) 12 stitches (total : 12 DCs)
.jpg)
add 1 DC in the next corner

chain 1

rotate to the right (90˙) your motif and work 2 SCs along the last DC done

and crochet 1 SC in the stitch of the corner

work 1 SC in the following 12 stitches (total : 12 SCs)

1 SC in the corner

chain 4

work 2 DCs in the same corner

crochet 1 DC in the following 4 stitches (I skip the first DC!) (total : 4 DCs)

make a slip stitch at the top of the initial chain 3

and this is what you have (on the right) compared with what you need to reach (on the left)

This is end of round 6 !
ROUND 7 :
chain 3 to start the round

crochet 1 DC into the following 7 stitches (total : 7 DCs)

work 1 DC in the corner (kind of)

then crochet another DC in the space between the previous chain 1 and first sc of round 6

chain 1

rotate to the right (90˙) your motif and crochet 2 SCs along the last DC done

work 1 SC in the following 16 stitches (total : 16 SCs)

crochet 2 SCs around previous chain 4

chain 4

crochet 2 DCs in the corner

work 1 DC in the following ( I skip set first DC) 13 stitches (total : 13 DCs)

crochet 1 DC in the corner (kind of)

then another DC in the space between the previous chain 1 and SC

chain 1 and rotate to the right (90˙) your work

crochet 2 SCs along the last DC and crochet 1 SC in each following stitch (total : 2+16=18 SCs)

work 2 SCs around chain 4

chain 4

work 2 DCs into last corner

crochet 1 DC in the following (I skip the first DC) 5 stitches (total : 5 DCs)

work a slip stitch on the top of the chain 3 of the beginning of the last round : YOU DID IT !!!

round 7 is completed as your rectangle, too ….

…. next week, I will add the stars !!!!! ;oD
You can find my Ravelry notes HERE !!!
xxxx Alessandra
Today links : Link your Stuff !, Craft Schooling Sunday and Busy Fingers Showing Off #60 !!!!
Well, I need to crochet some flags (not big, for a bunting) for an upcoming event in school : International Day !!!! Being Italian, I have to think about a decoration good for all Europe, so I thought about some blue european flags….
No problem to crochet the flags : a rectangle is fast done with some single or double crochets, but the Europe flag has in its centre a circle made of stars….
So I started a research on Pinterest for a crochet pattern including both a circle and a rectangle, but no luck…. sigh! I found, instead, patterns for circles in squares….. Then, I decided to develop one of this patterns into a rectangle : I obtained what I needed !!!!
….. still need to think about the stars to embroider on my blue flags, but I think some little straight stitches will do !!!! ;oD
WHAT DO YOU NEED ???
- a hook : 4mm for my yarn. Choose the right hook for the yarn you intend to use for your rectangles!!!
- yarn : I've worked two strands together of this "royal" blue of MIRAGE, a 4 ply yarn from Elle yarns (100% acrylic) from South Africa. Each ball weighs 25g.
- a pair of scissors
- a yarn needle
- a stitch marker (optional)
About the pattern that I've followed for the circle in a square, you can find it HERE. It's a brief photo tutorial written by Dorien (thank you!!!), who owns a blog named after herself : Just-Do. If you want, Dorien wrote even a tutorial for a bigger square : large circle in a square, tutorial.
I've followed the pattern/photo tutorial ( but I didn't use the magic ring : chained 4 and made a ring with a slip stitch in the first chain ) and these pics will show you my progress :
The first 5 rounds are done, but, as I told you before, I need a rectangle ….
…. to have the same one on the left in the above picture, I've added 2 extra rounds to Doriens' pattern : round 6 and 7 ! Note that : I follow US crochet terms and that, in this specific case, I don't change colours in my work, because my flags all have a blue background! Obviously, you can adapt the pattern for a colourful version, instead!!!
My photo tutorial starts from :
ROUND 6 :
After the last slip stitch, used to close the last round (5th), you need to chain 3
then, crochet 1 DC into next 7 stitches (total : 7 DCs)
now 1 DC in the corner (2 DCs, chain1, 2 DCs of 5th round)
chain 1
rotate to the right (90˙) your work
and crochet 2 SCs along the last DC you worked (the one in the corner)
add 1 SC in the first stitch you find (that is the top of the 3rd DC of the corner !)
and work 1 SC into the following 12 stitches (total : 12 SCs)
In the corner, crochet 1 SC
chain 4
and crochet 2 DCs in the same corner
then, crochet 1 DC into the following ( I skip the first DC of this side!) 12 stitches (total : 12 DCs)
add 1 DC in the next corner
chain 1
rotate to the right (90˙) your motif and work 2 SCs along the last DC done
and crochet 1 SC in the stitch of the corner
work 1 SC in the following 12 stitches (total : 12 SCs)
1 SC in the corner
chain 4
work 2 DCs in the same corner
crochet 1 DC in the following 4 stitches (I skip the first DC!) (total : 4 DCs)
make a slip stitch at the top of the initial chain 3
and this is what you have (on the right) compared with what you need to reach (on the left)
This is end of round 6 !
ROUND 7 :
chain 3 to start the round
crochet 1 DC into the following 7 stitches (total : 7 DCs)
work 1 DC in the corner (kind of)
then crochet another DC in the space between the previous chain 1 and first sc of round 6
chain 1
rotate to the right (90˙) your motif and crochet 2 SCs along the last DC done
work 1 SC in the following 16 stitches (total : 16 SCs)
crochet 2 SCs around previous chain 4
chain 4
crochet 2 DCs in the corner
work 1 DC in the following ( I skip set first DC) 13 stitches (total : 13 DCs)
crochet 1 DC in the corner (kind of)
then another DC in the space between the previous chain 1 and SC
chain 1 and rotate to the right (90˙) your work
crochet 2 SCs along the last DC and crochet 1 SC in each following stitch (total : 2+16=18 SCs)
work 2 SCs around chain 4
chain 4
work 2 DCs into last corner
crochet 1 DC in the following (I skip the first DC) 5 stitches (total : 5 DCs)
work a slip stitch on the top of the chain 3 of the beginning of the last round : YOU DID IT !!!
round 7 is completed as your rectangle, too ….
…. next week, I will add the stars !!!!! ;oD
You can find my Ravelry notes HERE !!!
xxxx Alessandra
Today links : Link your Stuff !, Craft Schooling Sunday and Busy Fingers Showing Off #60 !!!!
Please, show me your makes on IG using the following hashtag : #homemadeatmyplaceoriginals or tagging me @alessandrapoggiagliolmi .
Text, Design and Photography : Alessandra Poggiagliolmi
All Rights Reserved. No part of this pattern may be reproduced or transmitted in any form or by any means, without the prior written permission of the copyright holder.
Very good Ale - great job! Thanks for sharing your tutorial with everyone. :)
ReplyDeleteIt has been a long time without a proper photo tutorial by me…. Hope I did it well!!!! ;oD
Deletethank you, xxxxx Ale
Thanks for the tuto' it will be also nice with two colors, for a blankdt, pillow..etc. byebye Frzncien
ReplyDeleteYes!!!! Try and tell me !!!! ;oD
Deletexxxxxx ale
Great tutorial, it is nice to see a rectangle made in a different way! Love to see the stars you are going to make! Thanks for sharing!
ReplyDeletethank you Andre'e!!! Be patient and you'll see the stars really soon…. I hope!!!! ;oD
Deletexxxxxx ale
Thank you once again for a brilliant tutorial :) xxx
ReplyDeleteYour bright, clear and appealing pictures make me yearn - or should I write - 'yarn' to learn to crochet.
ReplyDeleteThank you so much for your kind words today on my blog. They really meant a lot to me.
Stephanie
Nice job!
ReplyDeleteHope to see the whole bunting before it goes away!
Very clever Ale! Can't wait to see the stars!
ReplyDeleteKate :}
Great tutorial, wow what patience to post all those photos! thanks so much for sharing on craft schooling Sunday!
ReplyDeleteGreat job Alessandra! Not the easiest of puzzles to solve, but you worked it out well. I look forward to seeing the finished bunting xx
ReplyDeleteThat's a nice pattern, Ale !! I had earlier made a star with circle using the pattern http://www.ravelry.com/projects/Maryfairy/star-overlay-2
ReplyDeleteYou can see the one I made in blue color at
http://createwittyunleashed.blogspot.in/2013/06/a-little-bit-of-crochet.html
Now I am looking for a crescent moon shape that fits on this circle square pattern. If you find any, please share.
Hello Ale, Hope you are well! This is a great tutorial, thanks for sharing! Looking forward to seeing the result next!
ReplyDeletehave a great week!
Ingrid xx
http://myfunkycrochet.blogspot.be
Hi Ingrid!!! All well here, thank you!
DeleteI'm crocheting some other flags for the bunting,so I hope to complete the work by the weekend! ;oD
xxxxxxx Ale
♥Vov,super! Thanks for this! xxx Riitta
ReplyDeletePosso scrivere in italiano, spero. Ho scoperto il tuo blog per caso, via Pinterest ma vedo che c'è gente che conosco qui! Le tue foto ed istruzioni sembrano preziose perché lavoro al uncinetto da poco tempo.
ReplyDeleteUn saluto affettuoso
Olimpia
Ecco la nuova follower! Grazie di avermi scritto!
Delete