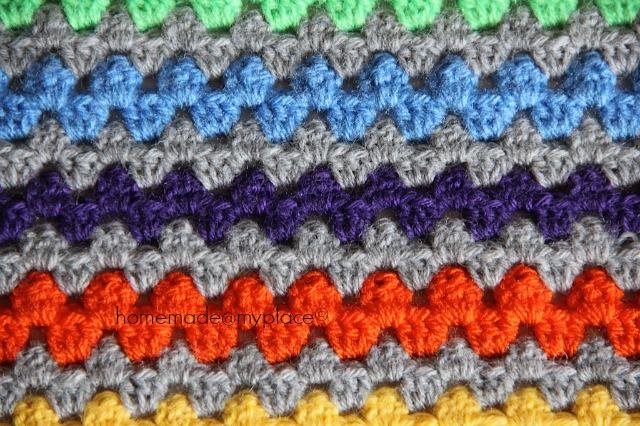
...As some of you know, I've followed this tutorial (thank you LuAnn!!!) to make this granny stripes blanket (ideal for a crib, I think!).....

My beginning chain was made of 111 stitches and I started my work using the grey acrylic yarn, that is the colour that I've then used in the between of all the bright stripes!
The size of the hook : 4mm.
All the yarns are italian acrylics, very soft and warm! ;oD I've used balls of 50g each : 3 grey, 2 red and 1 for every shade! Obviously, there are leftovers!
For each colour, the first stripe is made of 35 shells (total:105 stitches)+2 DCs at the beginning of the row+2 DCs at the end of the same row. TOTAL: 109 stitches. The second stripe, instead, is made of 36 shells (total: 108 stitches)+1 DC at the beginning of the row+1 DC at the end of the same row. Total: 110 stitches. ;oD
Please remember that I follow the american crochet terminology for my work!


For each colour (the grey is included, too!) I've crocheted two rows : 90 rows in total !
For sure, I wanted a nice border for the blanket (and I've decided for a red one!!!) and I loved the one crocheted by Esther, who made a nice tutorial about a granny stripe edging : thank you Esther!!!
I've followed her tutorial for the first row of my border.....


....but for the second row, I've decided for something a little bit different, a kind of "starry" border....see???


It's really easy to do, believe me!!! You start in any chain-1 space of the first row (the space between two 3DCs shells) with a slip stitch and chain five. Then : a slip stitch in the second chain from the hook, one single crochet in the next stitch, one half double crochet in the next stitch and one double crochet in the last stitch of the chain! You complete the point, just attaching it with a slip stitch in the next chain-1 space :

Even the corners are really simple to crochet, because you don't need to increase stitches, but just follow the below border and crochet the points as you go :

...a very neat corner, indeed...!!!!....

I've tried to design a scheme for the pointy edging....I hope it could be helpful...

After all these mini triangles/points/spikes, I blocked the blanket and ....TA-DAH...!!!!.....


....finished measurements are (approx) : 72x80cm
The other posts about the blanket are here and here !!!
Any problem/question, please feel free to contact me here or just leave a comment at the end of this post, thank you!
Today links : Creative Friday and Link your Stuff !
xxxx Alessandra
Once more, you made an exceptional pretty blanket.
ReplyDeleteSO well done, Alessandra!
It really expresse the all Italian feeling!
Enjoy!
Brigitte
It looks great Ale - and I love the spiky border you made. :)
ReplyDeleteA really beautiful Blanket with a great tutorial. I especially like the row of grey between each of the bright colors. It keeps your blanket form looking too busy while maintaining the cheer of many bright colors.
ReplyDeleteYour blanket is pretty with a real Ale's touch: the colours and the beautiful edge. Great job!
ReplyDeleteWow! This is so pretty, and snuggly too I'm sure :)
ReplyDeleteVery pretty and colorful blanket, Ale!! Great job!!
ReplyDeleteI think the blanket is beautiful and I love the colors. Thanks, love Carol
ReplyDeleteBeautiful blanket, Alessandra! I love that it is not only one colour with grey - that trend can be overdone - but the grey tones the multicolours down just enough. |
ReplyDeleteLovely.
Oh Ale, the blanket looks so! cozy! I like the red finish♥♥♥♥
ReplyDeleteXO, Martina♥
So much to catch up on! Love this blanket...think this is what I need to try a blanket with rows! Love your trolley too! :) x
ReplyDeleteYour blankie turned out beautiful, I especially love your edges :)
ReplyDeletePretty one and the edges are very unique! :)
ReplyDeleteLove it! And what a fun border!!
ReplyDeleteKate :}
Super nice blanket!! And red is the perfect color for the border :-). I like the points, they are a little dragonlike :o)
ReplyDelete