In February I started a small, but industrious project, which I completed before the Easter weekend ...


I had a big (500g !) yarn ball in silver (from Robin DK 500g) and I wanted to use it since a long time, so I collected a pile of crochet patterns books from my bookcase and I started to browse trough them all ...
It didn't take a long time to find the right pattern. I wanted something different and challenging in various ways...
First, I never tried a ripple pattern before, NEVER ! Unbelievable, if you think how easy it is and how common it is between the blankets makers!! There is always a first time, right?
The other thing that I was dreading was to start a long foundation chain for the blanket to be, but the pattern I found didn't need one!!!! How great was that!!!
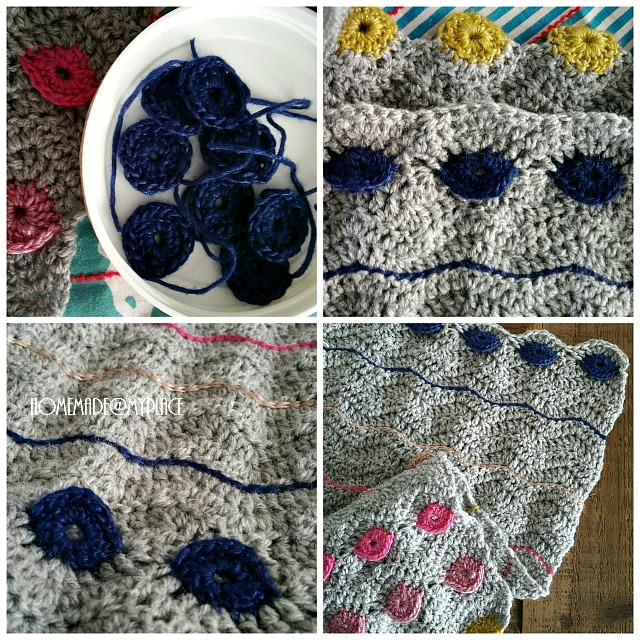
You "just" need to crochet "some" circles to start your blanket : I know, this could be a time consuming task, but it made my blanket special ! Worth it!
The pattern I'm writing about is by Leonie Morgan and you can find it on one of her books, that is 100 Colourful Ripple Stitches to Crochet, on pages 114/115.
Luckily the pattern is developed both in written and charted (the one I prefer) forms, so it was not a problem to follow. I agree with the personal author advice, who underlines the skill level as advanced.
You have to be a confident crocheter with some experience, because, for example, I found the written explanation for row 5 not well done .... but the chart and my personal crochet knowledge helped me a lot to figure out how to crochet properly row 5 (that is the row with the circles ! ;oD).
I even contacted Leonie via email to ask if I could share the pattern with my readers, to explain how to crochet this blanket and she was so kind to reply to me and she clarified all the copyright issues, that at the end I decided just to show you my result, with no photo tutorial/pattern along : sorry!
After this long introduction, let's start with the usual flow of pictures and comments from me!
Together with the silver yarn, I chose to use some discontinued Lustruous Extra Fine Merino DK by Sublime Yarns (shade 293 saffron and shade 294 folie) along with some Katia Kiss (shade 55 camel, shade 60 fuschia and blue navy). The hook used was a 4mm one!


At the beginning of this project, I decided to crochet 20 circles for each colour, starting with saffron for the bottom border of the blanket...

The pattern repeats itself every 4 rows and I followed it for the first 16 rows, using the silver yarn as the background for the blanket, while I was just changing the colour for the circles, for each new row with them in : saffron, folie (delicate pink), fuchsia and camel ... each row is made of 20 circles ...


I'm thrilled with the 3D effect given by the circles!!!
The pattern for the blanket was developing little by little, as I progressed with the crocheting and I took al the time I needed...
Did I want only rows of circles? Only the colours used until the end of row 16? Some different embellishment to add? Too much??
Well, let's start with some basic surface crochet, that was done in the between of rows 4 and 5 of the crochet ripple pattern... The colours sequence was totally repeated as for the circles ...


After that, in the middle of my project, I had the idea to add an extra colour (navy blue) ad to vary slightly the pattern ... This time I crocheted 40 circles in one colour ...


Once all the blue was done, I started to repeat the previous pattern, simply reversing the colours arrangement for the surface crochet and changing a bit the circles layout ( more like < and >)...


The last 3 rows of circles required 22 camel circles, 18 delicate pink circles and 20 fuchsia circles.
I needed, instead, 20 saffron circles for the top border of the blanket (as for the bottom/start), which were embodied in the third ripple row (counting the rows after the last row of circles made), This is also the last row worked for the blanket ...


After that, well the blanket was DONE !!! This baby measures : 98cmx96cm ...

Both sides of the blanket have been smoothed simply working groups of 4 chains, joined to the blanket with the help of slip stitches ...

Last extra photos ...


That's all !!!
xxxx Alessandra
Ooh that is such a lovely and unique blanket!! Everything about it is so nice: the colours, ripples and ofcourse the 3d effect. Well done Ale! Xxx Mirjam.
ReplyDeletethank you my sweet friend!!!! <3
Deletexxxx Ale
Lovely blanket Ale!
ReplyDeleteWow, this pattern is really something special! Very unique! The pretty colours make such a gentle, but firm effect together with the 3-D pattern. I am tempted to try it on a shawl - my everlasting love - although I already have many.
ReplyDeleteThank you Martina!!
DeleteI really appreciated your visit and your kind comment!!!
xxxxx Ale
A lot of work, but a great result, lovely colors, love it, byebye Francien
ReplyDeletethank you Francien !!!!
Deletexxxxxx Ale
What an interesting pattern! So nice you didn't have to start with a long chain!! Lovely colors as well!
ReplyDeleteKate :}
Ooooooh, so pretty Alessandra! You made a beautiful job of this quilt and made it your own :) :) Love the button feature - great 3D effect! x
ReplyDeleteYou never cease to amaze me. That would definitely test my limits. I've never done a ripple either.
ReplyDeleteWoow, what a wonderful blanket!! ♥ Fantastic effect, these sweet little buttons. Perfect color combination. I think I have to buy that book, too ;-). It's a real treasure, Ale!
ReplyDeleteNata xxx
What patience you must have. Neat.
ReplyDeletethank you for your visit Hanne!!!
Deletexxxx Ale
Beautiful blanket - I love this yarn and your color choice. Fantastic work :)
ReplyDelete