Just a little bit more than a month ago, I posted a photo tutorial for a Gingerbread man Ornament ... today I stay on the same theme, but I'll offer you a photo tutorial on how to crochet a sweet softie this time...

Are you tempted ???? ;oD
WHAT YOU NEED :
On your hook make a slip knot, chain 4 and push the tip of the hook into the first chain made and slip stitch to form a ring.
first round : chain 2, crochet 8 SCs and slip stitch in 1st SC to complete the round.
second round : chain 2, crochet 16 hDCs (2 hDCs in each stitch), slip stitch in 1st hDC to complete this round.
third round : chain 3, crochet 24 DCs (1 DC in odd stitches, 2 DCs in even stitches), slip stitch in 1st DC to complete the round.
fourth round : chain 3, crochet 32 DCs (1 DC in first stitch, 1 DC in second stitch, 2 DCs in third stitch : repeat this scheme till end of round), slip stitch in 1st DC to complete this round.
fifth round : chain 2, crochet 40 hDCs (1 hDC in first stitch, 1 hDC in second stitch, 1 hDC in third stitch, 2 hDCs in fourth stitch : repeat scheme until round end), slip stitch in 1st hDC to complete the round.
Cut yarn, fasten off and trim ends in.
You have to crochet another circle in the same way to have a "front head piece" and a "back head piece".
ARMS and LEGS (crochet 2 identical pieces for each limb)

We start with the ARMS :
collect hook and yarns (still working with 2 strands!), make a slip knot on the hook and chain 11.
first round : crochet your first SC in the 3rd chain from hook, then make other 7 SCs along the foundation chain, while in last chain crochet 3 SCs (first semicircle). Crochet 8 SCs along the foundation chain base and then make 3 SCs in the space formed by the initial 2 chains (chains 10 and 11) from the hook : your second semicircle is done. Slip stitch in the first SC to complete this round.
second round : chain 2 and crochet 8 hDCS along the straight side. Work 6 hDCs in the first semicircle, crocheting 2 hDCs in each stitch. Make other 8 hDCs along the other straight side and crochet 6 hDCs in the second semicircle, as done for the first one. Slip stitch in the first hDC, cut yarn, fasten off and trim ends in.
You have to crochet another arm in the same way !
LEGS :
Just follow the same instructions given for the arms, but you have to crochet a longer foundation chain : in fact, you need to chain 15 stitches!
Along both the straight sides, this time, you'll have 12 SCs (first round) and 12 hDCs (second round) !
You have to crochet two legs in the same way !
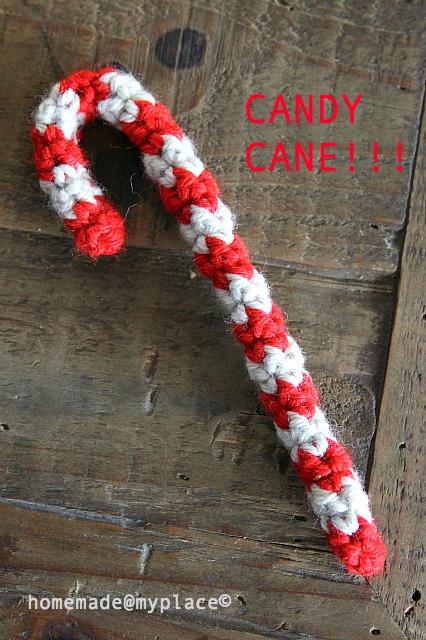
If you like, you can add a candy cane for your Gingerbread man Softie!
The pattern is not mine : I founded it HERE !!!!
I just added some more rows in my cane and a loop, made out of chains, so that my Gingerbread man can bring it around with himself and when "bored" you can hang it on your tree, or wherever you prefer !!!
Having completed all the pieces needed for your softie-to-be...

… you need to assembly them together, right? ;oD
ASSEMBLING THE BODY PARTS
Pick the 2 body parts and, if you didn't before, trim all the ends.
Take one oval and the fabric buttons (3), some thread and a needle : sew the buttons on the front of this oval


Please, if you decide to gift a softie to a small child, I suggest you to cut a piece of felt and put it in the back of the oval, along the line of the buttons : sew the buttons on this piece of felt and secure the thread on it!
Once the buttons are sewn on, collect the other body piece, some colourful yarn for the "icing", a hook and some toy stuffing!
Put the two body parts one over the other, with their wrong sides inside. Be sure to line up the stitches along the borders (I was helping myself with some stitch markers) and secure with a slip knot the colourful yarn on your hook : insert the tip of your hook under the top of the first couple of stitches and make a SC! You will join the 2 body parts with a round of SCs !!!


Keeping the body front in front of me, I joined the 2 parts starting from the first stitch along the straight side on my right, then along the semicircle and I completed even the other straight side before to stop and fill the body with some toy stuffing from the opening formed in the lower part of the body …


Once you have filled the belly of your softie, you can finish the joining procedure with the SCs. When you reach the first SC done, just make a slip stitch in the top of this stitch, cut yarn, fasten off and trim ends in !


ASSEMBLING THE HEAD PARTS
Collect the 2 head parts and, if you didn't before, trim all the ends.
Pick one circle, 2 buttons for the eyes, some thread and a needle to sew these buttons on the the front of the circle.
The smile is obtained with the help of some slip stitches (12!), a hook and some bright yarn! It's the same thing I did for my Gingerbread man Ornament !


To join the two circles together (front and back), I did the same as for the body parts, using the hook and the "icing" yarn to crochet a round of SCs, starting from the lower part of the head-to-be . I started from the bottom and I worked around, from right to left side, until I reached the eyes position. Through the opening, I put inside some stuffing and when happy with the filling, I completed the round of SCS. As for the body, I slip stitched in the top of the first SC, but WAIT BEFORE TO CUT THE YARN!


We need to join together the body with the head !!!

I didn't use any needle!!! I just made some slip stitches between head and body : the result is a floppy head with a vintage softie feeling !!!!


ASSEMBLING THE ARMS AND THE LEGS


Probably, this is the simplest part of all the work !!!
You have to position both arms and legs on the back of your softie and once you have decided that "it's ok!", you need a needle, some thread a 4 buttons to sew on the limbs!!! Very easy !!!


What do you think ??? Are you happy with yours ???? I think he is very cute !!!!!
I made some more, you know …


…. I hope to see yours, too, soon !!!! ;oD
xxxx, Alessandra
Today Links : Link your Stuff!

Are you tempted ???? ;oD
WHAT YOU NEED :
- a 5,5mm hook
- 2 DK yarn balls for the softie (I work 2 strands together!) and some colourful yarn for the icing (that is the outline for all the body parts!)
- yarn needle
- a pair of scissors
- stitch markers (4), that I use along the straight sides of the ovals, in the 1st and in the 18th stitch of both sides
- 2 buttons as eyes
- 3 buttons (mine are covered with fabric) for the belly
- 4 buttons to attach arms and legs in the back of your softie
- needles and threads to sew the buttons on
- toy stuffing
Please, remember I follow the US crochet terminology! Thank you ! ;oD
We can start to crochet RIGHT NOW !!!!
BODY (you need to crochet 2 identical pieces)
 |
| you don't need to sew on the buttons : it will be done later! |
Pick up the hook and make a slip knot with the 2 strands of yarn (in my case, these 2 strands are beige) and chain 21 stitches.
first round : crochet your first single crochet (=SC, from now on) in the 3rd chain from the hook, then crochet other 17 SCs along the foundation chain and in the last chain (that is the 1st chain we made!) crochet 3 SCs (you are starting your first semicircle). Now crochet 18 SCs along the straight side (base of your foundation chain!) and complete the round crocheting 3 SCs in the space between the initial 2 chains (=chains 20 and 21) from the hook (your second semicircle!). Close this round with a slip stitch in the top of the first SC made.
second round : chain 2 and crochet 18 half double crochets (=hDCs, from now on) along the straight side and make 6 hDCs in the first semicircle (that is 2 hDCs in each stitch). Crochet other 18 hDCc along the next straight side and 6 hDCs in the second semicircle, as done for the previous semicircle. Close this round with a slip stitch in the top of the first hDC you made!
third round : chain 3 and crochet 18 double crochets (= DCs, from now on) along the straight side and crochet 9 DCs in the first semicircle ( that is 1 DC in the odd stitches and 2 DCs in the even stitches!). Crochet 18 DCs along the next straight side and 9 DCs in the second semicircle, as done for the first semicircle. Close this round with a slip stitch in the top of the first DC you made.
fourth round : follow the instructions given for the third round. The only changes are the increasings in the semicircles! In first semicircle you have to crochet a total of 12 DCs : 1 DC in first stitch, 1 DC in second stitch, 2 DCS in third stitch. Repeat this scheme other 2 times!
In second semicircle you'll crochet 12 DCs, too : just follow the instructions given for the first semicircle. Close this round with a slip stitch in the top of the first DC made.
fifth round : chain 2 and follow the pattern given for the second round. Obviously, the increasings in the semicircles are different ! In first semicircle you need to crochet 15 hDCs as follows : 1 hDC in first stitch, 1 hDC in second stitch, 1 hDC in third stitch, 2 hDCs in fourth stitch. Repeat this scheme other 2 times, to complete the semicircle.
In second semicircle you'll crochet 15 hDCs, too : you have to follow the same scheme as for the first semicircle.
Close this round with a slip stitch in the top of the first hDC you made.
Cut yarn, fasten off and trim ends in.
You need to crochet another body piece to complete this part of the pattern, so that you will have a "front body part" and a "back body part".
HEAD (you need to crochet 2 identical pieces)
 |
| The buttons will be sewn on later! |
On your hook make a slip knot, chain 4 and push the tip of the hook into the first chain made and slip stitch to form a ring.
first round : chain 2, crochet 8 SCs and slip stitch in 1st SC to complete the round.
second round : chain 2, crochet 16 hDCs (2 hDCs in each stitch), slip stitch in 1st hDC to complete this round.
third round : chain 3, crochet 24 DCs (1 DC in odd stitches, 2 DCs in even stitches), slip stitch in 1st DC to complete the round.
fourth round : chain 3, crochet 32 DCs (1 DC in first stitch, 1 DC in second stitch, 2 DCs in third stitch : repeat this scheme till end of round), slip stitch in 1st DC to complete this round.
fifth round : chain 2, crochet 40 hDCs (1 hDC in first stitch, 1 hDC in second stitch, 1 hDC in third stitch, 2 hDCs in fourth stitch : repeat scheme until round end), slip stitch in 1st hDC to complete the round.
Cut yarn, fasten off and trim ends in.
You have to crochet another circle in the same way to have a "front head piece" and a "back head piece".
ARMS and LEGS (crochet 2 identical pieces for each limb)

We start with the ARMS :
collect hook and yarns (still working with 2 strands!), make a slip knot on the hook and chain 11.
first round : crochet your first SC in the 3rd chain from hook, then make other 7 SCs along the foundation chain, while in last chain crochet 3 SCs (first semicircle). Crochet 8 SCs along the foundation chain base and then make 3 SCs in the space formed by the initial 2 chains (chains 10 and 11) from the hook : your second semicircle is done. Slip stitch in the first SC to complete this round.
second round : chain 2 and crochet 8 hDCS along the straight side. Work 6 hDCs in the first semicircle, crocheting 2 hDCs in each stitch. Make other 8 hDCs along the other straight side and crochet 6 hDCs in the second semicircle, as done for the first one. Slip stitch in the first hDC, cut yarn, fasten off and trim ends in.
You have to crochet another arm in the same way !
LEGS :
Just follow the same instructions given for the arms, but you have to crochet a longer foundation chain : in fact, you need to chain 15 stitches!
Along both the straight sides, this time, you'll have 12 SCs (first round) and 12 hDCs (second round) !
You have to crochet two legs in the same way !

If you like, you can add a candy cane for your Gingerbread man Softie!
The pattern is not mine : I founded it HERE !!!!
I just added some more rows in my cane and a loop, made out of chains, so that my Gingerbread man can bring it around with himself and when "bored" you can hang it on your tree, or wherever you prefer !!!
Having completed all the pieces needed for your softie-to-be...

… you need to assembly them together, right? ;oD
ASSEMBLING THE BODY PARTS
Pick the 2 body parts and, if you didn't before, trim all the ends.
Take one oval and the fabric buttons (3), some thread and a needle : sew the buttons on the front of this oval


Please, if you decide to gift a softie to a small child, I suggest you to cut a piece of felt and put it in the back of the oval, along the line of the buttons : sew the buttons on this piece of felt and secure the thread on it!
Once the buttons are sewn on, collect the other body piece, some colourful yarn for the "icing", a hook and some toy stuffing!
Put the two body parts one over the other, with their wrong sides inside. Be sure to line up the stitches along the borders (I was helping myself with some stitch markers) and secure with a slip knot the colourful yarn on your hook : insert the tip of your hook under the top of the first couple of stitches and make a SC! You will join the 2 body parts with a round of SCs !!!


Keeping the body front in front of me, I joined the 2 parts starting from the first stitch along the straight side on my right, then along the semicircle and I completed even the other straight side before to stop and fill the body with some toy stuffing from the opening formed in the lower part of the body …


Once you have filled the belly of your softie, you can finish the joining procedure with the SCs. When you reach the first SC done, just make a slip stitch in the top of this stitch, cut yarn, fasten off and trim ends in !


ASSEMBLING THE HEAD PARTS
Collect the 2 head parts and, if you didn't before, trim all the ends.
Pick one circle, 2 buttons for the eyes, some thread and a needle to sew these buttons on the the front of the circle.
The smile is obtained with the help of some slip stitches (12!), a hook and some bright yarn! It's the same thing I did for my Gingerbread man Ornament !


To join the two circles together (front and back), I did the same as for the body parts, using the hook and the "icing" yarn to crochet a round of SCs, starting from the lower part of the head-to-be . I started from the bottom and I worked around, from right to left side, until I reached the eyes position. Through the opening, I put inside some stuffing and when happy with the filling, I completed the round of SCS. As for the body, I slip stitched in the top of the first SC, but WAIT BEFORE TO CUT THE YARN!


We need to join together the body with the head !!!

I didn't use any needle!!! I just made some slip stitches between head and body : the result is a floppy head with a vintage softie feeling !!!!


ASSEMBLING THE ARMS AND THE LEGS


Probably, this is the simplest part of all the work !!!
You have to position both arms and legs on the back of your softie and once you have decided that "it's ok!", you need a needle, some thread a 4 buttons to sew on the limbs!!! Very easy !!!


What do you think ??? Are you happy with yours ???? I think he is very cute !!!!!
I made some more, you know …


…. I hope to see yours, too, soon !!!! ;oD
xxxx, Alessandra
Today Links : Link your Stuff!
Very well explained tutorial, Ale! so sweet! Thanks!
ReplyDeleteHave a nice day and happy november!
Kisses from Catalonia!
That is a fun make!!!! Thanks for sharing!!!
ReplyDeletekeep well
Amanda xx
hello alessandra...such an adorable gingerbread figure..thank you for sharing the detailed tutorial and pattern...i echo the comment from amanda that this is a fun make...best wishes to you and yours for a joyous holiday season...take care...sally
ReplyDeletethank you so much Sally!!!
DeleteHappy Holidays to you, too!!!!
xxxxx Ale
This would be a lovely ornament / toy to make for Christmas! Thank you for sharing Ale!
ReplyDeleteSo cute! And you make everything look so easy. :)
ReplyDelete♥love, love, LOVE :) :) ♥
ReplyDeleteLeuk! Dankjewel voor de tutorial! Wordt gepind! Fijne dag.
ReplyDeleteSuch a cute festive little cookie! Looks like a great tutorial!
ReplyDeleteKate :}