October is just gone ....
November is here ....
.... and December will join us in a flash !!!!
All that just to inform you that I'm mentally ready for Christmas time ... little by little my mood is adapting to the idea of Christmas ( my boys have already written their letters to Santa Claus, aka mamma elf and papa' elf!!!)... so I started to think about a new tree decoration ...
Nothing extraordinary, but I think you can find my personal touch in it, right ?

I remember myself eating my first gingerbread man as a small kid in Calgary (Canada), during a Christmas party organised by the Oil Company my father was working for ... sweet memories !!!!
What I like about gingerbread man cookies is not their taste, but how much colourful they can be depending on the icing, candies or gum drops you use to decorate them !!!
Obviously, my gingerbread men are not baked, but crocheted !!! So the icing on my ornaments will be replaced by colourful yarns! ;oD
WHAT YOU NEED :
- 5mm hook
- some chunky yarns for the cookie base (caramel/beige/chocolate) and for the icing (all the colours you like!). I've been using some leftovers from my Indonesian yarns, 100% acrylic.
- a pair of scissors
- yarn needle
- 2 buttons as eyes for each gingerbread man
- needle to sew buttons on (check the holes size!)
- REMEMBER : I follow the US crochet terminology! Thank you! ;oD
My gingerbread man reaches the following dimensions : 23cm (height, without loop) x 14cm (width) and 5cm for the hanging loop.
You can choose the yarns you prefer to work with and then the hook size that pleases you most : have fun crocheting one or more gingerbread man ornaments!
READY TO START !!!
BODY
Pick your first colour and make a slip knot on the hook. Then, chain 4 and slip stitch in the first chain to form a ring.
First round : chain 2, and crochet 12 double crochets (=DCs) into the ring, then slip stitch into the top of the first DC done, cut the yarn and fasten off. Trim in all the ends.

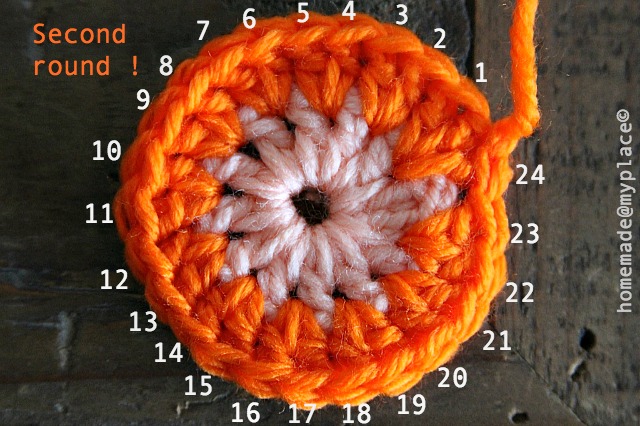
Second round : choose a new colour. Push your hook in any space between 2 DCs and pull to the front the new yarn (you'll have a loop) and hook again the yarn above the top of the circle and pass it through the loop : yarn joined! Chain 2 and crochet 2 DCs in the same space. You need to crochet 2 DCS in each next space, so that at the end of the round you'll have a total of 24 stitches. Slip stitch in the top of the first DC made, cut yarn, fasten off and trim in ends.

Third round : take the colour chosen for your cookie! Join the new yarn following the same technique explained at the beginning of round 2, pushing your hook trough the spaces between two couples of DCs. Chain 2 and crochet 3 DCs. Repeat 3 DCs in every next space! At the end of this round, slip stitch in the top of the first DC of this round and, please, DON'T CUT THE YARN, as you will need it for the 4th round, too! ;oD

Fourth round : still with the same yarn! Make 2 slip stitches in the next tops of the DCs of the first shell met and one more slip stitch in the space between the 2 shells. Chain 2 and crochet 3 DCs in the same space, then chain 1. Repeat 3 DCs + chain 1 in the following spaces (11). To close your round, slip stitch into the first stitch of the round, cut yarn, fasten off and trim in all the ends!!
The body of your gingerbread man is done !!!

Please, note the following : maybe, you would love to give an extra colourful round to your gingerbread's belly and you can do that! Just remember to choose a colourful yarn for the third round, that you will cut at the end of the same round! In the fourth round, you will use the chosen yarn for your cookie and you will join it in the space between two shells, in the usual way !!!
The differences between two cookies done slight differently will be minimal, as you can see ...


FACE (make 2)
You need to crochet a 3 rounds circle of DCs!
Pick the colour for the cookie base (that is the same one used for the last round of the gingerbread man's body) and make a slip knot on your hook, chain 4 and make a slip stitch in the first chain to make a ring.
First round : chain 2, crochet 12 DCs into the ring, then slip stitch in the top of the first DC. Now you can pull the yarn tail of the beginning to reduce the hole of the ring and cut the excess of yarn.
Second round : chain 2 and work 2 DCs in the same stitch. Crochet 2 DCs in each following stitch, so that at the end of the round you will have 24 DCs. Slip stitch in the top of the first DC and your round is completed.
Third round : chain 2 and crochet 1 DC in the same stitch, then crochet 2 DCs in the next stitch. Repeat this pattern : 1 DC in every odd stitch + 2 DCs in every even stitch. Stop when you've crocheted stitch 33, because you need to join the face to the body !!!
Collect the body and put it in front of the face-to-be, as follows :

You have the gingerbread man's face still on the hook and you need to crochet the last 3 DCS to complete it … and while completing the 3 DCs, you will even join the face to the body (so no sewing required!) . How ?
Observe the situation :

In the above picture, you can see 2 white dots that point out the 2 stitches where you have to crochet the last 3 DCs, while the arrows show the top of the 3 DCs (of any shell) that you have to consider for the joining.
Start to work your first DC of the face : wrap yarn around the hook, push the hook in the first stitch (first white dot on the right), wrap the yarn again, pull yarn to the front (3 loops), wrap yarn and pull it trough the first 2 loops : half DC is done ! Now, push your hook (from the front of the work) in the first DC of the body (first arrow on the right), wrap yarn around the hook, pull it trough the stitch and the 2 loops left on the hook : first DC and join are done !!!
Repeat the same sequence other 2 times, working the 2 DCs in the second stitch of the face (the white dot on the left). After the 3rd DC is completed, slip stitch in the first DC of the face, cut yarn, fasten off and trim in the ends.
Look at what you gained :


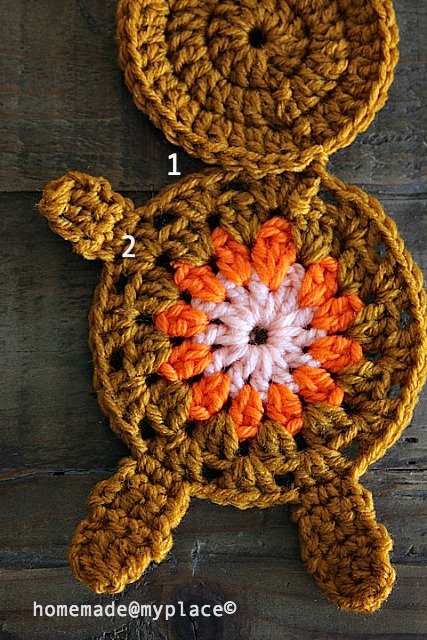
LEGS & ARMS
Turn your gingerbread man-to-be upside down and count 6 shells on the body (anticlockwise), starting from the "joining" shell (and not considering it in the counting!)

The legs will be crocheted in shells 5 and 7, while arms (see later) will be crocheted in shells 2 and 10.
legs
Pick the colour for the cookie base, make a slip knot on the hook and push it in the first DC (as in above picture) and crochet your first single crochet (=SC). Then make other 2 SCs to complete your first row and chain 1, turn your work. Second row : crochet 3 SCS, chain 1, turn. Third row : crochet 3 SCs, chain 1, turn. Fourth row : crochet 3 SCS, chain 2 (!!!), turn. Fifth row : you have to crochet 3 DCS, but not complete them! When you have done with the first 2 loops (first half of your DC done), start a new DC (first half of it) in the next stitch and then another one in the last stitch, so that you will have 4 loops on your hook, as you can see

wrap yarn around the hook and pull it trough all the 4 loops

Just to have a nice rounded foot!!! Cut yarn, fasten off and trim in ends ...


Make the other leg in the same way ...

arms
the pattern is the same followed for the legs, but with less rows. In fact, you have to work only 2 rows of SCs, remembering to end the 2nd row with chain 2. The third row is exactly the same as row 5 for the legs!
Remember to crochet the arms in shells 2 and 10 !


EYES & SMILE
This is the easiest part of all our work!!!
Choose a couple of nice buttons as eyes for your gingerbread man and experiment with shapes, colours and sizes ...


… and when ready, sew them on!
In case you have the idea to gift one of your ornaments to a kid not yet 3 years old, please remember to put a piece of felt/thick fabric in the back of the circle and fix the thread on it with some knots !


"But Gingerbread Man! What big eyes you have!"said the crocheter ...
"The better to see you with, my dear" replied the Gingerbread Man ...
… but maybe this another fairy tale, right ??? ;oD
and then slip stitch (8/10 slip stitches) a colourful happy smile, just along the line between the 2nd and 3rd round of the face …


BACK HEAD & HANGING LOOP
When starting the paragraph about the face, you have noticed brackets with inside written "make 2", right?
Well, this second circle, made exactly as the first one, is needed right now to complete the head of the gingerbread man ..


So, you need to crochet a 3 rounds circle of DCs, that will end with 36 stitches, but please don't make a slip stitch to close it … wait …
Find the stitch in the top of the gingerbread man's head and point it out with the help of the yarn needle … push your hook into the top of the first DC of the 2nd circle and push it trough (from the back of the work) even the top of the stitch of the first circle (=face) like here …


and start slip stitching in each stitch, around the head !

Be aware that when you reach the base of the head (where we joined body to face before), it will not be easy to slip stitch the 2 circles together, so just slip stitch (3 times) the stitches on the 2nd circle and start to slip stitch together after these 3 stitches. It will form a little gap in the back of the ornament, but luckily this will not ruin your work!
When you do the last slip stitch (you are back to the top of your ornament), chain 20 to make the hanging loop!

Close the loop in the back of your work, with a slip stitch in the first chain. Cut yarn, fasten off and trim the excess of yarn !!! DONE !!!!!! ;oD
" Run, run as fast as you can!"
"You can't catch me. I'm the Gingerbread Man!"


… quite addictive!!!!!
xxxx Alessandra
P.S. : I'm so sorry for the quality of this post, as it seems some anarchy ruled here!!! The colours, during the typing, were not obeying me at all!!! I've tried to correct the result different times, but with no results! Sorry for that!!!!
Today links : Craft Schooling Sunday and Link your Stuff!
The differences between two cookies done slight differently will be minimal, as you can see ...


FACE (make 2)
You need to crochet a 3 rounds circle of DCs!
Pick the colour for the cookie base (that is the same one used for the last round of the gingerbread man's body) and make a slip knot on your hook, chain 4 and make a slip stitch in the first chain to make a ring.
First round : chain 2, crochet 12 DCs into the ring, then slip stitch in the top of the first DC. Now you can pull the yarn tail of the beginning to reduce the hole of the ring and cut the excess of yarn.
Second round : chain 2 and work 2 DCs in the same stitch. Crochet 2 DCs in each following stitch, so that at the end of the round you will have 24 DCs. Slip stitch in the top of the first DC and your round is completed.
Third round : chain 2 and crochet 1 DC in the same stitch, then crochet 2 DCs in the next stitch. Repeat this pattern : 1 DC in every odd stitch + 2 DCs in every even stitch. Stop when you've crocheted stitch 33, because you need to join the face to the body !!!
Collect the body and put it in front of the face-to-be, as follows :

You have the gingerbread man's face still on the hook and you need to crochet the last 3 DCS to complete it … and while completing the 3 DCs, you will even join the face to the body (so no sewing required!) . How ?
Observe the situation :

In the above picture, you can see 2 white dots that point out the 2 stitches where you have to crochet the last 3 DCs, while the arrows show the top of the 3 DCs (of any shell) that you have to consider for the joining.
Start to work your first DC of the face : wrap yarn around the hook, push the hook in the first stitch (first white dot on the right), wrap the yarn again, pull yarn to the front (3 loops), wrap yarn and pull it trough the first 2 loops : half DC is done ! Now, push your hook (from the front of the work) in the first DC of the body (first arrow on the right), wrap yarn around the hook, pull it trough the stitch and the 2 loops left on the hook : first DC and join are done !!!
Repeat the same sequence other 2 times, working the 2 DCs in the second stitch of the face (the white dot on the left). After the 3rd DC is completed, slip stitch in the first DC of the face, cut yarn, fasten off and trim in the ends.
Look at what you gained :


LEGS & ARMS
Turn your gingerbread man-to-be upside down and count 6 shells on the body (anticlockwise), starting from the "joining" shell (and not considering it in the counting!)

The legs will be crocheted in shells 5 and 7, while arms (see later) will be crocheted in shells 2 and 10.
legs
Pick the colour for the cookie base, make a slip knot on the hook and push it in the first DC (as in above picture) and crochet your first single crochet (=SC). Then make other 2 SCs to complete your first row and chain 1, turn your work. Second row : crochet 3 SCS, chain 1, turn. Third row : crochet 3 SCs, chain 1, turn. Fourth row : crochet 3 SCS, chain 2 (!!!), turn. Fifth row : you have to crochet 3 DCS, but not complete them! When you have done with the first 2 loops (first half of your DC done), start a new DC (first half of it) in the next stitch and then another one in the last stitch, so that you will have 4 loops on your hook, as you can see

wrap yarn around the hook and pull it trough all the 4 loops

Just to have a nice rounded foot!!! Cut yarn, fasten off and trim in ends ...


Make the other leg in the same way ...

arms
the pattern is the same followed for the legs, but with less rows. In fact, you have to work only 2 rows of SCs, remembering to end the 2nd row with chain 2. The third row is exactly the same as row 5 for the legs!
Remember to crochet the arms in shells 2 and 10 !


EYES & SMILE
This is the easiest part of all our work!!!
Choose a couple of nice buttons as eyes for your gingerbread man and experiment with shapes, colours and sizes ...


… and when ready, sew them on!
In case you have the idea to gift one of your ornaments to a kid not yet 3 years old, please remember to put a piece of felt/thick fabric in the back of the circle and fix the thread on it with some knots !


"But Gingerbread Man! What big eyes you have!"said the crocheter ...
"The better to see you with, my dear" replied the Gingerbread Man ...
… but maybe this another fairy tale, right ??? ;oD
and then slip stitch (8/10 slip stitches) a colourful happy smile, just along the line between the 2nd and 3rd round of the face …


BACK HEAD & HANGING LOOP
When starting the paragraph about the face, you have noticed brackets with inside written "make 2", right?
Well, this second circle, made exactly as the first one, is needed right now to complete the head of the gingerbread man ..


So, you need to crochet a 3 rounds circle of DCs, that will end with 36 stitches, but please don't make a slip stitch to close it … wait …
Find the stitch in the top of the gingerbread man's head and point it out with the help of the yarn needle … push your hook into the top of the first DC of the 2nd circle and push it trough (from the back of the work) even the top of the stitch of the first circle (=face) like here …


and start slip stitching in each stitch, around the head !

Be aware that when you reach the base of the head (where we joined body to face before), it will not be easy to slip stitch the 2 circles together, so just slip stitch (3 times) the stitches on the 2nd circle and start to slip stitch together after these 3 stitches. It will form a little gap in the back of the ornament, but luckily this will not ruin your work!
When you do the last slip stitch (you are back to the top of your ornament), chain 20 to make the hanging loop!

Close the loop in the back of your work, with a slip stitch in the first chain. Cut yarn, fasten off and trim the excess of yarn !!! DONE !!!!!! ;oD
 |
| front |
 |
| back |
" Run, run as fast as you can!"
"You can't catch me. I'm the Gingerbread Man!"


… quite addictive!!!!!
xxxx Alessandra
P.S. : I'm so sorry for the quality of this post, as it seems some anarchy ruled here!!! The colours, during the typing, were not obeying me at all!!! I've tried to correct the result different times, but with no results! Sorry for that!!!!
Today links : Craft Schooling Sunday and Link your Stuff!
Please, show me your makes on IG using the following hashtag : #homemadeatmyplaceoriginals or tagging me @alessandrapoggiagliolmi .
Text, Design and Photography : Alessandra Poggiagliolmi
All Rights Reserved. No part of this pattern may be reproduced or transmitted in any form or by any means, without the prior written permission of the copyright holder.
They are adorable Ale! They certainly have your touch as they are so sweet and funny and colourful. (Hey, that' s a description of you :-)) Thanks for all the work by sharing the pattern with so many pretty photo's!
ReplyDeleteLots of love from Mirjam.
..... lovely description of me !!!! <3 <3 <3
DeleteHope you will try one soon!!!!
xxxxxxxx Ale
Super cute Ale! TFS!
ReplyDeleteClever Ale! And great job for starting the Christmas thinking!
ReplyDeleteKate :}
Such a cutie! Really nice, Ale.
ReplyDeleteI love them, they're really great. I love the smile! just need some gingerbread colour wool. X
ReplyDeleteThere you are my friend, I'm sure you were shocked to see all those contributors, unfortunately not enough are crafts! love these little guys, adorable and thanks for sharing on craft schooling Sunday!
ReplyDeleteyes! I noticed the crowd!!!!!! ;oD
Deleteyou are waelcome, as usual!!!!
xxxxxxx Ale
incredibile! amo tutti, ma soprattutto il turchese!
ReplyDeletetutti questi faranno che sorrido per una volta!
grazie per il modello, Ale!
Hi Ale, I like gingerbreadman. With love Chantal X
ReplyDeleteSuch a cute project and clearly and well written and photographed tutorial! Thank you for sharing this, have to make my own gingerbread man!
ReplyDeleteThank you for liking it!!!! When ready, I would love to "meet" your gingerbread man!!!! ;oD
Deletexxxxxx Ale
Cute project and great tutorial! Adore these gingerbread figures :)
ReplyDeletehello alessandra...i followed the link to this project from your gingerbread softies...your figures bring
ReplyDeletea smile to my face...i am enjoying making these little guys...thank you for sharing your talents with us...take care...sally
you are more than welcome!!!!! ;oD
Deletexxxxx Ale