…. Well, last year it was a lot of fun participating at this link-up, so why not join again this year, too ????
HERE you can find all the links of the projects of this year !!!! This 2014 Crafty Christmas Tutorial Link-Up is hosted by Laura Howard of Bugs and Fishes !!!!! Thank you Laura !!!!
So here I'm, with new ornaments to share with you all ….

…. oh sure, it's another crochet project (as last year : click here) !!!!! It's a colourful one ! It presents some different options ( Santa with or without gloves and boots; pom pom or not ? for Santa's hat or just a simple brim - or you prefer scallops ?- for his slouchy beanie !) and it doesn't require a lot of yarn or time, but some patience !!! This is why I think this project is not suitable for crochet beginners, not because of difficult stitches involved, but because some experience in the field helps and avoid some stress in the accomplishment of the steps you need to follow to crochet this little fella!!! ;oD
So, you need to gather :


HERE you can find all the links of the projects of this year !!!! This 2014 Crafty Christmas Tutorial Link-Up is hosted by Laura Howard of Bugs and Fishes !!!!! Thank you Laura !!!!
So here I'm, with new ornaments to share with you all ….
…. oh sure, it's another crochet project (as last year : click here) !!!!! It's a colourful one ! It presents some different options ( Santa with or without gloves and boots; pom pom or not ? for Santa's hat or just a simple brim - or you prefer scallops ?- for his slouchy beanie !) and it doesn't require a lot of yarn or time, but some patience !!! This is why I think this project is not suitable for crochet beginners, not because of difficult stitches involved, but because some experience in the field helps and avoid some stress in the accomplishment of the steps you need to follow to crochet this little fella!!! ;oD
So, you need to gather :
- a hook (I used a 3,5 mm one)
- some yarn (white and black for sure, then some pink for the face and more colours to define the body). I'm using acrylic, because is not a heavy yarn.
- buttons or sequins or jewel brads as eyes (if you prefer, you can just embroider them on Santa's face)
- a pair of scissors
- pink felt (to sew on the back of Santa's face)
- cotton threads : to sew on the beard and the hat (white) and for the felt (pink)
- yarn and sewing needles
- stitch markers (optional)
- a pencil + a glass to trace a circle on the pink felt
Please remember that I'm using the US crochet terminology, thank you !
I tend to trim in the ends of the work asap !
You can find my ravelry notes HERE !!!
I tend to trim in the ends of the work asap !
You can find my ravelry notes HERE !!!
The first part to start with is
HOW TO CROCHET SAINT NICK BODY
Collect your selected hook and the white yarn. Make a slip knot on the hook , chain 4 and make a
slip stitch in the first stitch to form a ring.
slip stitch in the first stitch to form a ring.
FIRST ROUND : chain 2 and crochet your first double crochet (DC) into the ring. Add 11 DCs, so that you'll have 12 DCs at the end of this round. Close the round with a slip stitch in the top of your first DC, then fasten off. Before trimming in the yarn at the centre of your ring, pull the yarn to reduce the hole of the ring.


SECOND ROUND : pick the black yarn now. Join the new yarn, in any space between two DCs with a slip stitch, chain 1, crochet 2 DCs : this is your first shell. Make other 11 shells of 2 DCs each in the following spaces . At the end of the round, you'll have 12 shells. Make a slip stitch at the top of the first DC to close the round. Fasten off. Look at the star you just made : so Christmassy, no ? ;oD


THIRD ROUND : choose a new colour : whatever you like for your Saint Nick!!!! Join the new yarn, in any space between two shells with a slip stitch and chain 1, then crochet 3 DCs in the same space. Make in every next space a shell of 3 DCs, so that at the end of the round, you'll have 12 shells. Close the round with a slip stitch in the top of your first DC. PLEASE, DO NOT FASTEN OFF !!!! Keep this same colour for the next and last round!!!! ;oD


FOURTH ROUND : with the same yarn, make 2 slip stitches in the 2nd and 3rd DCs of the first shell , make another slip stitch in the first space between two shells you encounter. Now, chain 2 and make 3 DCs in this same space (your first shell) and then chain 1 (= chain-1 space). Repeat other 11 times (3 DCs + chain 1). After the last chain-1 space, make a slip stitch in your first DC, so that you can complete your last round. Now, you can fasten off !!! Your first Saint Nick body is done !!!!


…. And next ????
HOW TO CROCHET SAINT NICK FACE

This time we need just one colour ! No fasten off until the end of the third round !!!! ;oD
You can pick any colour for your Saint Nick face. I've chosen pink because I have boxes of pink, so it's better to use some, right? Please, note that if you choose a different colour from pink, you need to select felt and cotton thread in accordance with your personal choice !!!
FIRST ROUND : collect your hook and make a slip knot on with the chosen yarn. Chain 4 and slip stitch in the first stitch to form a ring. Chain 2 and crochet 12 DCs. To close this round, just make a slip stitch in the top of the first DC.


SECOND ROUND : chain 2 and work 2 DCs in the same stitch. Then crochet 2 DCs in each of the following stitches of the first round. At the end of the round, you'll have 24 DCs. Make a slip stitch in the top of your first DC. This round is complete.


THIRD ROUND : chain 2 and make 1 DC, while in the second stitch crochet 2 DCs. Repeat this pattern (1 DC + 2 DCs) almost till the end of this round. In fact, you have to stop just before the end of this round, leaving the last 2 stitches of the previous round unworked. See pictures.


WHY ??? Just because in this way we can join the face to the body without sewing !!!! How cool is that ? ;oD
HOW ??? With the help of some pics, of course !!!! … and the right words, I hope !!! ;oD
Collect both the body and the face of Saint Nick and put them side by side (keeping the front of them in front of you) and choose any shell of the body to pair with the "hole" of the face …

Then, collect the face-to-be and start to work a DC in the usual way : insert the hook in the first stitch left of the second round, wrap the yarn in the back and pull it trough the stitch, yarn over and pass it trough the first two loops on your hook . Half of your DC is done.


Now, after collecting the body, insert your hook in the top of the first stitch (the one on the right) of the shell, right in the middle …

…. then wrap the yarn in the back ….

…. and pull it trough to the front …

… and complete your DC, pulling the yarn through the last two loops !!! ….

You have to repeat this kind of exercise two more times, for the last two DCs !!!
Insert your hook in the next (and last) stitch of the face …

…. and on and on you crochet ….


…. almost joined together!!!!! Now that you have completed the last DC of the face, just make a slip stitch in the first DC of the third round of the face and … remember to fasten off!!!


HOW TO CROCHET SAINT NICK BEARD
Some white yarn this time !!!

Make a slip knot on your hook, chain 4 and slip stitch in the first chain to make a ring.
FIRST ROUND : chain 2, make 3DCs, chain 2 and repeat (3 DCs + chain 2) other 3 times.
Slip stitch in the first DC to close the round.

SECOND ROUND : make 2 slip stitches in the 2nd and 3rd DCs of the first shell and one more slip stitch in the first corner. Chain 2, 3 DCs, chain 2, 3 DCs in the same corner …

… chain 1, 1 DC, 2 trebles (Tr), chain2, 2 Tr, 1 DC in the second corner …

… chain 1, 3 DCs, chain 2, 3 DCs in third corner …

… and fasten off !!!

Collect your face+body and choose the right placement for the beard and sew it on …


I sew, with the help of white cotton thread and a needle (!!!!), the beard from side to side, leaving the bottom free.
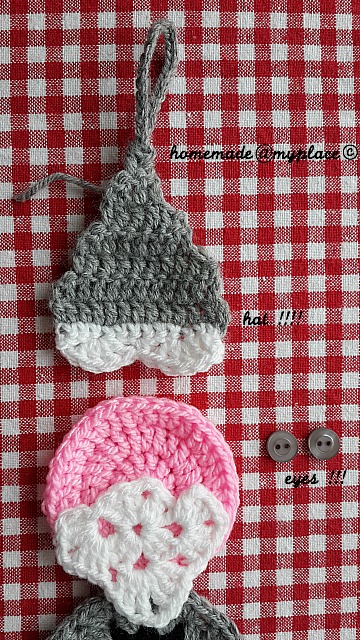
HOW TO CROCHET SAINT NICK HAT, ADD THE EYES and THE PIECE OF FELT


I like to match the hat with the same colour chosen for the body, but you can do as you wish. I didn't want a regular triangle for my Santa, so I tried to crochet it more like a slouchy beanie !!!
To start the hat, pick your hook and the yarn, make a slip knot and chain 16 .
ROW 1 : wrap the yarn around the hook, push it in the 5th chain from the hook ( this counts as your second DC; the first one is formed by the chains) and crochet 11 DCs. You have13 stitches in total.


ROW 2 : turn your work , chain 2 and make 1 DC in the second stitch of the row. In the next stitches, excluding the last one, crochet 10 DCs. You have 11 stitches in total. In this row we start to decrease, avoiding to crochet a DC in the first stitch and in the last stitch! We'll follow this same "rule" for the following rows, too. Remember that !!! ;oD


ROW 3 : turn your work, chain 2, make 1 DC in the second stitch , crochet 8 more DCs. You have a total of 9 DCS.
ROW 4 : turn your work, chain 2, make 1 DC in the second stitch, crochet 6 more DCs. You have a total of 7 DCs.
ROW 5 : turn your work, chain 2, make 1 DC in the second stitch, crochet 4 more DCs. You have a total of 5 DCs.
ROW 6 : turn your work, chain 2, make 1 DC in the second stitch, crochet 2 more DCs. You have a total of 3 DCs.
ROW 7 : turn your work, chain 2, make 1 DC in the second stitch. DONE! You reached the top of your Santa's hat ! ;oD

DON'T FASTEN OFF !!!!
In fact, from the top of the hat you can start the loop (chain, at least, 25 !), that will be so useful to hang your Saint Nick ! To close the loop, just slip stitch the last chain into the first chain made ! Don't cut the tail : it will be so useful to knot the pom pom at the hat ! ;oD


…. Obviously, a Santa's hat cannot miss a brim ... a simple one or with scallops ???
Well, turn the hat upside-down and collect some white yarn ! Notice that you'll work on the back of the hat as a start !

With the white yarn make 13 SCs for the brim of the hat …

… turn your work and chain 1 ….

… and start your first scallop, made of 4 DCs (worked in the 4th stitch from the beginning of the row) and attach it, with 1 SC, made in the 7th stitch from the beginning of the row ….

Some details of both scallops …


The centre of the second scallop is in the 10th stitch, while the last SC is in the last stitch of the row.
Fasten off and trim in the ends.
If you don't like scallops and prefer a simple brim, then just crochet 13 SCs with the white yarn, working (this time) in the front of the hat. Fasten off and trim.
You have to add a POM POM at the top of the hat ! You can choose to use a pom pom maker or to crochet one : chain 4, slip stitch to make a ring and work 10 DCs into the ring . Close the round with a slip stitch in the top of the first DC. Attach the pom pom with some knots in the back of the hat !
Before to sew the hat on the face of Saint Nick, you need to choose which kind of EYES to sew on … buttons ? embroidered ones? sequins? jewel brads ? what fits you is fine, but please, if you decide to gift your Saint Nick to a child, be really careful in your eyes selection ! Thank you !
First the eyes …
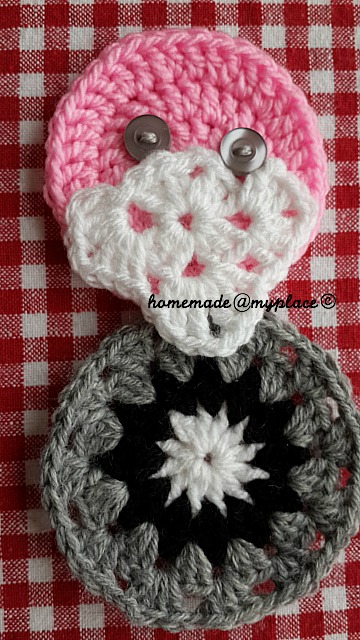
… then the hat …

To hide all the threads in the back of the head, just trace, with the help of the pencil and a glass, a circle on a piece of felt and sew it using the blanket stitch, for example …

HOW TO CROCHET GLOVES AND BOOTS FOR SAINT NICK
Are you still there ? Are you brave enough? ;oD
If you love the idea to complete your Saint Nick outfit with a pair of gloves and boots, well WHY NOT ???

The picture will give you an idea where to crochet those accessories for your Santa …

The arrows/stars indicate the chain-1 spaces where to crochet gloves & boots …

You have to collect some white yarn and crochet 3 SCs in each chain-1 space selected. Crochet these stitches working on the back of Saint Nick body, while in the front work both gloves and boots

GLOVES : in the first SC, join the blue yarn (just to simplify) with a SC and work the first DC without completing it : like in a puff stitch, where you have several half-doubles (in our case just 3), that is making two loops on the hook for every repeat. When worked the last half-double, pull the yarn through all the loops on the hook and you will remain with one loop. Fasten off. Repeat the same for the other glove !
BOOTS : like in a granny square, crochet a shell of 3 DCs (join the yarn in the first stitch with a SC). Fasten off. Repeat the same for the other boot.
Then, trim in all the ends ….


… Hope you had fun !!!!!!
If you don't fancy to assemble a Saint Nick, you can just use the single pieces (hats, beards, bodies, faces …) to decorate your presents or cards. You can also make little buntings or mini decorations to hang on your tree. Maybe some brooches? Or decorations sets ? Stockings fillers? Or appliqué for scarves, blankets, hats ….. Well, the possibilities are endless !!!! Choose the one that makes you happy to crochet it !!!! ;oD
xxxx Alessandra
Other links : Busy Fingers Showing Off #68, Craft Schooling Sunday and Link your Stuff!
,


SECOND ROUND : pick the black yarn now. Join the new yarn, in any space between two DCs with a slip stitch, chain 1, crochet 2 DCs : this is your first shell. Make other 11 shells of 2 DCs each in the following spaces . At the end of the round, you'll have 12 shells. Make a slip stitch at the top of the first DC to close the round. Fasten off. Look at the star you just made : so Christmassy, no ? ;oD


THIRD ROUND : choose a new colour : whatever you like for your Saint Nick!!!! Join the new yarn, in any space between two shells with a slip stitch and chain 1, then crochet 3 DCs in the same space. Make in every next space a shell of 3 DCs, so that at the end of the round, you'll have 12 shells. Close the round with a slip stitch in the top of your first DC. PLEASE, DO NOT FASTEN OFF !!!! Keep this same colour for the next and last round!!!! ;oD


FOURTH ROUND : with the same yarn, make 2 slip stitches in the 2nd and 3rd DCs of the first shell , make another slip stitch in the first space between two shells you encounter. Now, chain 2 and make 3 DCs in this same space (your first shell) and then chain 1 (= chain-1 space). Repeat other 11 times (3 DCs + chain 1). After the last chain-1 space, make a slip stitch in your first DC, so that you can complete your last round. Now, you can fasten off !!! Your first Saint Nick body is done !!!!


…. And next ????
HOW TO CROCHET SAINT NICK FACE
This time we need just one colour ! No fasten off until the end of the third round !!!! ;oD
You can pick any colour for your Saint Nick face. I've chosen pink because I have boxes of pink, so it's better to use some, right? Please, note that if you choose a different colour from pink, you need to select felt and cotton thread in accordance with your personal choice !!!
FIRST ROUND : collect your hook and make a slip knot on with the chosen yarn. Chain 4 and slip stitch in the first stitch to form a ring. Chain 2 and crochet 12 DCs. To close this round, just make a slip stitch in the top of the first DC.

SECOND ROUND : chain 2 and work 2 DCs in the same stitch. Then crochet 2 DCs in each of the following stitches of the first round. At the end of the round, you'll have 24 DCs. Make a slip stitch in the top of your first DC. This round is complete.


THIRD ROUND : chain 2 and make 1 DC, while in the second stitch crochet 2 DCs. Repeat this pattern (1 DC + 2 DCs) almost till the end of this round. In fact, you have to stop just before the end of this round, leaving the last 2 stitches of the previous round unworked. See pictures.


WHY ??? Just because in this way we can join the face to the body without sewing !!!! How cool is that ? ;oD
HOW ??? With the help of some pics, of course !!!! … and the right words, I hope !!! ;oD
Collect both the body and the face of Saint Nick and put them side by side (keeping the front of them in front of you) and choose any shell of the body to pair with the "hole" of the face …

Then, collect the face-to-be and start to work a DC in the usual way : insert the hook in the first stitch left of the second round, wrap the yarn in the back and pull it trough the stitch, yarn over and pass it trough the first two loops on your hook . Half of your DC is done.


Now, after collecting the body, insert your hook in the top of the first stitch (the one on the right) of the shell, right in the middle …

…. then wrap the yarn in the back ….

…. and pull it trough to the front …

… and complete your DC, pulling the yarn through the last two loops !!! ….

You have to repeat this kind of exercise two more times, for the last two DCs !!!
Insert your hook in the next (and last) stitch of the face …

…. and on and on you crochet ….


…. almost joined together!!!!! Now that you have completed the last DC of the face, just make a slip stitch in the first DC of the third round of the face and … remember to fasten off!!!


HOW TO CROCHET SAINT NICK BEARD
Some white yarn this time !!!
Make a slip knot on your hook, chain 4 and slip stitch in the first chain to make a ring.
FIRST ROUND : chain 2, make 3DCs, chain 2 and repeat (3 DCs + chain 2) other 3 times.
Slip stitch in the first DC to close the round.

SECOND ROUND : make 2 slip stitches in the 2nd and 3rd DCs of the first shell and one more slip stitch in the first corner. Chain 2, 3 DCs, chain 2, 3 DCs in the same corner …

… chain 1, 1 DC, 2 trebles (Tr), chain2, 2 Tr, 1 DC in the second corner …

… chain 1, 3 DCs, chain 2, 3 DCs in third corner …

… and fasten off !!!

Collect your face+body and choose the right placement for the beard and sew it on …


I sew, with the help of white cotton thread and a needle (!!!!), the beard from side to side, leaving the bottom free.
HOW TO CROCHET SAINT NICK HAT, ADD THE EYES and THE PIECE OF FELT
I like to match the hat with the same colour chosen for the body, but you can do as you wish. I didn't want a regular triangle for my Santa, so I tried to crochet it more like a slouchy beanie !!!
To start the hat, pick your hook and the yarn, make a slip knot and chain 16 .
ROW 1 : wrap the yarn around the hook, push it in the 5th chain from the hook ( this counts as your second DC; the first one is formed by the chains) and crochet 11 DCs. You have13 stitches in total.


ROW 2 : turn your work , chain 2 and make 1 DC in the second stitch of the row. In the next stitches, excluding the last one, crochet 10 DCs. You have 11 stitches in total. In this row we start to decrease, avoiding to crochet a DC in the first stitch and in the last stitch! We'll follow this same "rule" for the following rows, too. Remember that !!! ;oD


ROW 3 : turn your work, chain 2, make 1 DC in the second stitch , crochet 8 more DCs. You have a total of 9 DCS.
ROW 4 : turn your work, chain 2, make 1 DC in the second stitch, crochet 6 more DCs. You have a total of 7 DCs.
ROW 5 : turn your work, chain 2, make 1 DC in the second stitch, crochet 4 more DCs. You have a total of 5 DCs.
ROW 6 : turn your work, chain 2, make 1 DC in the second stitch, crochet 2 more DCs. You have a total of 3 DCs.
ROW 7 : turn your work, chain 2, make 1 DC in the second stitch. DONE! You reached the top of your Santa's hat ! ;oD
DON'T FASTEN OFF !!!!
In fact, from the top of the hat you can start the loop (chain, at least, 25 !), that will be so useful to hang your Saint Nick ! To close the loop, just slip stitch the last chain into the first chain made ! Don't cut the tail : it will be so useful to knot the pom pom at the hat ! ;oD
…. Obviously, a Santa's hat cannot miss a brim ... a simple one or with scallops ???
Well, turn the hat upside-down and collect some white yarn ! Notice that you'll work on the back of the hat as a start !
With the white yarn make 13 SCs for the brim of the hat …
… turn your work and chain 1 ….
… and start your first scallop, made of 4 DCs (worked in the 4th stitch from the beginning of the row) and attach it, with 1 SC, made in the 7th stitch from the beginning of the row ….
Some details of both scallops …
The centre of the second scallop is in the 10th stitch, while the last SC is in the last stitch of the row.
Fasten off and trim in the ends.
If you don't like scallops and prefer a simple brim, then just crochet 13 SCs with the white yarn, working (this time) in the front of the hat. Fasten off and trim.
You have to add a POM POM at the top of the hat ! You can choose to use a pom pom maker or to crochet one : chain 4, slip stitch to make a ring and work 10 DCs into the ring . Close the round with a slip stitch in the top of the first DC. Attach the pom pom with some knots in the back of the hat !
Before to sew the hat on the face of Saint Nick, you need to choose which kind of EYES to sew on … buttons ? embroidered ones? sequins? jewel brads ? what fits you is fine, but please, if you decide to gift your Saint Nick to a child, be really careful in your eyes selection ! Thank you !
First the eyes …
… then the hat …
To hide all the threads in the back of the head, just trace, with the help of the pencil and a glass, a circle on a piece of felt and sew it using the blanket stitch, for example …

HOW TO CROCHET GLOVES AND BOOTS FOR SAINT NICK
Are you still there ? Are you brave enough? ;oD
If you love the idea to complete your Saint Nick outfit with a pair of gloves and boots, well WHY NOT ???

The picture will give you an idea where to crochet those accessories for your Santa …

The arrows/stars indicate the chain-1 spaces where to crochet gloves & boots …

You have to collect some white yarn and crochet 3 SCs in each chain-1 space selected. Crochet these stitches working on the back of Saint Nick body, while in the front work both gloves and boots

GLOVES : in the first SC, join the blue yarn (just to simplify) with a SC and work the first DC without completing it : like in a puff stitch, where you have several half-doubles (in our case just 3), that is making two loops on the hook for every repeat. When worked the last half-double, pull the yarn through all the loops on the hook and you will remain with one loop. Fasten off. Repeat the same for the other glove !
BOOTS : like in a granny square, crochet a shell of 3 DCs (join the yarn in the first stitch with a SC). Fasten off. Repeat the same for the other boot.
Then, trim in all the ends ….

… Hope you had fun !!!!!!
If you don't fancy to assemble a Saint Nick, you can just use the single pieces (hats, beards, bodies, faces …) to decorate your presents or cards. You can also make little buntings or mini decorations to hang on your tree. Maybe some brooches? Or decorations sets ? Stockings fillers? Or appliqué for scarves, blankets, hats ….. Well, the possibilities are endless !!!! Choose the one that makes you happy to crochet it !!!! ;oD
xxxx Alessandra
Other links : Busy Fingers Showing Off #68, Craft Schooling Sunday and Link your Stuff!
,
Cute! I would think the crocheting was easier than photographing and writing up the tutorial. Ha! :) Best wishes, Tammy
ReplyDeleteOh I really love them, so cute.
ReplyDeleteGrtz,
Chris
Thank you Chris!!!!
Deletexxxxx Ale
Great tutorial, a lot of work but fun to do! They are cute, byebye Francien
ReplyDeleteThank you my dear Francien!!! ;oD
Deletexxxxxx Ale
Troppo simpatici!E sempre complimenti per la grande pazienza nel fare il tutorial!Baci!
ReplyDeleteLovely,so cute <3!!!
ReplyDeleteGreeting.:*
What a wonderful tutorial!! They are so much fun. I hope that you enjoyed them too. xx
ReplyDeleteVery clever Ale!! Great tutorial!
ReplyDeleteKate :}
What a grea tutorial. I guess it took some time to make it. ove the santa's but for now I'm busy making your christmas tree decorations. Love Tinie
ReplyDeleteColorful and adorable��
ReplyDeletethank you Andre'e!!!!! ;oD
Deletexxxxxx Ale
Excellent tutorial - thanks.
ReplyDeleteyou are more than welcome, Gillian!!!! ;oD
Deletexxxxxx Ale
Lovely!!
ReplyDeleteI love these little Santa's - they are so cute!! Thank you for sharing your tutorial Ale. :)
ReplyDeleteit's a great pleasure, Debi ! ;oD
Deletexxxxxx Ale
Hopped over here from Carina's Craftblog, and so glad I did! Do you think I could do these in size 10 cotton for a tiny ornament, or is that just asking for all kinds of trouble? ;) Thanks for the tutorial!!
ReplyDeleteHi Ellie !!!! thank you for your visit!
ReplyDeleteI think you can have a try and I wish you luck!!!! ;oD
xxxxxx Ale
Wonderful tutorials; i love them all, thank you!
ReplyDeleteIt's a pleasure!!! Have fun crocheting, xxxxx Ale
Delete