When I left you last time, I was starting to work on row 11, that was completed in a blink of the eye …


Then followed : row 12 …


row 13 …


and row 14 …


…. and these pics show you the muzzle's details developed little by little ….


…. and then the last row, # 15 was DONE ……


I think I can share with you some exhaustive facts about this piece of work, as promised last time we met !!!! ;oD
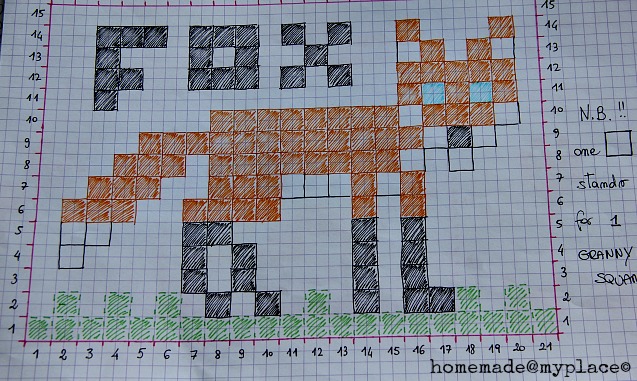
The original design is not mine. In fact, the inspiration comes from a pencil case named Freddy the Fox Zipper Bag/ Case/ Pouch (here) handmade by tinymeat . I made a sketch on a squared paper, that had gone under some changes from the original :


Then followed : row 12 …
row 13 …
and row 14 …
…. and these pics show you the muzzle's details developed little by little ….
…. and then the last row, # 15 was DONE ……
I think I can share with you some exhaustive facts about this piece of work, as promised last time we met !!!! ;oD
The original design is not mine. In fact, the inspiration comes from a pencil case named Freddy the Fox Zipper Bag/ Case/ Pouch (here) handmade by tinymeat . I made a sketch on a squared paper, that had gone under some changes from the original :
- I preferred to use just a pale orange for the fox, no yellow added
- the top of the tail has one more square/pixel
- the ears have a different shape (but same number of squares/pixels)
- blue eyes instead of black ones
- the point of the chin is white, no orange
- I've added the word FOX
- I decided to change one orange square/pixel into a white one, for the top of the fox chest
- I reduced the columns from 22 to 21, just avoiding a neck for the fox
This piece of fabric measures : 70cmX50cm, with a base made with 21 granny squares (as each row) and columns of 15 grannies each. There are 315 granny squares in total.
Colours used : hot pink (background, 197 squares)
orange (main colour for the fox, 63 squares)
black (paws/legs, nose, letters, 38 squares)
white (tail, muzzle, belly, chest, 15 squares)
blue (eyes, 2 squares)
This is the scheme followed ( I started to work from the base to the top, from left to right ) ;
If you prefer, you could add some extras like a blue sky, some clouds or green grass ….
In the above option, the numbers of the grannies for the background can be reduced to 170, adding 27 green ones instead !!!
Each granny square is made of just two rounds and one colour each time, as follow (US crochet terms) :
make a slip knot on the hook, chain 4 and slip stitch in the first chain to form a ring.
first round : chain 3 and crochet 2 double crochets (you have your first shell), (chain 3 + 3 DCs)* 3 times, chain 3 and slip stitch in the top of the first "chain 3" of this round.
second round : with the same yarn chain 4 and in the first corner : 3 DCs, chain 3, 3 DCs, chain 1. Repeat from the first 3 Dcs to chain 1 for the following two corners. In the fourth corner : 3 DCs, chain 3, 2 DCs and make a slip stitch in the 3rd stitch of the first " chain 4". Fasten off.
I made a photo tutorial for a basic granny square, but this was intended for a multicoloured one !
The granny squares have been joined little by little, using the classic join as you go method. If you need any good tutorial to look at, I suggest you the ones from here, here, here, here and a video found here !!!!!
All the tails from each granny, were trimmed while working. I started to trim after each square was done, but this way was too slow. So I decided to trim groups of tails ( more or less, 6 squares at a time) and it was mandatory to complete this work at the end of each row. If not, I didn't start a new row !!!!
If you need some good tips, have a look here !!!!
At this point you have all the informations you need to crochet your own fox, but I know that the curious ones would love to have an idea what I'm going to do with my fox….. ;OD
Well, at this right moment I know what my fox will be, but…..
I need a new blog post to reveal this last step !!!!!!
You can find the other foxy posts just browsing here, here and here !!!!!
xxxx, Alessandra
Today I join : Link your Stuff ! and Craft Schooling Sunday and a new one : yarn it all ! !!!!
Amazing:)thx for "how to"kiss
ReplyDeleteyou are really welcome!!!!!
Deletexxxxxxx Ale
WAUW !!
ReplyDeleteOh I really love your fox, good job on such a big project.
ReplyDeleteGrtz,
Chris
thank you my dear!
Deletexxxxxxx Ale
Wow! It's fabulous! So bright and cheer! Clever lady.
ReplyDeleteHi A, wow, what an amazing project. And it turns out so well, fresh colors for the background so we can see the fox:) clearly. I am curious for your next blog post, I was looking at it and thought, I would make a few strings at the top and hang it on a good spot on my wall:))))) byebye Francien
ReplyDeleteI think that hanging it would be so nice !!!! Then imagine a series of pixelated animals all together hanging from a wall… awwwww!!!!!
Deletesee you soon and thank you, xxxxx Ale
Wow it's beautiful♡♡, you've been working hard on this fox plaid. X Chantal
ReplyDeleteIt took some time, but it was worth it!!!!
Deletexxxxxx Ale
This comment has been removed by the author.
ReplyDeleteMr Fox is indeed a fine fellow! Conratulations, Ale, he looks marvellous! And many thanks for the Granny square tuturial too.
ReplyDeleteYOU are the fox, ale♥ - really clever work and soso beautiful to see!!!
ReplyDeletexxxxo, martina
thank you Martina!!!! I love to be considered the fox here!!!!! ;oD
Deletexxxxxx ale
Great work Ale - I love seeing how you've worked it all out - brill!
ReplyDeleteHe's definitely a fantastic Mr Fox :) :) But what will you do with this wonderful piece of art???? ..... :)
Alison xx
So very cool! You never cease to amaze me. I've seen butterflies done like this before. I have been wanting to try a cross-stitch rose pattern in the same manner. Might have a go at that over the Spring Break. Thanks always for inspiring with your boundless creativity. Best wishes, Tammy
ReplyDeleteCongratulations with the result, it looks very special. And don't we love foxes! :)
ReplyDeleteWell done Ale!!
thank you Andree' !!!! The project is almost completed and I'm so curious to know your opinion about the purpose of my work!!! In few days the big reveal!!!!
Deletexxxxx Ale
Your fox looks great Ale - great work. Can't wait to see what you do with him. Have a good day. :)
ReplyDeletethank you Debi !!!!! ;oD
Deletexxxxxxxx Ale
Wow! So clever! Cannot wait to see what you are going to do with this!
ReplyDeletethank you my dear!!!!!
Deletein few hours everything will be ready!!!!
xxxxxx Ale
♥ SUPER!! love this! xxx Riitta
ReplyDeleteNow that's one fabulous fox! :) x
ReplyDeleteAlessandra - me again! You've won my Giveaway, can you send me your contact details pleeeeeeease :) :)
ReplyDeleteAlison xx
Wow, this is really amazing! You're very creative.
ReplyDeleteVery cool! I admire you for sticking with it. You really finished it quickly for something so time-consuming. He's just great!
ReplyDeletethank you so much Pammy!!!!!
DeleteIt was a good crochet challenge!!!! ;oD
xxxxxx Ale
Alessandra what an amazing piece of work - it is just perfectly stunning and I just love it. My crochet skills are not up to your level sadly but how proud I would be if I could make something as original and visual stunning as you have. Well done you - what a talented lady you are. Have a fabulous Sunday, sending you many hugs and loves
ReplyDeleteDorothy
:-)xxxxxxxxxxxxxxxxxxxxxxxxx
you are always too kind Dorothy!!!!!!
Deletethank you, have a good week, xxxxxx Ale
That's a very lovely foxy !! Well done Ale!
ReplyDeleteLove from Mirjam.
thank you Mirjam!!!!!!
Deleteenjoy your week, xxxxxx ale
Ah ah ah...che suspence!!!Sono curiosissima!Il progetto é molto simpatico e la volpe é riuscita perfettamente...ma cosa sarà???:-)))
ReplyDeleteWow, you did a great job!!
ReplyDeleteGreetings from Marijke
Che bella Ale , deve essere un lavorone assemblare i quadretti al posto giusto, questo metodo per unire i moduli non mi riesce mai molto bene , invece a te è venuto benissimo. Un abbraccio e buona giornata
ReplyDeleteMaddalena
Very cool Ale! Great job! So curious about what you're going to do with him!
ReplyDeleteKate :}
So cute! That must have taken forever! wow.
ReplyDeleteI'm hosting a series right now all about yarn projects. I'd love to have you link up anything you've made involving yarn/twine!
Yarn it All! Link Party on Bugaboo Blog
This is such an awesome project, Ale!
ReplyDeleteYour fox is just perfect and I think the writing makes it fun, too. Can't wait to see what you do with him!
Have a great week,
Sarah x
Dear Ale, what a great color explosion. The pink is splashing through my computer. I love the blanket and the fact that you made it yourself (I mean the pattern) Love from Holland, Tinie
ReplyDeleteAle this is brilliant! :o) so pink, so foxy, so cool...you are inspiring me to get back on with my crochet. I saw foxy on Pinterest the other night and I picked up my never ending granny stripes blanket straight away and did a couple of rows... :o) xxx
ReplyDeleteOhhh Alessandra realy beautiful!
ReplyDeleteThis is AmAzInG!! Love the idea and the lovely bright colours...and your fox is very foxy!!
ReplyDeleteHelen xox
I know that's what my two would yell!
ReplyDeleteWell done, Ale, this is neatly thought out. Love it.
Thank you Stel!!!!!!!
DeleteYour appreciation just made me happy!!!!
xxxxxx Ale
Fantastic job Ale! thanks for sharing on Craft Schooling Sunday!
ReplyDeleteThank you Sara!!!!
Deletexxxxxx Ale
Hermosa y muy bien explicada Gracias por compartirla!!
ReplyDelete