Oh yes!! All the times I buy a padded bra I collect the pads out : I simply don`t like them ...at all!
So, having a nice collection (both circular and triangular) of pads, I thought I could reuse them in a clever way ... and simple granny motifs gave me the idea to crochet some padded ornaments !!!

If you do the same as me, well maybe you`ll be interested to know how to crochet these peculiar and squishy ornaments, right?
WHAT YOU NEED
Leftovers of worsted/aran yarn
5mm hook
scissors
yarn needle
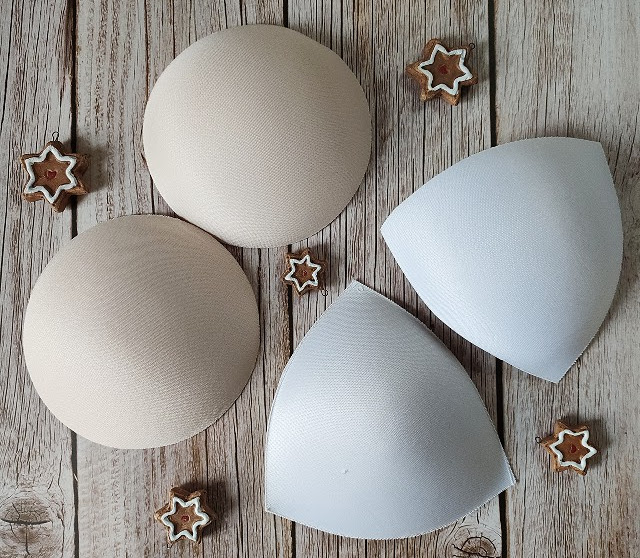
couples of removable bra pads, circular or triangular or both
matching sewing thread and needle
stuffing
baker`s twine
colourful beads (diameter : 3cm)
pins (useful when sewing together two pads)
I follow the US crochet terminology.
Please, note that the pads have sizes, so you may need to adapt the given patterns (L and XL sizes) to your own bra removable pads!
I suggest you to weave ends as you go !
PATTERN for GRANNY CIRCLE ORNAMENT
First step : sew together a couple of circular pads and before closing the gap, fill the void with some stuffing.

Round 1 : 3ch, 11DC, sl st in top of 3ch, fasten off (F.O.).
Round 2 : in any space between DCs : join new colour with a sl st, 1ch, 2DC, 1ch, (2DC, 1ch) in next space 11 times, sl st in top of first DC, F.O.
Round 3 : in any ch-1 space : join new colour with a sl st, 1ch, 3DC, 1ch, (3DC, 1ch) in next ch-1 space 11 times, sl st in top of first DC, F.O.
Round 4 : in any ch-1 space : join new colour with a sl st, 1ch, 2DC, 1ch, 2DC, (2DC, 1ch, 2DC) in next ch-1 space 11 times, sl st in top of first DC, F.O.
Round 5 : in any space between two shells : join new colour with a sl st, 1ch, 3DC, while in the next ch-1 space : 2DC, then (3DC in next space, 2DC in next ch-1 space) 11 times, sl st in top of first DC, F.O.
Work a second circle and stop at end of round 4.

We are going to join the two granny circles together using the join-as-you-method (JAYG) while working the fifth round of the second circle! The joining slip stitches are written in bold!
Start Round 5 (2nd circle) : in any space between two shell : join new colour with a sl st, 1ch, 3DC, collect the 1st circle (WS facing WS of 2nd circle), sl st in space after any 3DC shell of 1st circle, 2DC in next ch-1 space, sl st in space after 2DC of 1st circle and so on...


When you`ve joined together half of the circles, insert the stuffed pads and continue the joining

We add an extra round : 3ch, sl st in next space, 2ch, sl sl in next space, (3ch, sl st in next space, 2ch, sl st in next space) 11 times, F.O.
Weave in ends.


First step : sew together a couple of triangular pads and before closing the gap, fill the void with some stuffing.
You will notice less photos for this pattern, but this is because the process is the same as the previous one : it`s just a change of shape and written pattern!

Round 1 : 3ch, 2DC, 2ch, (3DC, 2ch) twice, sl st in top of 3ch, F.O.
Round 2 : in any corner : join new colour with a sl st, 1ch, 3DC, 2ch, 3DC, 1ch, (3DC, 2ch, 3DC, 1ch) in next corner twice, sl st in top of first DC, F.O.
Round 3 : in any corner : join new colour with a sl st, 1ch, 3DC, 2ch, 3DC, 1ch and in next space : 3DC, 1ch, [(3DC, 2ch, 3DC, 1ch) in corner, (3DC, 1ch) in next space] twice, sl st in top of first DC, F.O.
Round 4 : in any corner : join new colour with a sl st, 1ch, 3DC, 2ch, 3DC, 1ch, and (3DC, 1ch in next space) twice, [(3DC, 2ch, 3DC, 1ch) in corner, (3DC, 1ch in next space) twice] twice, sl st in top of first DC, F.O.
Round 5 : in any corner : join new colour with a sl st, 1ch, 3DC, 2ch, 3DC, 1ch, and (3DC, 1ch in next space) 3 times, [(3DC, 2ch, 3DC, 1ch) in corner, (3DC, 1ch in next space) 3 times] twice, sl st in top of first DC, F.O.
Round 6 : in any corner : join new colour with a sl st, 1ch, 3DC, 2ch, 3DC, 1ch and (3DC, 1ch in next space) 4 times, [(3DC, 2ch, 3DC, 1ch) in corner, (3DC, 1ch in next space) 4 times] twice, sl st in top of first DC, F.O.
You may notice that in the picture above both rounds 5 and 6 are red : sorry for the confusion!
Work a second triangle and stop at end of round 5.

We are going to join the two granny triangles together using the join-as-you-method (JAYG) while working the sixth round of the second triangle! The joining slip stitches are written in bold!
Start Round 6 (2nd triangle) : in space before corner : join new colour with a sl st, 2ch, collect the 1st triangle (WS facing WS of 2nd triangle), sl st in space before corner of 1st triangle, in corner : 3DC, sl st in corner of 1st triangle 3DC, sl st in space after corner of first triangle, (3DC in next space, sl st in corresponding space in first triangle) 4 times and so on...
When you`ve joined together 2/3 of the triangles, insert the stuffed pads and continue the joining, and in last space : 2DC, sl st in top of initial 2ch, so joining is complete!
We add an extra round : 3ch, sl st in next space, (3ch, sl st in next space) all around F.O.
Weave in ends.

Knot some baker`s twine and add a colourful bead so you have a lovely ornament!

In case you are using darker pads as filling for your ornament (like black), try to use darker colours to hide it : it works, as you can see :


Hope you love this idea, too!
xxxx Alessandra
Please, show me your makes on IG using the following hashtag : #homemadeatmyplaceoriginals or tagging me @alessandrapoggiagliolmi .
Text, Design and Photography : Alessandra Poggiagliolmi
All Rights Reserved. No part of this pattern may be reproduced or transmitted in any form or by any means, without the prior written permission of the copyright holder.
This comment has been removed by a blog administrator.
ReplyDelete