.... and here it is : my first post of the year!!!!
I'm happy to be back, after a long Christmas break in Italy and some fun on Instagram!!!! ;oD
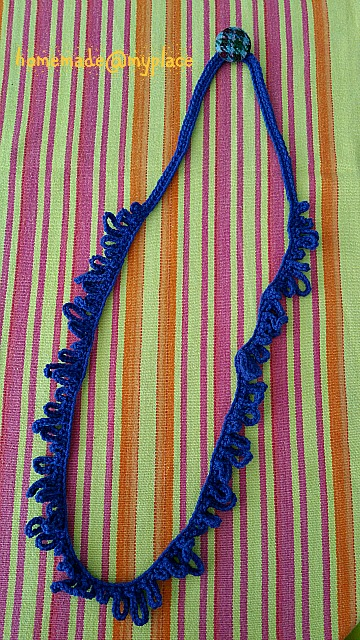
As you remember (here), I made some handmade gifts for friends and family members and today I've decided to share one of the patterns with you : did you like the crocheted necklaces ???


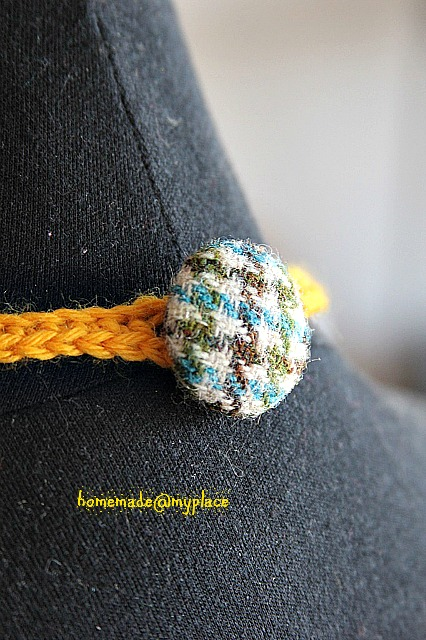
They were both gifted : one to my mum (the bold turquoise one, because she has beautiful blue eyes) and one to her sister, aka my auntie (the delicate yellow one .... not because of her eyes!!!!).
I made one for me (4mm hook and yarn from Sirdar WASH'n"WEAR), too, while checking the pattern for you to follow ....

You will need to crochet your own
LOOPY NECKLACE PATTERN
Pick up your 4mm hook, make a slip knot on it and crochet 204 chains.
Insert hook in 2nd chain from hook and make your first single crochet (=SC).
Crochet other 34 SCs along the foundation chain. (you'll have a total of 35 SCs).
Now : 1 SC in next chain, chain 5, 1 SC in next chain (first loop)
1 SC in next chain, chain 10, 1 SC in next chain (second loop)
1 SC in next chain, chain 15, 1 SC in next chain (third loop)
1 SC in next chain, chain 10, 1 SC in next chain (fourth loop)
.... and this is what you will have on your hook .... the first 35 SCs and the four loops ...


You have to repeat the above pattern other 16 times !
You'll have a total of 17 groups of loops (68 loops!) when completed the repetition!!!
After the repetition, you have to crochet : 1 SC in next chain, chain 5, 1 SC in next chain
This is your last loop (#69!) !!!
After that, crochet 30 SCs, so that you reach the last chain of the foundation chain!
Make a loop for the button, chaining as many chains you need (it depends from the dimensions of your button) and then sip stitch in the first chain made for this loop.
Cut yarn, trim in ends and sew the botton on the other end of the necklace!


If you want to crochet a chunky version of this necklace, just change hook (8mm) and yarn and, obviously, something from the original pattern :
Chain 101 chains, instead of 204!
Crochet 15 SCs at the beginning of the necklace, while crochet 10 SCs at the end !
The loopy pattern develops differently :
you start and end with : 1 SC in next chain, chain 5, 1 SC in next chain
in the between, you are going to repeat the original 4 loops pattern only 8 times !
N.B. : the beginning and the end of the loopy pattern presents two close by "five chains" loops !!!


Another thing to consider, before wearing the necklace, is to block it ....

It's really curly when you finish to crochet it, but spraying some water on the necklace, pinned on a rubber board ... well it works!! Let it dry properly (you will just need one night to obtain that!) !!!


NOW you can proudly WEAR it!!!!!


some more details .....


xxxx Alessandra
Today links : Link your Stuff! and Craft Schooling Sunday
I'm happy to be back, after a long Christmas break in Italy and some fun on Instagram!!!! ;oD
As you remember (here), I made some handmade gifts for friends and family members and today I've decided to share one of the patterns with you : did you like the crocheted necklaces ???


They were both gifted : one to my mum (the bold turquoise one, because she has beautiful blue eyes) and one to her sister, aka my auntie (the delicate yellow one .... not because of her eyes!!!!).
I made one for me (4mm hook and yarn from Sirdar WASH'n"WEAR), too, while checking the pattern for you to follow ....
You will need to crochet your own
- 4mm crochet hook (yellow version)/ 8mm hook (turquoise version)
- yarn : there are no restrictions! My yellow yarn is from KATIA MERINO BLEND (colour 19), while the turquoise yarn is from SCHACHENMAYR original MERINO SUPER BIG MIX (colour 69)
- a pair of scissors
- a yarn needle
- buttons as closure (mine are tweed fabric covered, from my friend Alison here )
- some pins and a suitable surface for blocking!
LOOPY NECKLACE PATTERN
Pick up your 4mm hook, make a slip knot on it and crochet 204 chains.
Insert hook in 2nd chain from hook and make your first single crochet (=SC).
Crochet other 34 SCs along the foundation chain. (you'll have a total of 35 SCs).
Now : 1 SC in next chain, chain 5, 1 SC in next chain (first loop)
1 SC in next chain, chain 10, 1 SC in next chain (second loop)
1 SC in next chain, chain 15, 1 SC in next chain (third loop)
1 SC in next chain, chain 10, 1 SC in next chain (fourth loop)
.... and this is what you will have on your hook .... the first 35 SCs and the four loops ...


You have to repeat the above pattern other 16 times !
You'll have a total of 17 groups of loops (68 loops!) when completed the repetition!!!
After the repetition, you have to crochet : 1 SC in next chain, chain 5, 1 SC in next chain
This is your last loop (#69!) !!!
After that, crochet 30 SCs, so that you reach the last chain of the foundation chain!
Make a loop for the button, chaining as many chains you need (it depends from the dimensions of your button) and then sip stitch in the first chain made for this loop.
Cut yarn, trim in ends and sew the botton on the other end of the necklace!


If you want to crochet a chunky version of this necklace, just change hook (8mm) and yarn and, obviously, something from the original pattern :
Chain 101 chains, instead of 204!
Crochet 15 SCs at the beginning of the necklace, while crochet 10 SCs at the end !
The loopy pattern develops differently :
you start and end with : 1 SC in next chain, chain 5, 1 SC in next chain
in the between, you are going to repeat the original 4 loops pattern only 8 times !
N.B. : the beginning and the end of the loopy pattern presents two close by "five chains" loops !!!


Another thing to consider, before wearing the necklace, is to block it ....

It's really curly when you finish to crochet it, but spraying some water on the necklace, pinned on a rubber board ... well it works!! Let it dry properly (you will just need one night to obtain that!) !!!


NOW you can proudly WEAR it!!!!!


some more details .....


xxxx Alessandra
Today links : Link your Stuff! and Craft Schooling Sunday
Please, show me your makes on IG using the following hashtag : #homemadeatmyplaceoriginals or tagging me @alessandrapoggiagliolmi .
Text, Design and Photography : Alessandra Poggiagliolmi
All Rights Reserved. No part of this pattern may be reproduced or transmitted in any form or by any means, without the prior written permission of the copyright holder.
Beautiful creations! All are so beautiful and the botton is a special detail! Thank you for sharing pattern.
ReplyDeleteWishing you a year full of creativity and fun projects!
Hugs and love from Portugal,
Ana Love Craft
www.lovecraft2012.blogspot.com
Thank you Ana!!!!!
DeleteAll the best to you, too!!!!
xxxxx Ale
What a great idea! I love the tweed buttons too. M x
ReplyDeleteAha daarvoor dienden die speldjes! :-)) Tof!
ReplyDeleteBrava Kris!!! ;oD
Deletexxxxx Ale
Sono bellissime!
ReplyDeleteIsabella
grazie Isabella!!!!
Deletexxxxx Ale
As a fashion statement - quite unique and eye-catching if made in different colors and varying lengths! Great job Ale!
ReplyDeleteMore great creativity!!! You really are so very clever! xx
ReplyDeleteSo beautiful !! I love those, especially, the yellow one is so pretty:) I also liked the way you added button to close it.
ReplyDeleteQuin munt de regals tant bonics, Ale!
ReplyDeletevaig a fer un cop d'ull al seu Instagram!
jo estic pensar en crear un compte a instagram... no sé què fer....
que tinguis un bonic dia!
Welcome back Alessandra! Beautiful crochet necklaces - they look a lot of fun to make too :) :) Thankyou for the lovely mention, hehe! Happy 'Belated' New Year BTW :)
ReplyDeleteAlison x
Hi Ale,
Deletefor some reason there is no "reply room" for me, so I just post my comment als a reply to some one else's post.
Your necklaces are great. Very well done!
You must have made some people very happy.
And the pictures are very much in detail. I can figure it all out.
Pretty pictures too. I like the bunch of needles.
Have a nice weekend
Love
Brigitte
Hi Brigitte!!!
Deletethank you for liking both pics and necklaces!!! ;oD
Have a great weekend, xxxxx Ale
Fun! The buttons are a great touch!
ReplyDeleteKate :}
wow! Looks nice and so much details. I once made a garland like this. But your necklaces are much more beautiful!
ReplyDeleteThere you are my friend! Love this necklace, thanks so much for sharing on craft schooling Sunday!
ReplyDeletethank you Sara!!!!
Deletelove, xxxxx Ale
Mi sembra di averla vista , di persona , o quasi ; ))))
ReplyDeleteChe bottoni !!!