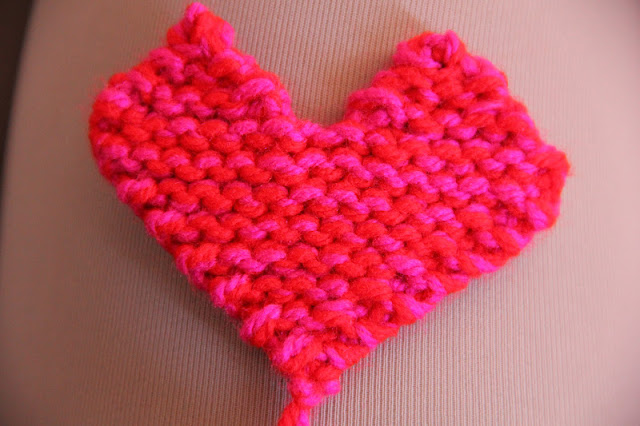
I love hearts (I have another tutorial here) and I love simple things, too.
So, I would like to share with you a little tutorial on how to knit a small and simple heart in a very short time. The shape is really linear and geometric and I like it in this way!
Do you want to follow me step by step?
If the answer is yes, please start collecting the followings...
What you need for this project

- a pair of straight knitting needles 4mm or 4 1/2mm (honestly it's up to you! Even bigger or smaller)
- 2 yarn balls in 2 different colours
- a pair of scissors
- a tapestry needle
- a stitch holder or another spare straight needle
Basic knitting know-how:
- slip knot
- cast on (the method you fancy more)
- knit (k) (garter stitch)
- increase method : kfb (knit into front and back of same stitch)
- decrease method : k2tog (knit two stitches together)
- turn
- bind off
The pattern you'll follow:
put on your knitting needle a slip stitch
cast on one stitch, so that you'll have two stitches on your needle
rows 1 and 2 : knit (k) the two stitches
row 3 : kfb first stitch, kfb second stitch (4 stitches on your knitting needle)
rows 4, 6, 8, 10, 12, 14, 16 : k all the stitches
row 5 : kfb first stitch, k 2 stitches, kfb last stitch (6 stitches)
row 7 : kfb first stitch, k 4 stitches, kfb last stitch (8 stitches)
row 9 : kfb first stitch, k 6 stitches, kfb last stitch (10 stitches)
row 11 : kfb first stitch, k 8 stitches, kfb last stitch (12 stitches)
row 13 : kfb first stitch, k 10 stitches, kfb last stitch (14 stitches)
row 15 : kfb first stitch, k 12 stitches, kfb last stitch (16 stitches)
row 17 : k2tog, k 4 stitches, k2tog (6 stitches on the needle) and turn your work. Put the remnant 8
stitches on a stitch holder or a knitting needle for a while.
rows 18, 20, 22 : k all the stitches
row 19 : k2tog, k 2 stitches, k2tog (4 stitches)
row 21 : k2tog, k2tog (2 stitches)
row 23 : k2tog (you are binding off!)
enlarge the left loop, pass the tails through it and pull tight! This side of the heart is done!
Now, go back to the stitch holder/knitting needle and put the stitches on a knitting needle and follow the pattern from row 17 to the end!
Now, some helpful pictures!!!
To start, put a slip knot on the knitting needle

Then, cast on one more stitch, so that you'll have two stitches

After row 2

At the end of row 3 (you have just added two new stitches, so you have four on your needle)

The next rows follow in this way : in the even rows (rows 4, 6, 8, 10, 12, 14 and 16) you need only to knit (k), while in the odd rows (rows 5, 7, 9, 11, 13 and 15) you have to remember to increase the stitches in the first and last stitches of each of these rows!!! Ok? I hope so!
At the end of row 16 you'll see the base of your little heart

In following the pattern, right now, beginning row 17, you have to pay more attention... Infact, as said in the pattern, you have to : k2tog, k 4 stitches, k2tog, but you have to leave the remnant 8 stitches on hold : how? Simply as you can see in the next pics : slide off the knitting needle with the non knitted stitches


Put these stitches on the stitch holder or a spare knitting needle (as I did)

So, you are working one point of your heart! At the end of row 22 , you'll have only two stitches

At this point (!), k2tog and on the needle it will be just one stitch left

(sorry, I forgot to turn the pic in the right position.....)
Cut the tails

Enlarge the loop of the stitch

Thread the tails in a tapestry needle, that you'll make pass through the loop


Pull them tight

You have to repeat the same passages for the other point of your heart (starting to redo the pattern from row 17 until the end of it, as before!). Then, you could shout out loud : DONE!!!!

You have to weave in all the tails or only the ones you don't need (it depends from the use of your little heart, so think well before starting the weaving... ;-D )))

If you like, you can knit more hearts...


So, I wish you a lot of fun in knitting them, but if you have any problem or question, please, feel free to contact me here ! Thank you!!
See you soon, xxxx
Today link : Link your Stuff!
My Ravelry notes are HERE !!!!
At the end of row 16 you'll see the base of your little heart

In following the pattern, right now, beginning row 17, you have to pay more attention... Infact, as said in the pattern, you have to : k2tog, k 4 stitches, k2tog, but you have to leave the remnant 8 stitches on hold : how? Simply as you can see in the next pics : slide off the knitting needle with the non knitted stitches


Put these stitches on the stitch holder or a spare knitting needle (as I did)

So, you are working one point of your heart! At the end of row 22 , you'll have only two stitches

At this point (!), k2tog and on the needle it will be just one stitch left
(sorry, I forgot to turn the pic in the right position.....)
Cut the tails

Enlarge the loop of the stitch

Thread the tails in a tapestry needle, that you'll make pass through the loop


Pull them tight

You have to repeat the same passages for the other point of your heart (starting to redo the pattern from row 17 until the end of it, as before!). Then, you could shout out loud : DONE!!!!

You have to weave in all the tails or only the ones you don't need (it depends from the use of your little heart, so think well before starting the weaving... ;-D )))

If you like, you can knit more hearts...


So, I wish you a lot of fun in knitting them, but if you have any problem or question, please, feel free to contact me here ! Thank you!!
See you soon, xxxx
Today link : Link your Stuff!
My Ravelry notes are HERE !!!!
Hi dear Alessandra, Thank you very much expecially step by step pictures.. It is so important that sometimes I don't understand very well but pictures help me to understand the patterns so much.. Heart are so lovely..:))
ReplyDeleteHappy sunny days..:))
xoxo
Thank you, sweet friend for sharing with us your awesome tutorial! Looks so easy-preasy! Need to make some of them :o)
ReplyDeleteHappy weekend to all Family
Love
Natasha