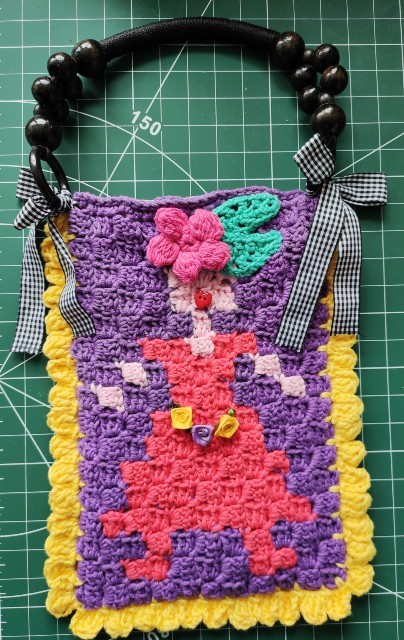
So, this is what comes next the Frida Filet Panel (see previous here ) : a small handbag made using the corner to corner (C2C) technique!
If you need one too, just follow the given pattern and play with colours and embellishments!
WHAT YOU NEED
-5mm hook
-Cotton Blend Plain by Knitcraft from Hobbycraft, 100g/50% cotton, 50% acrylic/215m in the following shades : purple [1000], coral [1007], light pink, green, yellow [1008]. You don't need more than a ball for each one.
-Home Cotton by The Women's Institute, 100g/85% cotton, 15% polyester/160m in the following shades : dark pink and yellow, used for the flowers on Frida's hair. Alas it's discontinued. A good matching substitute is Premier Home Cotton, 75g/120m and same fiber content.
-stitch markers
-1 black rope handle with wooden beads, mine is from Indonesia, but you can find similar online, sold by pair.
-gingham B&W ribbon, 2cm wide, cut two pieces 70cm long
-a couple of red heart buttons, H=1cm, W=1cm
-at least 6 mini satin rosettes
-cotton fabric for lining (I've recycled it from an old curtain!)
-yarn needle
-needle and thread for sewing the various embellishments
Please, note I follow the US crochet terminology.
Skill level : intermediate [ it means you know how to change colours and/or to carry unused yarn]
Measurements : 18x28cm, the panel
22x30cm, the bag (without handle)
C2C CROCHET and GRAPH
The graph shows you that the project begins in the lower right corner. After the first tile/row is done, you are going to increase by one tile per row until you reach the longest row(s) of the pattern [ rows 11-16]. After that, you start decreasing by one tile per row until you reach the last tile in the upper left corner of the graph.
In the bottom right corner of the graph you can see some black arrows : they show you the direction your work is going. I didn't put all the rows in the graph, but this is what happens : you work each row along a diagonal, in case of odd rows the diagonal goes from top right to bottom left, while for even rows it goes from bottom left to top right.
For example :
Row 7: [descending arrow] you work first 2 purple tiles, then : 2 red, and 3 purple, turn.
Row 8: [ascending row] you work first 3 purple, then : 3 red, and then 2 purple, turn.
Follow the graph to see where the change of colour happens.
PATTERN for PANELS [MAKE 2]
Every first half of a C2C pattern has the characteristic to increase (= to add) one tile per row.
After completing your longest row(s), then you will begin to eliminate (= decrease) one tile per row.
You start with one tile in first row and you end with one tile in last row.
I put a stitch marker on the RS of the first tile to be sure I'm following correctly the chart!
Yarn A = purple
Yarn B = coral
Yarn C = light pink
Using A :
Row 1 (RS):a) chain 6
b) work 1DC (= double crochet) in 4th chain from hook
c) DC into the last two chains, turn. [ 1 tile in A] ↙
Row 2 (WS): d) chain 6
e) work 1DC in 4th chain from hook and DC into the last two chains.
f) sl st (= slip stitch) in the space between the 3ch and first DC of tile of row 1
g) chain 3
h) 3DC along 3ch of tile of row 1, turn. [2 tiles in A] ↗
Row 3: [↙] Repeat steps d-h to begin and repeat steps f-h to end, turn. [3 tiles in A]
For the following rows repeat steps d-h to begin and then repeat steps f-h in each remaining tile of row.
Row 4 (WS): [↗] 1 tile A, 1 tile B, 2 tiles A, turn. [4 tiles]
Row 5: [↙] 1 tile A, 1 tile B, 1 tile A, 1 tile B, 1 tile A, turn. [5 tiles]
Row 6: [↗] 2 tiles A, 2 tiles B, 2 tiles A, turn. [6 tiles]
Row 7: [↙] 2 tiles A, 2 tiles B, 3 tiles A, turn. [7 tiles]
Row 8: [↗] 3 tiles A, 3 tiles B, 2 tiles A, turn. [8 tiles]
Row 9: [↙] 3 tiles A, 3 tiles B, 1 tile A, 1 tile B, 1 tile A, turn. [9 tiles]
Row 10: [↗] 1 tile A, 6 tiles B, 1 tile A, 1 tile C, 1 tile A, turn. [10 tiles]
Row 11 (RS): [↙] 3 tiles in A, 5 tiles in B, 3 tiles in A, turn. [11 tiles]
Rows 11-16 have the same amount of tiles = 11 in total.
From Row 12 we start to decrease, which means we create a flat edge on the left side of the panel.
...but we are still increasing on the right side of the panel!
We decrease at the beginning of WS rows (= even rows), while we still increase at the beginning of RS rows (= odd rows).
Row 12 (WS): a) 1ch, sl st on top of next three DC
b) sl st on top of turning chain (= 3ch)
c) 3ch
d) 3DC around turning chain and sl st in the space between the 3ch and first DC of next tile of prev row, etc...
[↗] 2 tiles in A, 5 tiles in B, 1 tile in A, 1 tile in C, 2 tiles in A, turn. [11 tiles]
Row 13 (RS): [↙] 4 tiles in A, 6 tiles in B, 1 tile in A, turn. [11 tiles]
Row 14: [↗] decrease as in Row 12, 2 tiles in A, 6 tiles in B, 3 tiles in A, turn. [11 tiles]
Row 15: [↙] 4 tiles in A, 4 tiles in B, 3 tiles in A, turn. [11 tiles]
Row 16 (WS): [↗] decrease as in row 12, 4 tiles in A, 1 tile in B, 1 tile in C, 5 tiles in A, turn. [11 tiles]
From next row we start to create a flat top for the panel, so we start to decrease even at the beginning of the odd rows : we are going to eliminate a tile at the beginning of each row!
Row 17 (RS): [↙] decrease as in Row 12, 3 tiles in A, 2 tiles in C, 1 tile in B, 4 tiles in A, turn. [10 tiles]
Row 18 (WS): [↗] decrease as in Row 12, 1 tile in A, 2 tiles in C, 1 tile in B, 1 tile in A, 2 tiles in C, 2 tiles in A, turn. [9 tiles]
Row 19: [↙] decrease as in Row 12, 1 tile in A, 3 tiles in C, 4 tiles in A, turn. [8 tiles]
Row 20: [↗] decrease as in Row 12, 4 tiles in A, 2 tiles in C, 1 tile in A, turn. [7 tiles]
Row 21: [↙] decrease as in Row 12, 1 tile in A, 1 tile in C, 4 tiles in A, turn. [6 tiles]
Row 22: [↗] decrease as in Row 12, 5 tiles in A, turn. [5 tiles]
Row 23: [↙] decrease as in Row 12, 4 tiles in A, turn. [4 tiles]
Row 24: [↗] decrease as in Row 12, 3 tiles in A, turn. [3 tiles]
Row 25 (RS): [↙] decrease as in Row 12, 2 tiles in A, turn. [2 tiles]
Row 26 (WS): [↗] decrease as in Row 12, 1 tile in A, sl st in space created by turning chain of adjacent tile, turn and sl st on top of dc of this last tile, F.O. [1 tile]
Weave in all ends.
JOINING and BORDER
Once you have the two panels, put them over each other with WS facing.
We can start the joining using the bright yellow yarn.
Make a slip knot on your hook and work 1sc on the left top, sure of taking in both panels.
Then : (3ch, 1sc in space between tiles) to repeat to end, when you reach the right top of the bag and finish with 1sc. Joining done, but do not fasten off, as we are going to start a decorative border!
So, turn your work and in first ch-3 space :
*4ch, Tr3tog, 4ch, sl st in same space, sl st in next ch-3 space** and repeat from * to **, until you reach the last ch-3 space, where you fasten off. Weave in all ends.
Tr3tog = treble three together = *yo twice, insert hook under the ch-3 space, yo, pull up a loop, (yo, draw through two loops) twice, repeat from * two more times, yo, draw through all loops on hook.
BAG TOP
To give a neat finish to the bag opening, just work a round of stitches using the purple yarn :
make a slip knot on your hook and work 1sc in the same space where you worked the sc for the joining, then along the top : (2sc along the st post, 3sc in the DC tops) to the end, 1sc around the yellow sc of joining (see picture below). Repeat the same on the other side, ending the round with a sl st in top of first sc made.
Work a second round of sl sts, then fasten off. Weave ends in.
LINING
Well, I'm not a skilled seamstress so I think I'm not really good at it and mostly not very good in explaining what I did, but I will try to give you an idea of what the process was!
I had some old cotton fabric from Ikea I used for some curtains. I measured both the inside length and width of the bag and cut the fabric accordingly. I added two cm to the width and some more to the length.
I folded the fabric in half, keeping the RS inside. Then I sewed by hand both sides using a matching thread to the bag top.
Then I put the lining inside the bag and folded in the fabric tops.
Last, I sewed the top to the edge of the bag...DONE!!! (Phew!)
EMBELLISHMENTS
You can decide to add whatever you like most!
I had some leftovers from old wips and I used them to decorate my bag!
You start from the head, positioning leaves first, then the flower and the mouth. The rosettes are the last touch!
Leaves pattern
These were made for a pattern submitted to Inside Crochet magazine (issue 126) and were used to decorate some water bottle holders (Summer Days Bottle Holder, pages 76-77).
With the green yarn work a 14ch foundation chain and
Round 1: 1sc in 2nd ch from hook, 1ch, miss next ch, 1hDC in next ch, 1ch, miss next ch, 1DC in next ch, 2ch, 1DC in next ch, 1ch, miss next ch, 1hDC in next ch, 1ch, miss next ch, 1sc in next ch, 1sl st in each of next 3 ch, turn and working on other side of foundation chain, miss first ch, 1sl st in each of next 2ch, 1sc in next ch, 1ch, miss next ch, 1hDC in next ch, 1ch, miss next ch, 1DC in next ch, 2ch, 1DC in next ch, 1ch, miss next ch, 1hDC in next ch, 1ch, miss next ch, 1sc in next ch, sl st in top of first sc. Fasten off. Leaving long tails both at beginning and end is very useful, as they can be used to sew the leaf on the bag!
Flower pattern
They are five petals puff flowers and you can find the pattern on YouTube :
here , by Bella Coco !
Once all is done and sewed on, this is what you will have ...
Knot the handle to the bag using the gingham ribbon ...
and TA-DAH.....
...Happy with the result???
Thank you,
xxxx Alessandra
Please, show me your makes on IG using the following hashtag : #homemadeatmyplaceoriginals or tagging me @alessandrapoggiagliolmi .
Text, Design and Photography : Alessandra Poggiagliolmi
All Rights Reserved. No part of this pattern may be reproduced or transmitted in any form or by any means, without the prior written permission of the copyright holder.


Comments
Post a Comment
Hi my dear reader!
I'm very happy to see you here! After your visit, feel free to leave a comment!
I love to hear from you and I like to keep in touch!
I'll answer you back asap!!
Thank you and enjoy your day,
xxxx Alessandra