As you all know, there are hundreds of ways to make a pom pom!!!!
But I found this one and I would like to share with you, because is really simple but less common!
You'll need :

After cutting the sides and the central opening, you will have (back and front pictures!) :


Now take a ball of yarn and start to wrap the thread around the cardboard

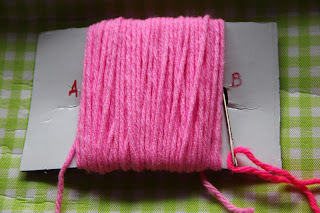
And after some wrapping you'll have something like this

At the end (you decide the thickness of your pom pom, just choosing how many times you would wrap the yarn around the cardboard!), from one extreme of the opening to the other one, you'll see

Take the scissors and cut the yarn

Thread a new yarn (I use a different colour just to show you better the next steps)

Let the needle pass trough the right slit (B)


pass the needle now through slit (A)

and in the front you'll observe the following

Ok! Put apart the needle and make one knot (just one!) to secure the wrapped yarn

With the scissors, begin to cut the top of your pom pom to-be (vision from the font)


from back side (upside down, sorry!)

Cut the bottom now

Your pom pom is almost freee!!!

Make one more knot in the middle of your work, pulling thightly the yarn but trying not to break it!

Cut the cardboard from both sides to the slits A and B

Separate the two cardboard pieces, so that your pom pom is finally free!!

Trim and enjoy it!!!

Remember, if there is any problem or question, contact me here , please!!!!
See you soon, xxxx
But I found this one and I would like to share with you, because is really simple but less common!
You'll need :
- some colourful yarn
- a pair of scissors
- a ruler
- a pencil
- a tapestry needle
- thick cardboard

After cutting the sides and the central opening, you will have (back and front pictures!) :


Now take a ball of yarn and start to wrap the thread around the cardboard

And after some wrapping you'll have something like this

At the end (you decide the thickness of your pom pom, just choosing how many times you would wrap the yarn around the cardboard!), from one extreme of the opening to the other one, you'll see

Take the scissors and cut the yarn

Thread a new yarn (I use a different colour just to show you better the next steps)

Let the needle pass trough the right slit (B)


and in the front you'll observe the following

Ok! Put apart the needle and make one knot (just one!) to secure the wrapped yarn

With the scissors, begin to cut the top of your pom pom to-be (vision from the font)


from back side (upside down, sorry!)

Cut the bottom now

Your pom pom is almost freee!!!

Make one more knot in the middle of your work, pulling thightly the yarn but trying not to break it!

Cut the cardboard from both sides to the slits A and B

Separate the two cardboard pieces, so that your pom pom is finally free!!

Trim and enjoy it!!!

Remember, if there is any problem or question, contact me here , please!!!!
See you soon, xxxx
Thanks for this easy instruction!
ReplyDeleteHave a nice Weekend!
Love, Miriam
This is such a cute idea! I must try it out :D
ReplyDeleteHave a lovely weekend!
Alison x
Oh that's different! Thanks for showing us Alessandra!
ReplyDeleteSo cute and pom pommy :o) xx
ReplyDelete